Microsoft Azure offers many different virtual machines for use, but Windows Server 2019 remains one of the most recent and a commonly deployed operating system. There are several ways to deploy this server OS, but in this article we are going to explore how to do this in the Azure Portal.
Provisioning Windows Server 2019
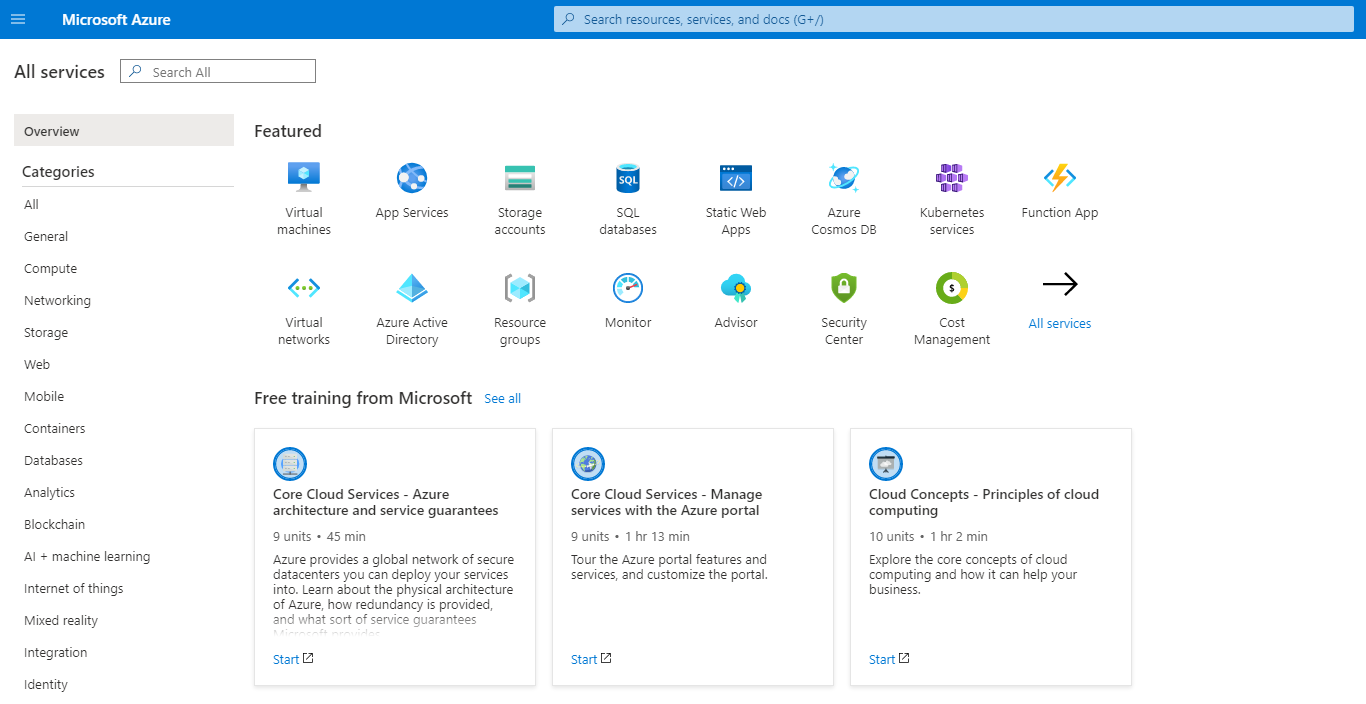
First it is necessary to navigate to the Virtual Machines (VM) section within the Azure Portal. You can find this in the All Services → Featured or Compute section or by searching for Virtual Machines using the search bar.
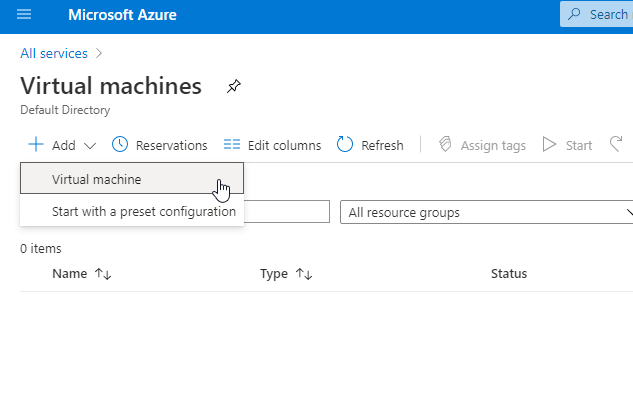
Next, click on Add → Virtual Machine to start the process of creating a new VM. This will present you with the Create a virtual machine wizard.
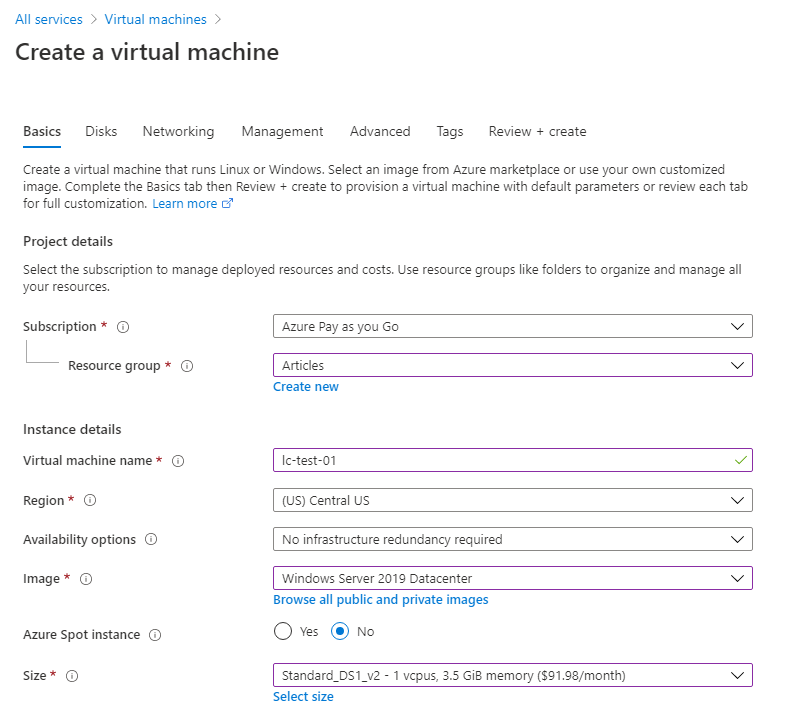
There are a number of options that are important to consider when provisioning a VM in Azure.
- Resource Group - Where should the VM be stored and what resources should be grouped together with this VM.
- Virtual Machine Name - The name should be unique and descriptive, as this will make finding and managing the system easier later on.
- Region - The geographic region that the VM is located in. This can have performance and connection implications depending on other resources that may be needed.
- Image - In this article we are choosing the Windows Server 2019 Datacenter image.
- Azure Spot Instance - Azure Spot Instanceshttps://azure.microsoft.com/en-us/services/virtual-machines/ are lower cost options for VM's that access unused Azure compute capacity with the trade-off of availability.
- Size - The computing resources, CPU and memory, that are assigned to the VM.
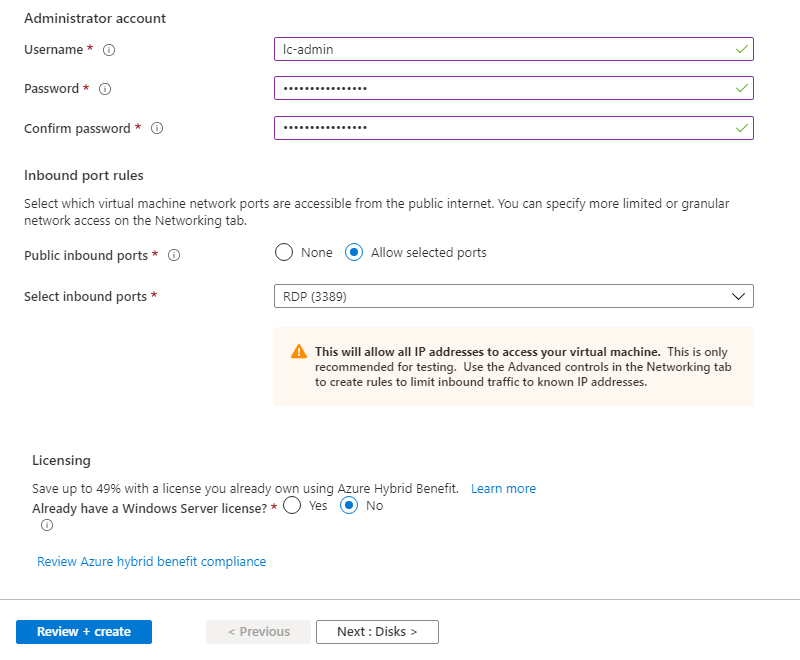
After working through the initial options, you are required to create a username and password for the Administrator account that will be automatically added to the newly provisioned VM.
You cannot use common usernames such as
admin
or
administrator
, so you will need to decide on a unique username for your administrative user.
Additionally, you can allow inbound firewall ports on VM creation. This is important as you will usually need port 3389 open to remotely connect via remote desktop protocol (RDP) connection.
Disk Configuration
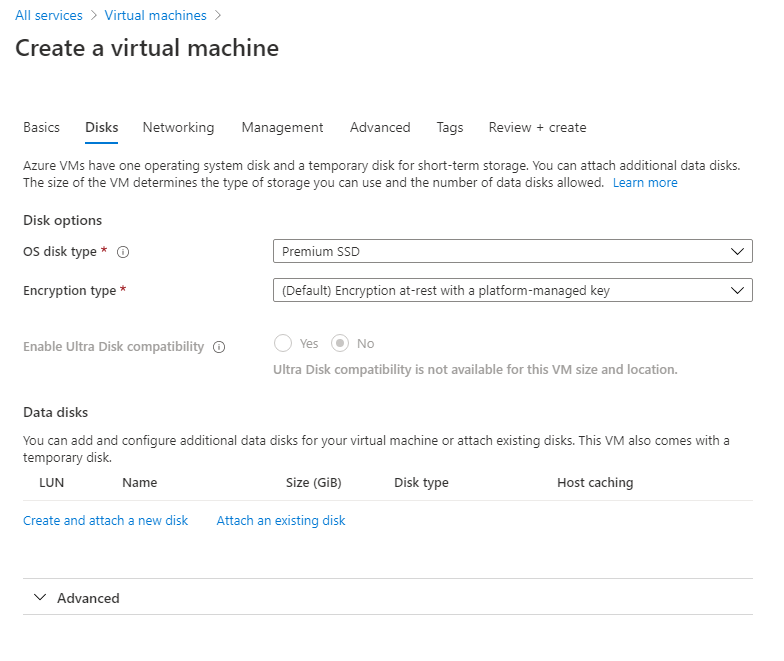
After the initial collection of VM provisioning details, we will move on to deciding what disk resources to assign.
-
OS Disk Type - Choosing between spinning disk (HDD) or faster solid state drives (SDD) backing storage will make a difference for VM performance.
- Standard HDD
- Standard SSD
- Premium SSD
-
Encryption Type - Platform managed encryption means that Azure could technically decrypt the contents of the machine, but makes encryption management very easy. Customer-managed encryption is when a customer supplies an encryption key that only they hold and Azure would be unable to read the contents of the drive but may limit capabilities and increase the administrative burden.
- (Default) Encryption at-rest with a platform-managed key
- Encryption at-rest with a customer-managed key
Data disks allow you to add additional attached storage, such as secondary data drive. This could be an existing disk that is in a storage resource group already, or you can create and attach a brand new disk. In this example, we are going to stick with the default system drive only.
Networking Configuration
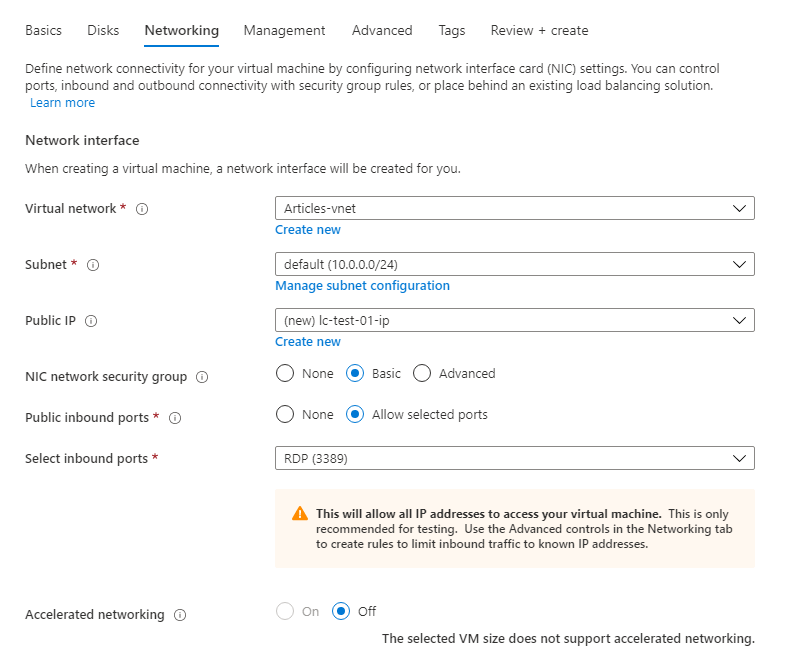
Networking will define our connectivity to outside and inside Azure resources. We will define the virtual network to join the VM to, its subnet, and whether a public IP will be provisioned for this VM.
Additionally, you can choose whether or not to use NIC network security groups and their functionality level. If you choose Advanced for the network security group (NSG), Azure will prompt you to either create a new NSG or use an existing one. You won't be able to define open ports during provisioning, but you will have greater flexibility and power over the final network configuration.
Configure VM Management Settings
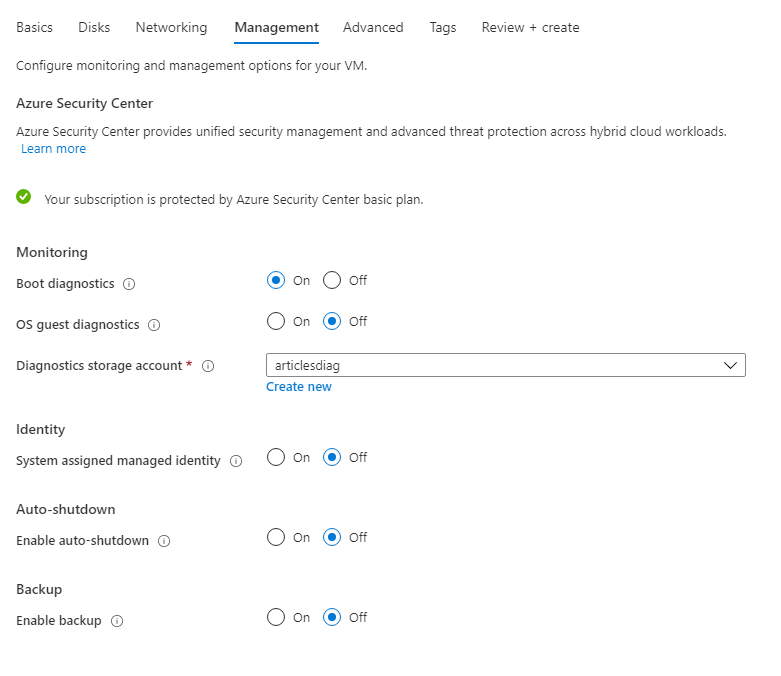
Next, we will move on to Management and most of the defaults make sense. But there are a few very useful features that may be useful for the VM.
Monitoring
- Boot Diagnostics - Enabling this makes troubleshooting when a system boot goes badly, much easier.
- OS Guest Diagnostics - This does require storage space, which is why it is not enabled by default, but when turned on metrics are delivered every minute to make tracking performance and usage much easier.
Identify
Using the system assigned managed identity feature means that you are telling Azure to integrate this VM with a variety of other features.
Auto-shutdown
To avoid extra cost when a VM is not needed, it can be advantageous to use the auto-shutdown feature to turn off the VM in down times.
Backup
Backing a system up is a crucial step that every administrator should make sure works well. Using the backup feature of Azure takes the load and worry off an administrator and restores become very easy.
Configure Advanced Settings
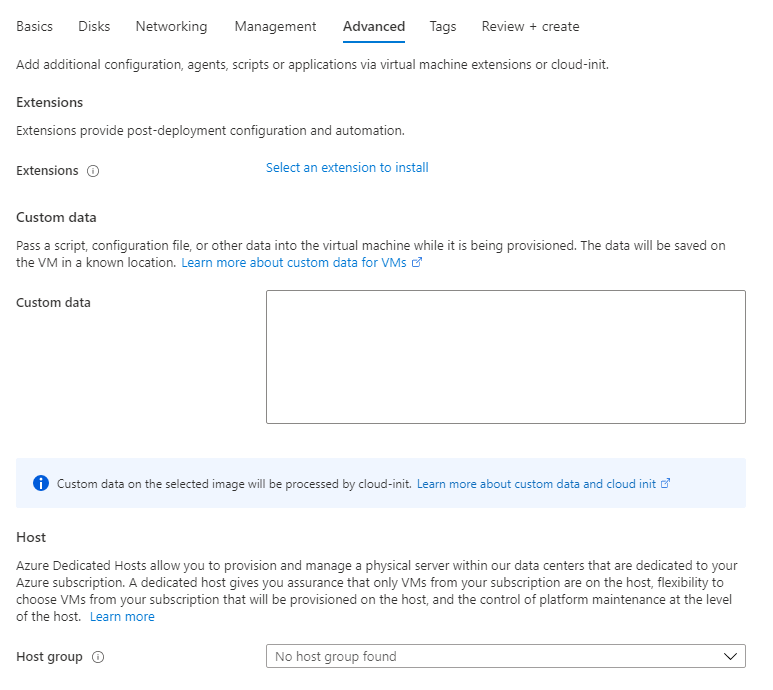
In this section, there are a few additional options that are typically not used on basic deployments. Third-party extensions that may be automatically installed to the VM upon provisioning can be chosen here. With the custom data option, scripts, files, or other data can be automatically saved to the VM in a known location. This allows provisioning processes to take advantage of the additional data passed in.
Azure Dedicated Hosts, if host groups are defined, allow you to make sure that your VM's are located together, sometimes referred to as the affinity of a set of VM's, this is useful when managing certain VM configurations and performance characteristics.
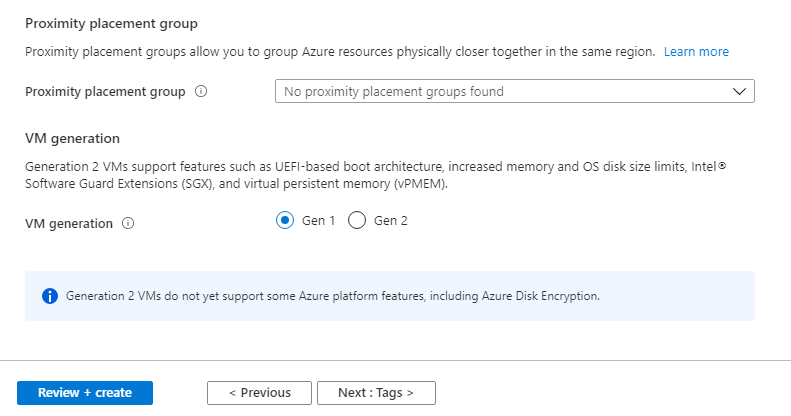
Finally, proximity placement groups, is similar to a dedicated host but more general in that the VM's are closer together in a specified region, but not necessarily on the same host. Finally, you have the option to choose Generation 1 or Generation 2 VM's but not all features are equal. As of the moment, the default is Generation 1.
Tag Resource Metadata
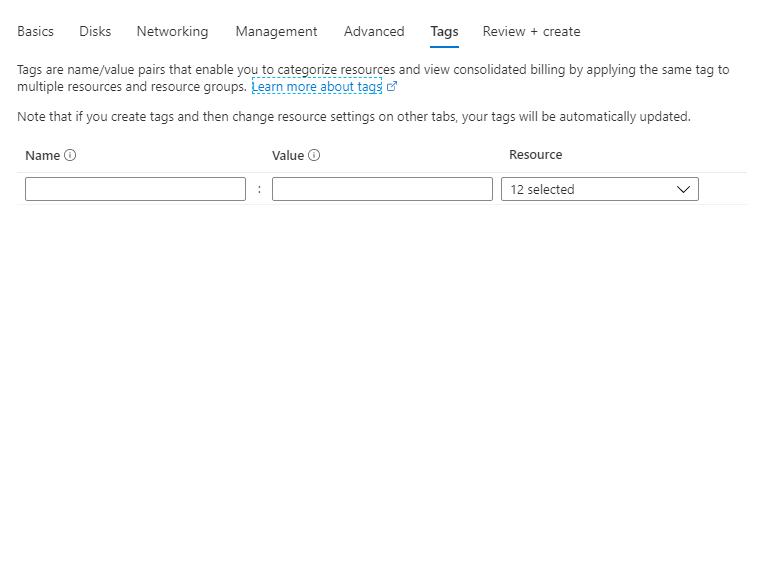
By placing tags on a given Azure resource, makes identifying characteristics of the VM's easier to manage and find later on. In this example, we are not tagging any resources, but it is a wise decision especially as your environment grows.
Create the Virtual Machine
Finally, it is necessary to review the options that you have selected and proceed to create the VM if everything looks correct. Once the VM provisioning has started, you are free to do other tasks in the Azure Portal and you will be notified once the VM is ready.
Conclusion
Azure Virtual Machines, and Windows Server 2019 Datacenter in particular, are a powerful and easy to use environment and operating system. The ease of deployment and wealth of configuration options make Azure an exceptionally compelling option for your cloud deployment needs!

