Quick Links
TypeScript adds static typing to JavaScript, which improves the IDE experience and reduces bugs. It's easy to learn, but transitioning an existing application to TypeScript can be an arduous process. We'll discuss some of the techniques for working with it in your app.
What Is TypeScript?
TypeScript is a syntactical superset of JavaScript that adds support for static typing, among other things. It compiles directly to vanilla JS that will run in any browser.
Vanilla JS is dynamically typed. Variables can change types at runtime, and JS will accept it. This makes it very flexible, but often leads to a mess in larger projects. TypeScript enforces type safety---you can't pass an
int
value to a function that takes a
string
.
This alone has some great benefits. Since every function clearly defines what arguments they take, it makes working with them much easier. TypeScript integrates very well with IDE tooling, providing rich autocomplete and type checking where vanilla JS would only have basic syntax highlighting.
It also makes basic bug checking easier for your IDE to do. If you're missing an argument for a function, VS Code will let you know straight away, before it's even compiled.
Installing TypeScript and Webpack
A note before we begin: if you're using a React project built with create-react-app, the Webpack config is handled for you as part of
react-scripts
. If you want to modify it, you can eject your config (not recommended unless you want to handle ongoing configuration yourself), fork
react-scripts
rewired
to modify it indirectly without breaking updates.
However, if you're starting a new project, you can simply use create-react-app's TypeScript template when generating a new project.
npx create-react-app --template typescript
This will be preconfigured to support TypeScript out of the box. If this works for you, you can skip the rest of this section. You can also transition an existing project to a create-react-app TypeScript template using this method.
If you're not using React, you'll have to install it manually. Install TypeScript as a development dependency for your project:
npm install --save-dev typescript
You'll also want to install TypeScript globally on your machine, which will allow you to use the CLI:
npm install -g typescript
To test it out, you can create a basic function like the following:
function Hello(object: string) {

             console.log(`Hello, ${object}!`);

            }

            Hello('World')
Saved as test.ts. All TypeScript files should have a .ts extension (or .tsx for JSX). You can compile it manually using tsc:
tsc test.ts
Running this with the -w flag will make tsc watch for new changes and build whenever you save, but you probably want to integrate it into Webpack as part of your build process. If you don't have Webpack, install it from npm:
npm install --save-dev webpack webpack-cli
Create a TypeScript configuration file at tsconfig.json which will store your compiler settings:
{

             "compilerOptions": {

             "outDir": "./dist/",

             "sourceMap": true,

             "skipLibCheck": true,

             "noImplicitAny": true,

             "module": "commonjs",

             "target": "es6",

             "jsx": "react"

             }

            }
Then, you'll want to create or modify your webpack.config.json file to resolve TypeScript extensions and use ts-loader. You'll also want to turn on source maps for enhanced debugging.
module.exports = {

             mode: "production",

             // Enable sourcemaps for debugging webpack's output.

             devtool: "source-map",

             resolve: {

             // Add '.ts' and '.tsx' as resolvable extensions.

             extensions: [".ts", ".tsx"]

             },

             module: {

             rules: [

             {

             test: /.ts(x?)$/,

             exclude: /node_modules/,

             use: [

             {

             loader: "ts-loader"

             }

             ]

             },

             // All output '.js' files will have any sourcemaps re-processed by 'source-map-loader'.

             {

             enforce: "pre",

             test: /.js$/,

             loader: "source-map-loader"

             }

             ]

             },

             // When importing a module whose path matches one of the following, just

             // assume a corresponding global variable exists and use that instead.

             // This is important because it allows us to avoid bundling all of our

             // dependencies, which allows browsers to cache those libraries between builds.

             externals: {

             "react": "React",

             "react-dom": "ReactDOM"

             }

            };
Now, running npx webpack or webpack-dev-server will automatically handle loading TypeScript files for you.
How To Work With JS Based Packages
If you've just installed TypeScript, changed some of your extensions to .ts, and noticed that everything is now on fire, don't worry. Many JS libraries don't have support for Typescript out of the box, but third-party types are usually available from DefinitelyTyped, a community repository dedicated to maintaining typings for the most common libraries as separately installable npm dependencies. For example, React is available from @types/react:
npm install --save-dev @types/react @types/react-dom
This will immediately get rid of the issues when using the associated package. If you're getting compiler errors after installing a new package, try installing @types/package.
Luckily, TypeScript will still compile and work with native JS just fine---you just may see some red squiggles telling you it's a problem. If you really want to fix typings for an npm package that doesn't have publically available types, you can write a declaration file for it, optionally by forking DefinitelyTyped (and submitting your new typings to the community repo).
A declaration file looks like the following, usually saved as package.d.ts somewhere in your src:
export as namespace Package

            export = Package

            declare namespace Package {

             interface Type {

             value: boolean

             }

             // etc...

            }
Then you can use the declaration by adding a reference at the top of any code using that package:
///<reference path="package.d.ts"/>
How To Type Legacy Code
Typing legacy code is a manual process that will be specific to your business logic, so it will take some time depending on your project size. However, the basic concept isn't too hard, and it simply involves creating custom interfaces for values passed to and returned by the functions you've implemented.
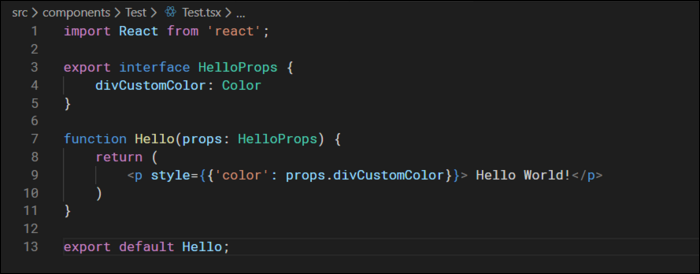
For example, say you have a React component that takes a few props, and renders some JSX:
To type this, you can define a new interface for the function to use. Every time you reference a key on props in the code, such as props.divCustomColor here, add it to the interface along with the corresponding type.
Then, when you use this function in another file, you'll get an error if you don't define props.divCustomColor, or try to pass it an incorrect type. If your app already handles values in a type-safe way, that may be all you need to type many of your components. However, you may have to tweak some things to better handle strict typing.
If you're really scratching your head over something, you can always give up and disable TypeScript compiler warnings using the ts-ignore flag:
//@ts-ignore
Or ts-nocheck for an entire file.
Adding Project-Wide Types
If you want to add custom types project-wide, you'll want to create a global declaration file. For example, if you wanted to create a referenceable enum storing your app's colors, allowing you to use them directly by name, you can save the following as global.d.ts in your src folder:
declare global {

                enum Color {

                    primary = "#6ca583",

                    accent = "#9b8dab",

                }

            }

            export {};
Disable Implicit Any Checking If You're Really Having Issues
The most common error you'll probably run into is TypeScript complaining about "Implicit Any." You can make functions accept any type using the explicit any, or val: any. This is fine, and while you should usually make more strict typings, it's better sometimes to tell TypeScript to relax.
By default, all values will implicitly have the any type, which is just the default JavaScript dynamic typing system. TypeScript will complain about this a lot. If you want, you can disable the complaining by setting noImplicitAny to false:
{

             "compilerOptions": {

             "noImplicitAny": false

             }

            }
Be careful with this though---this only silences the error, and doesn't fix the root problem. However, if you want to enable this temporarily while you work on typing everything out, this will allow your code to compile in the meantime.


