The new Windows Terminal app is awesome---one of the coolest features you can set up is custom SSH profiles that are available as a dropdown menu. This allows you to access your servers quickly without typing in the hostname every time!
Prerequisites
This feature is usually meant for separate profiles or instances, like Ubuntu WSL vs. Powershell vs. CMD. However, you have the ability to launch a profile and run a command, and that command can be
ssh
. It's a pretty simple setup, but extremely useful.
To use this setup, you'll need the new Windows Terminal App, which you can download from the Windows store. You'll also need WSL installed, which is what is launched when you run bash.exe. By default, it uses your default WSL distro.
Customizing Your Profile
Open up the terminal app, then select "Settings" from the dropdown menu.

The settings are just a JSON file that you'll have to edit. You can view the schema for this online, but it should have some default profiles that you can add to.

Add the following profile:
{

             "name" : "SERVER NAME",

             "commandline" : "bash.exe -c "ssh ubuntu@example.com "",

             "guid" : "{1d43c510-93e8-bbbb-a18b-e432641e0942}",

             "icon" : "C:\Users\Anthony\Pictures\example.png",

             "closeOnExit" : true,

             "colorScheme" : "Campbell",

             "cursorColor" : "#FFFFFF",

             "cursorShape" : "bar",

             "fontFace" : "RobotoMono Nerd Font",

             "fontSize" : 10,

             "historySize" : 9001,

             "snapOnInput" : true,

             "startingDirectory" : ""

            },
Note that you will need to change the display name, the server hostname and user, and the GUID. You can optionally specify an icon for the server, which can be loaded from the disk.
The rest of the profile is just boilerplate settings, though you are certainly free to customize the font face and other options.
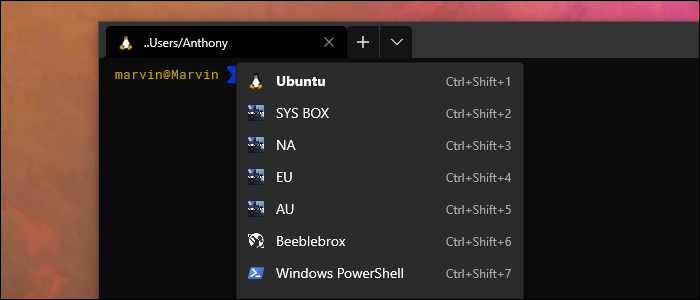
Save it with Control+S, and you'll see it updated next time you use the dropdown:

Clicking on any of these will open up bash and SSH to the specified server automatically.