Quick Links
Analytics are important for any business that deal with lots of data. Elasticsearch is a log and index management tool that can be used to monitor the health of your server deployments and to glean useful insights from customer access logs.
Why Is Data Collection Useful?
Data is big business---most of the internet is free to access because companies make money from data collected from users, which is often used by marketing companies to tailor more targeted ads.
However, even if you're not collecting and selling user data for a profit, data of any kind can be used to make valuable business insights. For example, if you run a website, it's useful to log traffic information so you can get a sense of who uses your service and where they're coming from.
If you have a lot of servers, you can log system metrics like CPU and memory usage over time, which can be used to identify performance bottlenecks in your infrastructure and better provision your future resources.
You can log any kind of data, not just traffic or system information. If you have a complicated application, it may be useful to log button presses and clicks and which elements your users are interacting with, so you can get a sense of how users use your app. You can then use that information to design a better experience for them.
Ultimately, it'll be up to you what you decide to log based on your particular business needs, but no matter what your sector is, you can benefit from understanding the data you produce.
What Is Elasticsearch?
Elasticsearch is a search and analytics engine. In short, it stores data with timestamps and keeps track of the indexes and important keywords to make searching through that data easy. It's the heart of the Elastic stack, an important tool for running DIY analytics setups. Even very large companies run huge Elasticsearch clusters for analyzing terabytes of data.
While you can also use premade analytics suites like Google Analytics, Elasticsearch gives you the flexibility to design your own dashboards and visualizations based on any kind of data. It's schema agnostic; you simply send it some logs to store, and it indexes them for search.
Kibana is a visualization dashboard for Elasticsearch, and also functions as a general web-based GUI for managing your instance. It's used for making dashboards and graphs out of data, something that you can use to understand the often millions of log entries.

You can ingest logs into Elasticsearch via two main methods---ingesting file based logs, or directly logging via the API or SDK. To make the former easier, Elastic provides Beats, lightweight data shippers that you can install on your server to send data to Elasticsearch. If you need extra processing, there's also Logstash, a data collection and transformation pipeline to modify logs before they get sent to Elasticsearch.
A good start would be to ingest your existing logs, such as an NGINX web server's access logs, or file logs created by your application, with a log shipper on the server. If you want to customize the data being ingested, you can also log JSON documents directly to the Elasticsearch API. We'll discuss how to set up both down below.
If you're instead primarily running a generic website, you may also want to look into Google Analytics, a free analytics suite tailored to website owners. You can read our guide to website analytics tools to learn more.
Installing Elasticsearch
The first step is getting Elasticsearch running on your server. We'll be showing steps for Debian-based Linux distributions like Ubuntu, but if you don't have
apt-get
, you can follow Elastic's instructions for your operating system.
To start, you'll need to add the Elastic repositories to your
apt-get
installation, and install some prerequisites:
wget -qO - https://artifacts.elastic.co/GPG-KEY-elasticsearch | sudo apt-key add -

            sudo apt-get install apt-transport-https

            echo "deb https://artifacts.elastic.co/packages/7.x/apt stable main" | sudo tee /etc/apt/sources.list.d/elastic-7.x.list
And finally, install Elasticsearch itself:
sudo apt-get update && sudo apt-get install elasticsearch
By default, Elasticsearch runs on port 9200 and is unsecured. Unless you set up extra user authentication and authorization, you'll want to keep this port closed on the server.
Whatever you do, you'll want to make sure it's not just open to the internet. This is actually a common problem with Elasticsearch; because it doesn't come with any security features by default, and if port 9200 or the Kibana web panel are open to the whole internet, anyone can read your logs. Microsoft made this mistake with Bing's Elasticsearch server, exposing 6.5 TB of web search logs.
The easiest way to secure Elasticsearch is to keep 9200 closed and set up basic authentication for the Kibana web panel using an NGINX proxy, which we'll show how to do down below. For simple deployments, this works well. However, if you need to manage multiple users, and set permission levels for each of them, you'll want to look into setting up User Authentication and User Authorization.
Setting Up and Securing Kibana
Kibana is a visualization dashboard:
sudo apt-get update && sudo apt-get install kibana
You'll want to enable the service so that it starts at boot:
sudo /bin/systemctl daemon-reload

            sudo /bin/systemctl enable kibana.service
There's no additional setup required. Kibana should now be running on port 5601. If you want to change this, you can edit /etc/kibana/kibana.yml.
You should definitely keep this port closed to the public, as there is no authentication set up by default. However, you can whitelist your IP address to access it:
sudo ufw allow from x.x.x.x to any port 5601
A better solution is to set up an NGINX reverse proxy. You can secure this with Basic Authentication, so that anyone trying to access it must enter a password. This keeps it open from the internet without whitelisting IP addresses, but keeps it secure from random hackers.
Even if you have NGINX installed, you'll need to install apache2-utils, and create a password file with htpasswd:
sudo apt-get install apache2-utils

            sudo htpasswd -c /etc/nginx/.htpasswd admin
Then, you can make a new configuration file for Kibana:
sudo nano /etc/nginx/sites-enabled/kibana
And paste in the following configuration:
 upstream elasticsearch {

             server 127.0.0.1:9200;

             keepalive 15;

             }

             upstream kibana {

             server 127.0.0.1:5601;

             keepalive 15;

             }

             server {

             listen 9201;

             server_name elastic.example.com;

             location / {

             auth_basic "Restricted Access";

             auth_basic_user_file /etc/nginx/.htpasswd;

             proxy_pass http://elasticsearch;

             proxy_redirect off;

             proxy_buffering off;

             proxy_http_version 1.1;

             proxy_set_header Connection "Keep-Alive";

             proxy_set_header Proxy-Connection "Keep-Alive";

             }

             }

             server {

             listen 80;

             server_name elastic.example.com;

             location / {

             auth_basic "Restricted Access";

             auth_basic_user_file /etc/nginx/.htpasswd;

             proxy_pass http://kibana;

             proxy_redirect off;

             proxy_buffering off;

             proxy_http_version 1.1;

             proxy_set_header Connection "Keep-Alive";

             proxy_set_header Proxy-Connection "Keep-Alive";

             }

             }
This config sets up Kibana to listen on port 80 using the password file you generated before. You'll need to change elastic.example.com to match your site name. Restart NGINX:
sudo service nginx restart
And you should now see the Kibana dashboard, after putting your password in.

You can get started with some of the sample data, but if you want to get anything meaningful out of this, you'll need to get started shipping your own logs.
Hooking Up Log Shippers
To ingest logs into Elasticsearch, you'll need to send them from the source server to your Elasticsearch server. To do this, Elastic provides lightweight log shippers called Beats. There are a bunch of beats for different use cases; Metricbeat collects system metrics like CPU usage. Packetbeat is a network packet analyzer that tracks traffic data. Heartbeat tracks uptime of URLs.
The simplest one for most basic logs is called Filebeat, and can be easily configured to send events from system log files.
Install Filebeat from apt. Alternatively, you can download the binary for your distribution:
sudo apt-get install filebeat
To set it up, you'll need to edit the config file:
sudo nano /etc/filebeat/filebeat.yml
In here, there are two main things to edit. Under filebeat.inputs, you'll need to change "enabled" to true, then add any log paths that Filebeat should search and ship.

Then, under "Elasticsearch Output":

If you're not using localhost, you'll need to add a username and password in this section:
username: "filebeat_writer"

            password: "YOUR_PASSWORD"
Next, start Filebeat. Keep in mind that once started, it will immediately start sending all previous logs to Elasticsearch, which can be a lot of data if you don't rotate your log files:
sudo service filebeat start
Using Kibana (Making Sense of the Noise)
Elasticsearch sorts data into indices, which are used for organizational purposes. Kibana uses "Index Patterns" to actually use the data, so you'll need to create one under Stack Management > Index Patterns.

An index pattern can match multiple indices using wildcards. For example, by default Filebeat logs using daily time based-indices, which can be easily rotated out after a few months, if you want to save on space:
filebeat-*
You can change this index name in the Filebeat config. It may make sense to split it up by hostname, or by the kind of logs being sent. By default, everything will be sent to the same filebeat index.
You can browse through the logs under the "Discover" tab in the sidebar. Filebeat indexes documents with a timestamp based on when it sent them to Elasticsearch, so if you've been running your server for a while, you will probably see a lot of log entries.
If you've never searched your logs before, you'll see immediately why having an open SSH port with password auth is a bad thing---searching for "failed password," shows that this regular Linux server without password login disabled has over 22,000 log entries from automated bots trying random root passwords over the course of a few months.

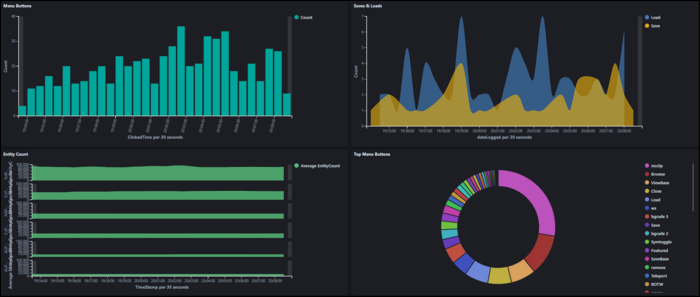
Under the "Visualize" tab, you can create graphs and visualizations out of the data in indices. Each index will have fields, which will have a data type like number and string.
Visualizations have two components: Metrics, and Buckets. The Metrics section compute values based on fields. On an area plot, this represents the Y axis. This includes, for example, taking an average of all elements, or computing the sum of all entries. Min/Max are also useful for catching outliers in data. Percentile ranks can be useful for visualizing the uniformity of data.
Buckets basically organize data into groups. On an area plot, this is the X axis. The simplest form of this is a date histogram, which shows data over time, but it can also group by significant terms and other factors. You can also split the entire chart or series by specific terms.

Once you're done making your visualization, you can add it to a dashboard for quick access.

One of the main useful features of dashboards is being able to search and change the time ranges for all visualizations on the dashboard. For example, you could filter results to only show data from a specific server, or set all graphs to show the last 24 hours.
Direct API Logging
Logging with Beats is nice for hooking up Elasticsearch to existing services, but if you're running your own application, it may make more sense to cut out the middleman and log documents directly.
Direct logging is pretty easy. Elasticsearch provides an API for it, so all you need to do is send a JSON formatted document to the following URL, replacing indexname with the index you're posting to:
http://example.com:9200/indexname/_doc
You can, of course, do this programmatically with the language and HTTP library of your choice.

However, if you're sending multiple logs per second, you might want to implement a queue, and send them in bulk to the following URL:
http://example.com:9200/_bulk
However, it expects a pretty weird formatting: newline separated list pairs of objects. The first sets the index to use, and the second is the actual JSON document.
{ "index" : { "_index" : "test"} }

            { "field1" : "value1" }

            { "index" : { "_index" : "test2"} }

            { "field1" : "value1" }

            { "index" : { "_index" : "test3"} }

            { "field1" : "value1" }
You might not have an out-of-the-box way to handle this, so you might have to handle it yourself. For example, in C#, you can use StringBuilder as a performant way to append the required formatting around the serialized object:
private string GetESBulkString<TObj>(List<TObj> list, string index)

            {

             var builder = new StringBuilder(40 * list.Count);

             foreach (var item in list)

             {

             builder.Append(@"{""index"":{""_index"":""");

             builder.Append(index);

             builder.Append(@"""}}");

             builder.Append("n");

             builder.Append(JsonConvert.SerializeObject(item));

             builder.Append("n");

             }

             return builder.ToString();

            }