Cloud9 is a web-based IDE that allows you to write and run code from anywhere, using just your browser. You can install it on your EC2 instances to edit code and configuration files directly, rather than using a CLI text editor.
What Is Cloud9?
You're probably at least a little familiar with its core text editor if you've ever done any work with Lambda functions---it powers the integrated editor in the Lambda Console. While it probably will lose in the battle against competitors like VS Code, Atom, and Sublime for most people, it's still a fully featured IDE.
By default, Cloud9 will launch a new development environment on a new EC2 instance. This instance will be stopped and started whenever you fire up or close Cloud9. Because you don't have to worry about installing dependencies like
node
and
git
locally, your Cloud9 environment will work the same, regardless of whether you're connecting from your desktop or from a Chromebook on the couch.
While that's great, it's perhaps more useful to install Cloud9 onto an existing EC2 instance. This will connect over SSH allowing you to edit configuration and code on the instance itself, effectively replacing a CLI text editor like
vim
. You'll have full access to the underlying image using the integrated console, and can access any file in the directory that you set your environment to be in.
Cloud9 isn't limited to EC2 instances---because it connects over SSH; as long as your server is accessible somehow over SSH, you can connect to non-AWS servers in the same way.
Installing Cloud9
Cloud9 requires a few dependencies, which we'll have to install before setup. The first is Python 2.7---specifically this version. You can install Python from apt, or your distro's package manager:
sudo apt install python2.7 python-pip
Next is NodeJS. You can install a version manually, but it's better to use Node Version Manager (nvm) to handle updates. Install it with the following command:
curl -o- https://raw.githubusercontent.com/creationix/nvm/v0.33.0/install.sh | bash
Source your bashrc to add it to your PATH,
. ~/.bashrc
And install the latest version of Node through nvm:
nvm install node
Now, you can download and install Cloud9 on your server:
curl -L https://raw.githubusercontent.com/c9/install/master/install.sh | bash
This will take a few minutes to get everything situated.
In the meantime, you should head over to the IAM Management Console to create a new IAM user for accessing Cloud9, as AWS recommends not using your root account to create and access environments. If you already have an Administrator IAM user that you're fine with using, simply log into that account and skip this step.
Create a new user:

Give it management console access, set a password, and attach the AWSCloud9Administrator permission policy to it.
Once the user is created, click on the "Security Credentials" tab, and assign an MFA device. This can be an authenticator app on your phone or a hardware key fob, but you'll definitely want to set this up, otherwise your servers will be accessible with just a password.

Now, when you launch Cloud9, you'll be asked to sign in to your IAM account and enter in your MFA details, making it quite secure.
Connecting to Your Server
Sign in to whatever IAM account you wish to use for Cloud9, then head over to the the Cloud9 Management Console. Create a new environment, and specify that you want to connect to a remote server over SSH.

There's a couple options here. The first is the user account you'll use to sign in. AWS recommends using an account with administrator access, so if you're planning on doing most of your work in your Home directory, go with your default user (ec2-user or ubuntu). If you want to be able to edit configuration files anywhere on your server, such as /etc/nginx/, you'll need to connect as root.
Connecting as root isn't recommended security practice, even for SSH, but Cloud9 doesn't leave an open web connection on the device itself. All communication from Cloud9 to your server is done through SSH, and you can't even access the Cloud9 console without authenticating as your IAM user. Either way, you'll want to make sure you have MFA set up for your IAM user, as you're still connecting as a user with administrator privileges, root or not.
Next, you'll want to enter in the host address and port. This will need to be accessible from the open internet, but you can use a VPN to forward the connection.
Finally, your environment path. This defaults to a newly created folder just for Cloud9, which is good if you're using it as a standalone IDE. But if you want to edit your files, you'll need to set this to something else. You should probably set it to ~/ if you're using a normal user, or to / if you're using root. Anything outside your environment path will not be accessible (by the primary editor at least), although you can always change this in the settings, or create multiple environments with different profiles.
Before you create the environment, you'll need to copy the public SSH key, and add it to the ~/.ssh/authorized_keys file of the user you're connecting as. This will authenticate AWS and allow the connection.
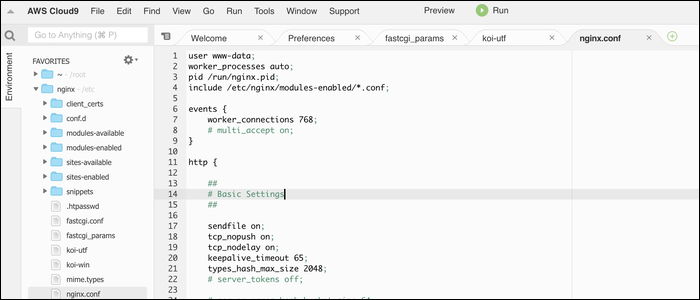
Click "Create Environment," and after a few seconds, you'll be brought to your environment where you're free to edit files as you please.

If you've set your environment to /, you'll definitely want to make use of the "Favorites" feature for frequently accessed folders, as browsing through the /etc/ folder to find nginx in the long dropdown list is tedious to say the least.
Install Cloud9 As An "App"
Cloud9 is still 100% a web app; however, you can make it function like a regular app by creating a shortcut from Chrome. From the Chrome settings menu, select More Tools > Create Shortcut.

If you tick "Open as Window," Cloud9 will open in a dedicated window without the Chrome menubar, just like a regular app. You can add this shortcut to your dock or applications folder alongside all your other apps.