Quick Links
Welcome to Terminator, an interesting name for the world's most advanced and fully featured terminal multiplexer. A terminal multiplexer allows you to run one-to-many terminal sessions from within one or more windows, in an organized way. Read all about it.
What Is Terminator?
Terminator is a graphical Linux software program, running seamlessly under Python 3, which lets system administrators and other users use multiple terminal (shell) windows at the same time. Even the terminal client software included with your operating system will let you do this, but Terminator has a special GUI format unlike other one-at-the-time or tab-based terminal client softwares.
Installing Terminator
To install Terminator on your Debian/Apt based Linux distribution (Like Ubuntu and Mint), do:
sudo apt install terminator
To install htop and iotop on your RedHat/Yum based Linux distribution (Like RedHat and Fedora), do:
sudo yum install terminator
First Impressions
When you open Terminator for the first time, it will feel just like any other terminal client software, though it has an interesting red-colored header bar, much in line with the red Terminator logo.

However that dynamic immediately changes once you right-click the black background and review the menu represented:

(This image was captured by taking a photo of the screen, as Terminator's built-in right-click menu's do not allow for capturing with a screen capture tool.)
Split Horizontally and Split Vertically are two options available to us to divide our Terminal window into 2, or more windows! Have another look at the header image of this article, and you can see how we can split, and split again. You can have as many windows as you like, as long as you are comfortable with smaller and smaller windows, depending on how many windows splits you add.
For example, to make four equal squared windows, one could first right-click in the black space of the terminal, and select Split Horizontally. With the horizontal divider line now visible in the middle of the window, right-click in the black space of the top section. Next, select Split Vertically. You will now have three windows. Repeat the same for the bottom half of the screen by right-clicking in the black space below the horizontal divider line. Next click Split Vertically again, and you will now have four windows!
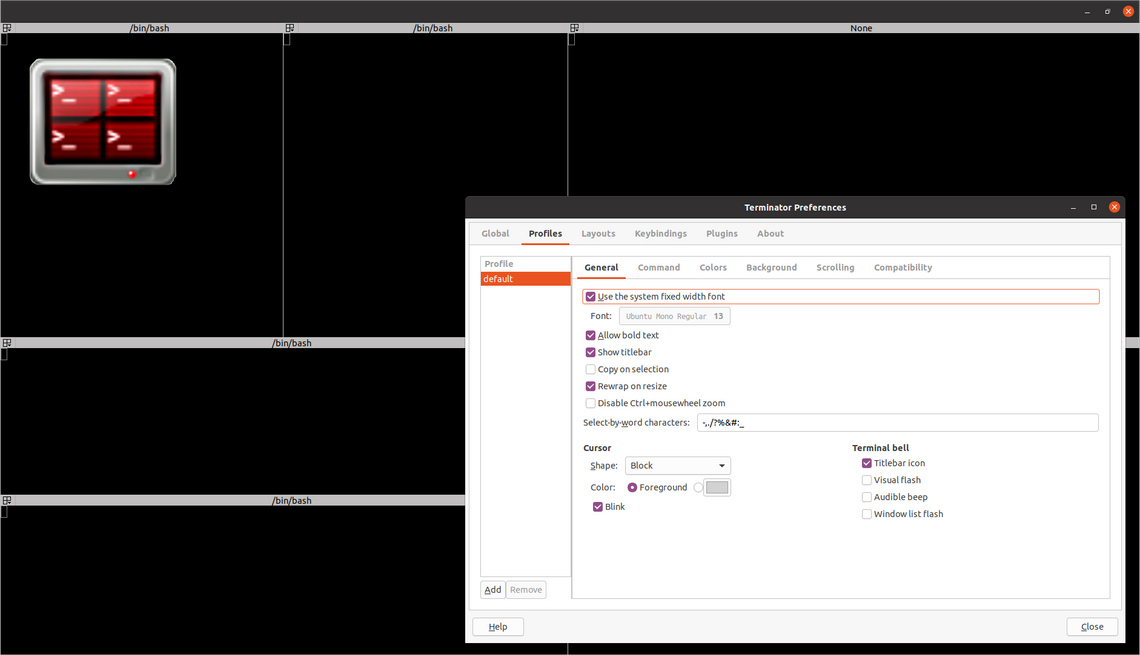
In the same menu, we also see a Preferences button and clicking this will lead you to the configuration window. Go ahead and click the Preferences button.
Near Borderless Windows & Infinite Scrollback
Do you like the paper thin divider lines in the header image for this article? If so, let us set them up in the same way on your workstation. To do so, first disable scroll bars (don't worry, you can still scroll up and down simply by scrolling with your mouse scroll wheel up and down). To do, click Profiles > Scrolling > set 'Scrollbar is:' to 'Disabled'

You will also want to set the following options while you are in this screen and tab:

Ensure 'Scroll on output' is unticked. Tick 'Scroll on keystroke' and 'Infinite Scrollback'. The first option ensures that if you scroll up/down and new output is being generated at the end of your terminal output, the screen will not constantly jump back while you are scrolling. Note that if you are at the end of the terminal output, the output will still scroll as normal. The second option allows you to press a key to scroll.
The final option enables infinite scrollback. I would highly recommend this, unless you have an older or slower machine you are working on. It is great to be able to scroll back up all the way to the start of your session!
To come back to our near-borderless windows setup, go to the Global tab and set the Appearance options as follows:

Ensure that 'Extra Styling (Theme dependent) is ticked', and set 'Terminal separator size' to 1.
Now let's save our configuration as default. This requires a little workaround. Go to the Layouts tab > press the 'Add' button > Double click 'New Layout' and rename it to 'default'. There will now be two 'default' layouts in the list. This is fine. Press Close and close terminator fully (in Ubuntu usually by clicking the 'X' at the top right of the screen). You will receive a message like this:

Simply press 'Close Terminals', and restart Terminator. You should now have paperthin terminal divider lines and infinite scrollback!

Automatically Type in Select, or All, Windows
It is easy to configure Terminator to replicate key strokes sent to one terminal window to all windows at the same time, and to turn this key copy function on and off at will. To do click the little dropdown button at the top left of any terminal window (inside Terminator):

Next click 'Broadcast all'. Type something and note how it is being replicated to all windows at the same time!
You can also click 'New group...' and define a name for a new group, or type the name of an existing group if you previously created one. This will allow you to sent keystrokes to only a specific set of terminals, configured to be in the same group. The group name is any arbitrary name you can think off.
Terminator Crashing?
If you ever run into a situation where Terminator crashes, for example after an update, or after changing many configuration options, either immediately on startup or a few seconds after, there is usually a easy way to fix this. You will however loose your configuration settings, though often these are quickly re-setup. To do, simply open a terminal prompt (using the default terminal client in your operating system desktop) and type:
mv ~/.config/terminator ~/.config/terminator.PREV
Then re-open Terminator and it should work fine, though you will be back to a single window that needs to be re-split, configuration options need to be re-enabled etc. and don't forget to save your new configuration as 'default' as described earlier!
Enjoy Terminator!
Terminator takes less then 30 minutes to setup, and often only about five to ten. There are big benefits to using Terminator as we have seen - automatic typing, better screen real estate management and infinite scrollback just to name a few. Enjoy!