Quick Links
Cloud servers don't have to be Linux-based---Windows server workloads are able to run in AWS and are compatible with most of the built-in services that Amazon offers, including their CloudWatch monitoring tools, though you will have to install the agent manually.
Running servers in on-prem data center may mean having an infrastructure-monitoring solution that runs alongside each server. This solution often consumes just as many resources as the application it's supposed to be monitoring!
In the Amazon Web Services (AWS) cloud, the same robust monitoring and logging exists without needing to worry about provisioning extra resources or configuring access. AWS's solution to this problem is CloudWatch.
CloudWatch is an AWS service that captures the logs and server metrics from various sources. CloudWatch collects information from resources like EC2 (Elastic Compute Cloud) instances or on-prem servers. It then consolidates them into one central location in AWS.
By the end of this tutorial, you'll be able to install the AWS CloudWatch agent on a Windows EC2 instance and configure it to send logs into CloudWatch.
Prerequisites
To follow along, you'll need the following:
- An AWS Account
- A 64-bit Windows Server EC2 instance OR an on-prem server running Server 2008 or later
- The key file associated with the instance (EC2 instances only)
Connecting to a Windows EC2 Instance
The first step in setting up CloudWatch is installing the CloudWatch agent. The agent is what sends information back to AWS that your server generates. Before you can do that though, you first need to connect to your Windows EC2 instance.
To connect to a Windows EC2 instance, you'll need to get two pieces of information from the EC2 section in your AWS console for the Windows instance you want to login to: the Public DNS name and the key file associated with the instance.
Once you have those, go into the EC2 service from the AWS console, right-click on the instance, then select "Get Windows Password." Once here, you'll be prompted for the key file, and if you have the correct one, it will get you to the screen below.

If you or another administrator has already changed this password, or you don't have access to the key file, then right-click on the instance, select "Terminate" and start over. There is no recovering keys once they are lost, and not even Amazon can recover them for you.
That being said, if you are able to retrieve the Windows password, copy it and save it for later in a password manager. Now, open a remote desktop client and log in to the server by using the Public DNS name from earlier with the credentials above. If you did everything correctly, you should see a familiar sight: The Windows server desktop.

Installing the CloudWatch Agent
Now that you've RDP'd into the instance, you can start installing the CloudWatch agent. To do so, Amazon provides you with a prebuilt .msi installer to use. Per the CloudWatch documentation, you can see under Download Link under each architecture that there are two different URLs for it: one regional and one general use. Either will work for this tutorial.
Start by opening a PowerShell window on your EC2 instance and entering the commands below. The first command will download the CloudWatch installer to the local user profile and the second will execute the installer.
        Invoke-WebRequest -Uri https://s3.amazonaws.com/amazoncloudwatch-agent/windows/amd64/latest/amazon-cloudwatch-agent.msi -OutFile $env:USERPROFILEDownloadsamazon-cloudwatch-agent.msi -UseBasicParsing
Invoke-Item $env:USERPROFILEDownloadsamazon-cloudwatch-agent.msi
Once the installer has been run, you'll notice that a new Windows service for CloudWatch is installed on the server. This service is what allows CloudWatch to run in the background collecting the information it needs to.
Confirm that the service has been installed and is not running by using the Get-Service cmdlet in the screenshot below. Don't start it yet, you'll need to configure it first, which you'll do that in the next section.

Configuring CloudWatch
Now that the CloudWatch agent is installed, you'll need to tell it what to report back. In addition to the preselected metrics, Amazon allows you to create custom metrics, send logs, and even report back events from Windows Event Viewer. It would be very computationally expensive to send everything back all the time and make a lot of noise. By setting a configuration, you can tell AWS what things are important and what to watch.
Amazon uses a JSON configuration file to direct the agent on which logs and metrics to collect. If you are already familiar with making these files or have been given a premade one by your organization, then you can use that. If creating configuration files is not something you are familiar with, Amazon also provides a wizard to get started.
To start the wizard, you'll need to run it from the CloudWatch install directory. Go back to the PowerShell console and enter Invoke-Item "C:Program FilesAmazonAmazonCloudWatchAgentamazon-cloudwatch-agent-config-wizard.exe" This command will start the wizard in an interactive session, and after answering a few questions, it will generate a JSON file with the configuration.
By default, the wizard saves the config file to the user profile as config.json, but it's also possible to save them to the AWS Systems Manager. The Systems Manager will allow you to have the same configuration versioned and easily accessible to several instances at a time, but requires that the AWS configuration is done for each of those instances.
Following is a sample configuration file generated by the wizard. Your file might be a little different; the file below is only a basic example.
        {
    "logs": {
        "logs_collected": {
            "files": {
                "collect_list": [
                    {
                        "file_path": "C:\ENTER\PATH\HERE\log.txt",
                        "log_group_name": "log.txt",
                        "log_stream_name": "{instance_id}"
                    }
                ]
            },
            "windows_events": {
                "collect_list": [
                    {
                        "event_format": "xml",
                        "event_levels": [
                            "WARNING",
                            "ERROR",
                            "CRITICAL"
                        ],
                        "event_name": "System",
                        "log_group_name": "System",
                        "log_stream_name": "{instance_id}"
                    }
                ]
            }
        }
    },
    "metrics": {
        "append_dimensions": {
            "AutoScalingGroupName": "${aws:AutoScalingGroupName}",
            "ImageId": "${aws:ImageId}",
            "InstanceId": "${aws:InstanceId}",
            "InstanceType": "${aws:InstanceType}"
        },
        "metrics_collected": {
            "LogicalDisk": {
                "measurement": [
                    "% Free Space"
                ],
                "metrics_collection_interval": 60,
                "resources": [
                    "*"
                ]
            },
            "Memory": {
                "measurement": [
                    "% Committed Bytes In Use"
                ],
                "metrics_collection_interval": 60
            },
            "statsd": {
                "metrics_aggregation_interval": 60,
                "metrics_collection_interval": 10,
                "service_address": ":8125"
            }
        }
    }
}
Starting the CloudWatch Agent
Now that the service has been installed and the configuration has been set, you can start the agent. Inside of your open PowerShell console, change into the CloudWatch directory by running cd "C:Program FilesAmazonAmazonCloudWatchAgent" and then run the command below to start the CloudWatch agent with the config file you just created on an EC2 instance. This command will take the config file generated by the wizard and start the service with those settings.
.amazon-cloudwatch-agent-ctl.ps1 -a fetch-config -m EC2 -c file:$env:USERPROFILEconfig.json -s
If you now rerun the Get-Service cmdlet from earlier, you will see that the CloudWatch agent service is now running as shown below.

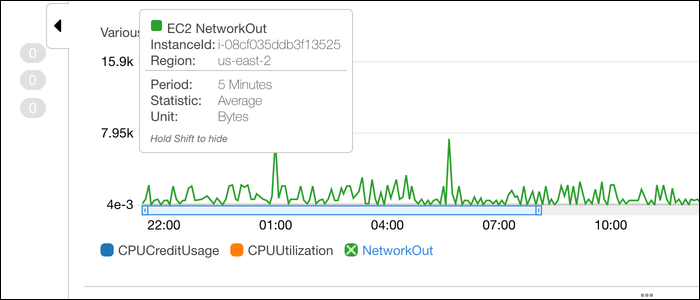
Additionally, if you go to the CloudWatch page in the AWS console, under the "Metrics" section on the left, select the "All-Metrics" tab, then go under All > EC2 > Per-Instance Metrics, you will see your instance metrics reporting to CloudWatch as shown below.

Conclusion
You should now be able to set up AWS CloudWatch on Windows EC2 instances. With some small changes to the commands, the same process will work for on-prem servers, too. From here, you can set up alarms to alert you if something goes wrong, log groups to aggregate application logs from your servers, and automate the installation of the CloudWatch agent using PowerShell.