Quick Links
DigitalOcean is one of the easiest to use cloud virtual machine providers out there. If you need a quickly provisioned computing environment, DigitalOcean virtual machines typically become available in under 60 seconds. Instead of using the user interface (UI), it's often best to automate.
Terraform is an infrastructure as code language that allows you to use providers, such as DigitalOcean, to provision resources without using the DigitalOcen UI. In this article, we explore how to use Terraform to provision a DigitalOcean Droplet (virtual machine).
Installing Terraform
Terraform is available for a multitude of platforms, Windows and Linux alike. The easiest method is to download the executable from the link below and place the executable into a system path to allow referencing it from anywhere.
https://www.terraform.io/downloads.html
Create API Keys from DigitalOcean
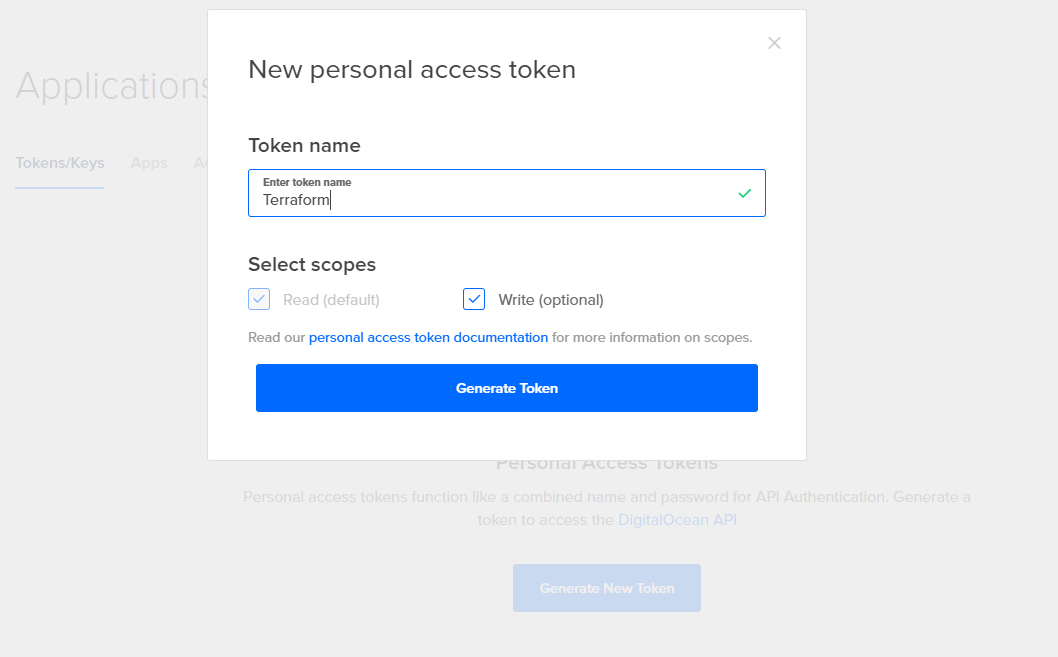
For Terraform to communicate with DigitalOcean, we need to generate API Keys for use with the DigitalOcean provider. The following steps outline how to create a new API key specifically for use with Terraform. You might use other API Keys, but it is best practice to not reuse keys, where you can, to easily disable access when necessary.
- Login to the DigitalOcean control panel.
- Navigate to the API section.
- Click on "Generate New Token."
- Enter a token name and allow the token both read and write privileges.
- Copy the API Key as you will not be shown it again, we will then use this for Terraform.
Getting Started
The first step with any Terraform setup is to initialize a new configuration. First, create a directory to house our Terraform configuration.
        mkdir digitalocean-terraform
cd digitalocean-terraform
Next, we need to create a digitalocean.tfvars file that we will use to hold our API Key that we previously generated. This is a best practice, as to not hard-code the credentials. When using version control, which is recommended, you can ignore any .tfvars files, or specific ones, to make sure those credentials do not get stored within the version control history.
touch digitalocean.tfvars
Within the digitalocean.tfvars, we will create a simple variable named api_token. This will be used later on within our Terraform scripts.
api_token = 12345123213412425
Creating the Droplet Resource File
Now that we have Terraform and DigitalOcean configuration set up, let's create our Terraform configuration file. Create the file digitalocean.tf, and use the boilerplate code below to get started. To allow our configuration to use the provider and credentials, we need to tell it where to get that data.
        variable "api_token" {
  default = ""
}

provider "digitalocean" {
  token = var.api_token
}
Now that we have our script configured, we can run terraform init code, and it will now create our Terraform metadata and install providers. You will notice that the command output shows the provider being downloaded for use. Additionally, we have told our provider to use the credentials that were previously specified in the .tfvars file.

Filling Out the Droplet Commands
In this case, we want to provision a simple droplet resource. There are a couple of parameters that we are going to use. We want to use their cheapest available plan, in the NYC1 data center, and add on a couple of options that will make the Droplet more flexible in the future.
-
Droplet Image:
ubuntu-18.04-x64 -
Region:
NYC1 -
Size:
s1-vcpu1-1gb
Now that we have our base attributes, let's construct a Terraform config for this droplet.
        resource "digitalocean_droplet" "web" {
  image              = "ubuntu-18-04-x64"
  name               = "test-web-vm"
  region             = "nyc1"
  size               = "s-1vcpu-1gb"
  monitoring         = true
  ipv6               = true
  private_networking = true
}
The additional commands that we are adding here are for monitoring, ipv6, and private networking. Monitoring means that you will have metrics, such as CPU and memory, from within the DigitalOcean cloud console. You can then set alerts on these metrics, so it is very useful for the future. IPv6 means that your droplet will be accessible from IPv6, which helps to future-proof your droplets. Finally, private networking means that your droplet will get a 10.x.x.x address that is accessible by other droplets but not the public internet.
There is one other very useful ability and that is user data. For Linux, this allows you to run certain commands on the provisioning of the VM, such as updating packages. We can include this right into the Terraform configuration, by adding this attribute on.
        resource "digitalocean_droplet" "web" {
  image              = "ubuntu-18-04-x64"
  name               = "test-web-vm"
  region             = "nyc1"
  size               = "s-1vcpu-1gb"
  monitoring         = true
  ipv6               = true
  private_networking = true
    user_data          = "#cloud-confignpackage_update: truenpackage_upgrade: true"
}
If you start to do a lot with user_data, you can store the data within a YAML file and then include it within the resource declaration.
file("user-data.yml")
Deploying the Droplet
Now that our Terraform configuration is ready, let us deploy the droplet by running the following code.
terraform apply -var-file="digitalocean.tfvars

You might also notice a new .tfstate file is created. This captures the current state that Terraform knows of for your environment. If you attempt to deploy this droplet configuration again, Terraform will not, as it already knows that the droplet has been created. If you delete this file, it will cause Terraform to not recognize that the resource exists and attempt to create it again.
Wrapping Up
As you can tell from this article, creating a resource in DigitalOcean via Terraform is quick and simple. There are many more resources that you can provision using the DigitalOcean provider.
Using this configuration as code, you can provision entire environments quickly and easily within DigitalOcean using Terraform. For example, if you need a brand-new development environment, and you have it previously mapped out in a Terraform configuration using a simple deployment command, you can have a brand-new development environment ready to go.
Combining Terraform and DigitalOcean enables a powerful combination that not only protects your infrastructure, allows version control, but enforces consistency and security.