Quick Links
Lambda has a web-based text editor that you've probably used before for writing your functions. It's great for beginners learning the platform, but it's not the best way to go about handling updates. Here's how to track your Lambda functions on Git.
How CI/CD For Lambda Works
Instead of using the manual editor, you should develop your functions locally, commit and push changes to a Git repo, and have CodePipeline handle building and deployment for you.
CodePipeline runs automatically whenever it detects changes in your source control, and sends the changes over to CodeBuild (or Jenkins) for building. This step is optional, and you might not use it for Lambda, but if you're using something like TypeScript you'll need this stage. After building, changes are pushed to CodeDeploy, which handles deployment.
CodeDeploy will automatically update your Lambda functions and push a new version. To make the deployment process smoother, it can shift traffic gradually using an alias, until 100% of traffic is directed towards the new function.
To handle the actual deployment, CodeDeploy uses AWS's Serverless Application Model (SAM). SAM is an extension of CloudFormation, an infrastructure-as-code service. It's basically a human-readable data-serialization language (YAML) template that is used to handle all of the configuration associated with deploying Lambda functions and their prerequisites, and is a vital part of being able to deploy using only code.
Setting Up Source Control
This step is fairly simple. You'll want to create a new project directory to hold all of your code, and initialize it with Git. The SAM template will go at the root of this directory, named
template.yml
. Each function will go in their own folder, with the root being index.js for each. This clearly separates everything, and makes it easier to manage
ProjectDirectory

             |--template.yml

             |--Function

             | |--index.js

             |--AnotherFunction

             |--index.js
CodePipeline supports Github and BitBucket for source control. If you're using either of these, all you'll need to do is create a new branch for deployments (or simply use master, if you're fine with that). If you're using a different service, you'll want to use AWS's own CodeCommit source control as a secondary repository, pushing changes to it whenever you'd like to make updates.
Writing a SAM Template
This step will be the most complicated, and the most specific to your function and its requirements. You'll have to create a SAM template that will configure your Lambda function, and all of its required resources.
A basic template looks something like this:
AWSTemplateFormatVersion: '2010-09-09'

            Transform: AWS::Serverless-2016-10-31

            Description: An AWS Serverless Specification template describing your function

            Resources:

             HelloWorld:

             Type: AWS::Serverless::Function

             Properties:

             Handler: HelloWorld/index.handler

             Runtime: nodejs8.10
This registers one resource, a Lambda function, that runs on NodeJS, and has its handler in HelloWorld/index.js.
You can deploy other resources from the SAM template as well. For example, to give API Gateway permission to invoke your function, and set your function to run on a specific API path, you would add the following:
AWSTemplateFormatVersion: '2010-09-09'

            Transform: AWS::Serverless-2016-10-31

            Description: An AWS Serverless Specification template describing your function

            Resources:

             HelloWorld:

             Type: AWS::Serverless::Function

             Properties:

             Handler: HelloWorld/index.handler

             Runtime: nodejs8.10

             Events:

             HelloWorldApi:

             Type: Api

             Properties:

             Path: /helloworld

             Method: GET

             HelloWorldPermission:

             Type: AWS::Lambda::Permission

             Properties:

             Action: lambda:InvokeFunction

             FunctionName:

             Fn::GetAtt:

             - HelloWorld

             - Arn

             Principal: apigateway.amazonaws.com

             SourceArn:

             Fn::Sub: arn:aws:execute-api:${AWS::Region}:${AWS::AccountId}:*/*/*/*
You'll definitely need more specific uses than what can be listed here, so for more information on SAM you can read our guide to working with it, AWS's developer guides, or the full schema on Github.
Once you have a working template, you can test deployment by installing the SAM CLI:
pip install aws-sam-cli
Then, you'll package your project and store the artifacts in an S3 bucket:
sam package

            --template-file template.yml

            --output-template-file package.yml

            --s3-bucket bucket-name
And you will manually run the deployment:
sam deploy

            --template-file package.yml

            --stack-name sam-hello-world

            --capabilities CAPABILITY_IAM
If everything worked properly, you should see a new CloudFormation stack and an application in Lambda with your functions.
Packaging and Deploying the Project with CodePipeline
This stage is not optional, even if you're not working with a compiled language. Using the SAM template, CodeBuild will be used here to handle packaging the project into something that can be deployed with CodeDeploy very easily. Optionally, you can run other commands before packaging, such as npm run build and npm install.
First, you'll need an execution role capable of handling the CloudFormation updates. Open the IAM Management Console to add a new role. Select "CloudFormation" as the resource that will use this role, then attach the "AWSLambdaExecute permission policy.
Save the role, open it up, and attach the following inline policy:
{

             "Statement": [

             {

             "Action": [

             "apigateway:*",

             "codedeploy:*",

             "lambda:*",

             "cloudformation:CreateChangeSet",

             "iam:GetRole",

             "iam:CreateRole",

             "iam:DeleteRole",

             "iam:PutRolePolicy",

             "iam:AttachRolePolicy",

             "iam:DeleteRolePolicy",

             "iam:DetachRolePolicy",

             "iam:PassRole",

             "s3:GetObject",

             "s3:GetObjectVersion",

             "s3:GetBucketVersioning"

             ],

             "Resource": "*",

             "Effect": "Allow"

             }

             ],

             "Version": "2012-10-17"

            }
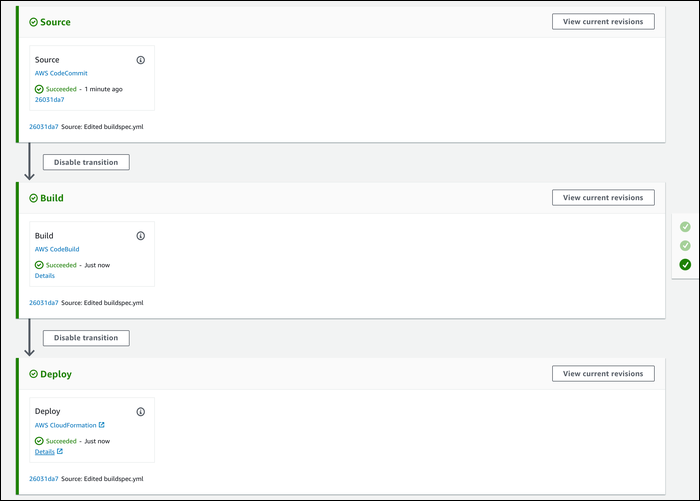
Create a new pipeline from the CodePipeline console. Choose the default settings of creating a new service role. This will be configured automatically.
For the source control stage, choose your source control type, repo, and release branch.
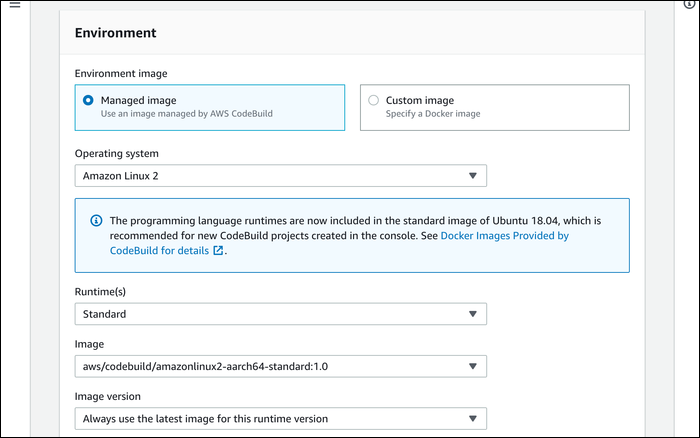
For the build stage, you'll want to create a new project in CodeBuild. The default configuration is fine, simply choose Amazon Linux 2 as the build operating system, and select the standard runtime and standard image.
The main thing you will need for codePipeline is your buildspec.yml file, placed in the root of your project directory. This configures CodeBuild with the commands it needs to run. The following configuration is an example that installs TypeScript, all NPM packages, runs npm run build, and then packages everything up for CloudFormation.
version: 0.2

            phases:

             install:

             runtime-versions:

             nodejs: 10

             commands:

             - npm install -g typescript

             build:

             commands:

             - echo Build started on `date`

             - npm install time

             - npm run build

             - export BUCKET=typescript-lambda

             - aws cloudformation package --template-file template.yml --s3-bucket $BUCKET --output-template-file outputtemplate.yml

            artifacts:

             type: zip

             files:

             - template.yml

             - outputtemplate.yml
You'll probably need to modify this to suit your project.
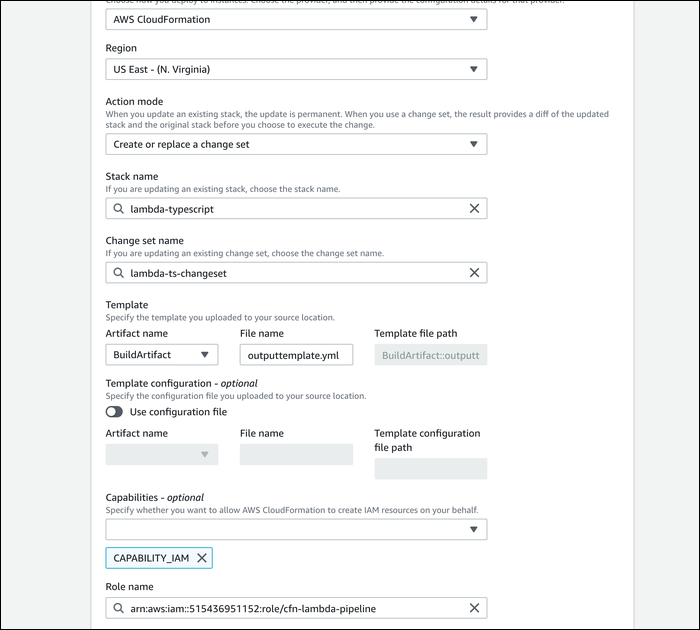
Once that's done, you can configure the final stage. Rather than using CodeDeploy though, we'll use CloudFormation to update things directly, as all of the packaging happened in the build phase anyway. Choose "CloudFormation" as the deploy provider, and set the action mode to "Create or replace a change set." Enter in a new name, and change set name.
For the template, select "BuildArtifact," and enter in outputtemplate.yml from the previous step. Add "Capability IAM" to the capabilities, and select the service role you manually created earlier.
Click "Create" and your pipeline should run without errors. However, the CloudFormation stage makes a change set, which is like a preview of the changes. To actually deploy the changes, we'll need to execute the change set.
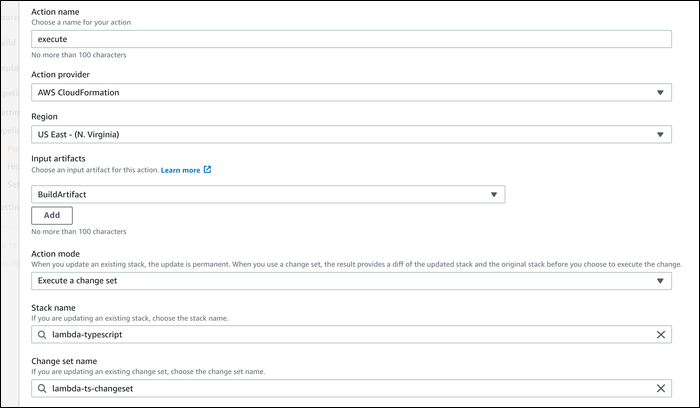
Click "Edit" on your created pipeline. Under "Deploy," click "Edit," and click "Add Action Group" after the already created action. If you create the new action before this one, it won't work.
Choose "CloudFormation" as the provider. Select "BuildArtifact" as the input artifact. For the action mode and change set name, enter in the same values you created for the first deployment action.
Click "Save," and you'll be brought back to the pipeline's main screen. Click "Release Change" to manually run the pipeline again. It should now complete, and the changes should be visible in the Lambda console.
If you're getting errors, it's fairly easy to track down, as you can click on "More Details" next to the error message in CodePipeline. It's likely to be either a failed build, an incomplete SAM template, or insufficient permissions for CodeBuild or CloudFormation.
If you commit changes to your source control, it should be detected by CodePipeline, and start this whole process over again.

