Quick Links
Apple Pay is an accelerated checkout option that makes it very easy to buy products, both in person and on the web. It's easy to integrate on most e-commerce platforms, and improves customer experience on your online store.
How Does Apple Pay Work?
Apple Pay allows customers to pay with a pre-saved credit or debit card using Touch ID or Face ID. The process is fairly seamless; in person, you'd have to wave your phone or watch over the terminal, but online, you just click the buy button, authenticate with your face, and you're done.
Apple Pay can be used on any device with Touch ID or Face ID, though it will only work in Safari, which means users of other browsers like Chrome will likely choose a different option when checking out. Since it's exclusive to Apple devices, you'll of course want to offer other options, like Google Pay, PayPal, or regular debit cards.
The process of adding Apple Pay to your store will depend on what payment provider you're already using. In any case, Apple Pay has a few rules that you'll have to abide by:
- Your entire site must be served over HTTPS with a valid SSL certificate.
- Your server must support TLS 1.2 or later.
- The domain must be verified with Apple using a file hosted on your site.
Really, you should be following the first two rules regardless. The latter may be handled automatically by some services, but if you're doing things manually (like with the Stripe API) then you may have to set this up yourself.
If you don't want to use any external service, you can also set up Apple Pay manually using Apple's JavaScript APIs. This is quite complicated and, considering you'll likely need an external service anyway to handle credit cards, we highly recommend using a service like Stripe.
Using Shopify
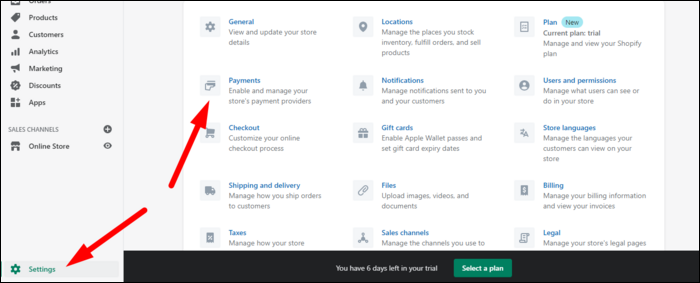
If you're using Shopify, one of the biggest e-commerce providers, the setup is really simple and just requires you to click a few buttons. Under the Settings menu, in the bottom left of the admin console, click on Payments:
Then, in the section for credit cards, click on Manage, then enable Apple Pay under "Accelerated
Checkouts." Your store should immediately show Apple Pay as an option on supported devices.
Shopify has a lot of other benefits---of course you can use them to accept credit card payments on yoru website, but they also support payments using Bitcoin or other cryptocurrencies, as well as a host of other options like ShopPay.
We'd highly recommend using Shopify if you're going to be selling things online. Not only are they the biggest platform out there that isn't Amazon, but the user experience for your end user is better than almost anything else---especially when you combine with the ease of using Apple Pay.
Using WooCommerce
Another popular e-commerce solution is WooCommerce, which runs on WordPress. You can add Apple Pay support to it pretty easily.
If you're using WooCommerce Payments, you'll simply need to enable "Payment Request Buttons" under Payments > Settings. WooCommerce should automatically register your domain with Apple and perform all the setup for it to work.
If it's not showing up, double check that your site is served over HTTPS and that you have a live WooCommerce Payments account, not one in Dev Mode.
If you're using Stripe for checkout with WooCommerce, it should be enabled automatically, though you'll want to make sure "Payment Request Buttons" is checked under WooCommerce > Settings > Payments > Stripe.
Setting Up Checkouts With Stripe
Stripe is a payment processing service, similar to PayPal except that it has excellent developer support and supports a large number of checkout methods, including Apple Pay.
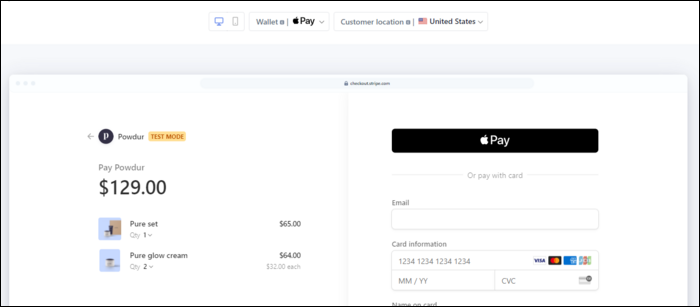
If you're using Stripe Checkout, a Stripe-hosted checkout page which handles payment processing automatically, you don't have to do anything. Apple Pay is supported by default on any device that supports it, and is displayed as the first option on the checkout page.
If you're using the Stripe API on your own site, you'll need to do a bit of setup. First, you'll need to verify your domain with Apple. Download their domain association file, and host it at the following location:
https://example.com/.well-known/apple-developer-merchantid-domain-association
Then, you'll need to send a request to the Stripe API to verify. You'll find the sk_live_ key on your Stripe dashboard.
curl https://api.stripe.com/v1/apple_pay/domains

             -u "sk_live_••••••••••••••••••••••••":

             -d domain_name="example.com"
Once verified, you'll be able to use the Stripe SDK to create and send payments and payment buttons. This will depend highly on your frontend configuration, so you'll want to consult their docs on how to set up Payment Request Buttons.


