Do you love how Stacks look in Mac OS X and want to add that kind of functionality to your Windows system? Here we look at 7Stacks which gives you a similar experience.
Note: Stacks attach to the Taskbar in Windows 7 and to the Quick Launch Toolbar in Vista and XP.
Setting Up Your New Stacks
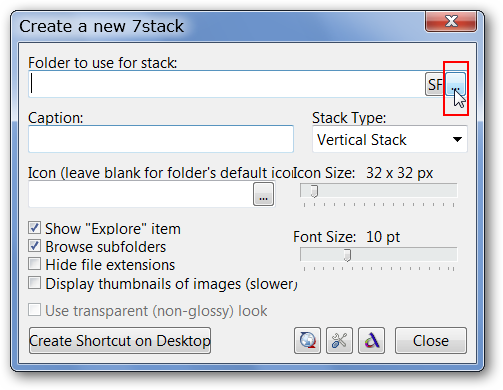
Installation of 7Stacks is simple and straightforward. As soon as you start the app you can immediately begin creating stacks using this window. Notice that you will need to choose between two browsing options to “add” the appropriate folder for your new stack.
The “SF Button” is for “special folders” and the “… Button” is for adding any regular folder that you desire. We decided to begin with a regular folder first.
Note: The default “Stack Type” is “Vertical Stack”.
We browsed until we found the Internet Browsers folder from our start menu, selected it, and clicked “OK”.

As you can see more details are filled in now such as “Target Path” and the “Caption/Name” for this particular stack. Once you have things sorted click on “Create Shortcut on Desktop”.
Note: You may want to deselect the “Show Explore Item” option if you do not want to access the “stack’s originating folder” using Windows Explorer and wish to cut down on “clutter” in your stacks.

Here is our new “Stack Shortcut” on the Desktop…

In Windows 7 right click on the shortcut and select “Pin to Taskbar”. For those using Windows Vista and XP drag the shortcut to your “Quick Launch Toolbar”.

There is our first stack full of browser shortcut goodness.

If you want access to the shortcuts in one of the folders in the stack click on it and it will open (“shift into focus”) as shown here.

Whenever you are ready to create a new stack right click on any existing “stack icons” and select “Create a new stack”.

This time we decided to create a stack for a “special folder” and use “Grid” as the “Stack Type”.

When you click on the “SF Button” you will see a “classic start menu styled” menu. You can choose one of the preset choices in the main area or browse through the “Start Menu, Common Folders, & Other” sub-areas. Here we chose “My Pictures”…

Once again click on “Create Shortcut on Desktop” to finish your new stack and add it to your “Taskbar or Quick Launch Bar”.

Here is our “Pictures Stack” using the “Grid Setting”. Looking good…

For our final addition we created a stack for “My Documents” using the “Menu Stack Type”.

Not bad at all. Notice how the folders are set up for easy content browsing.

A look at our three stacks pinned to the “Taskbar”.

Preferences
There are only a few preferences to sort through for 7Stacks…”Text Appearance, Behavior, & Stack Closing Style”.

Conclusion
If you have been wanting Mac OS X Stacks style functionality in your Windows system then 7Stacks is definitely worth taking a look at.
Thanks to HTG reader Realitizer for the great tip!
Links
Note: Download link has been updated to reflect changes at the 7Stacks homepage.