Recently, we showed you how to use the Windows 7 Start menu in Windows 8. Now, we’ll show you how to have the functionality of Metro UI and the Windows 7 Start menu in Windows 8 at the same time.
7Stacks is a program that allows you to have “stacks” of icons on your Taskbar. You can reduce icon clutter by grouping related icons into a single icon. We will use to create a Windows 7-style Start menu beside the Windows 8 one. Their website says that 7Stacks works in Windows 7, Vista, and XP, but we tested it in Windows 8 Developer Preview and found it to work.
Before installing 7Stacks, you need to make sure hidden items are being shown. Open Windows Explorer and select any folder. Click the View tab. if your window is not wide enough to show all the groups on the View tab, click the tall, narrow arrow button on the right side to access the rest of the groups.
Click the Hidden items check box in the Show/hide group so there is a check mark in the box. Once you have turned on Hidden items, double-click on the .exe file you downloaded (see the link at the end of this article) to run the 7Stacks installation.

Before the installation begins, the following dialog box may display. Click the More Info link.

Click the Run Anyway button that becomes available.

Follow the instructions on each screen of the setup wizard.
You can use 7Stacks to create other stacks in addition to the Start menu stack we show you here. When the Select Additional Tasks screen displays, you may want to turn on the Create a desktop icon check box to make it easier to create new stacks using 7Stacks from the desktop.
On the final screen in the setup wizard, there is a check box that allows you to start 7Stacks immediately upon exiting the setup wizard. If you want to start 7Stacks right away, select this check box.

Once 7Stacks starts, click the … button on the right side of the Folder to use for stack edit box.

In the Browse for Folder dialog box, navigate to the following folder, select it, and click OK.
C:\ProgramData\Microsoft\Windows\Start Menu\Programs

Enter a title in the Caption edit box. This title will display as the text on the shortcut you create. Select an option from the Stack Type drop-down list. We chose Menu, but you can choose Vertical Stack, if desired. They both produce a popup menu that looks similar to the classic Start menu.

To select an icon for the shortcut, click the … button on the right side of the Icon edit box.
The Change Icon dialog box displays. There are many icons available in the default selected .dll file. Scroll through them and click on one to select it. Click OK.
NOTE: You may also use the Browse button to select another .exe, .dll, or .ico file to use.
We accepted the default values for the rest of the options. Click Create Shortcut on Desktop.

The Status box displays at the bottom of the Create a new 7stack dialog box telling you that the stack was successfully created. Click Close.

To put the stack on the Taskbar, drag the new shortcut you created to the Taskbar. We put it right next to the Windows 8 Start button.

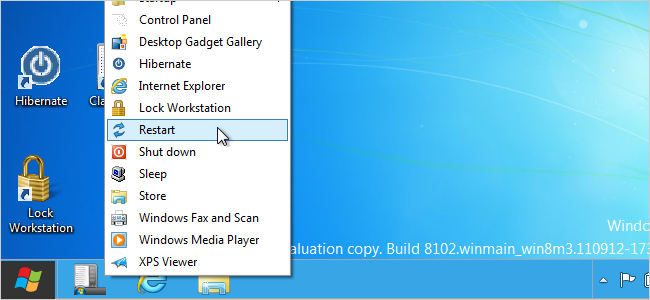
Now, when you click on the shortcut you put on the Taskbar, a classic-style Start menu pops up. The Windows 8 Metro UI-style Start menu is also available for use next to the classic-style Start menu.

7Stacks does not provide search functionality on the classic start menu. If you want a different search tool to use in Windows 8, you can use FileSearchEX. It is meant for Windows 7, but because Windows 8 is built based on Windows 7, FileSearchEX will work. We installed it in Windows 8 and tested it and it seemed to work. The installation process is a little different than we described in the article linked to above. They now offer a .exe file that installs the program for you. The “Windows protected your PC” message displays just like we described for 7Stacks earlier in this article. Click More Info and then Run Anyway to install FileSearchEX.
Download 7Stacks from http://alastria.com/software/7stacks/.