Quick Links
Previously, we published a list of useful tips and tricks for getting the most out of Windows 7 Explorer. Here are some additional tips to help improve your productivity when using Explorer.
Easily Restart Windows Explorer in Windows 7

Generally, when you want to test an explorer shell plugin or a registry hack, you have to log off and log back in before it will work. It's faster to kill the explorer.exe process in Task Manager and then restart it. The following article shows an easy way to this.
Hidden Trick to Close Windows Explorer in Windows 7 or Vista
View the Full Path of a Folder or File and Copy it in Windows 7
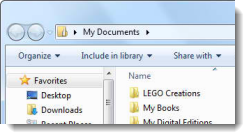
If you have recently started using Windows 7, you'll notice that the path in the address bar no longer displays in the traditional way (e.g., C:\Users\Lori\Documents). It now displays as shown in the following image.

To view the classic full path, simply click in empty part of the address bar. The classic full path displays highlighted.

You can easily copy the path by right-clicking any part of the address and selecting Copy address or Copy address as text from the popup menu. The Copy address option is optimized for copying and pasting folders in Windows Explorer. The Copy address as text option is useful if you plan to paste the full path into a document.

The following article shows you how to easily copy the path for an individual file. This is especially useful if you want to upload a file to a website or open a file in a program without having to manually browse to the location in the Open dialog box.
Copy Path of a File to the Clipboard in Windows 7 or Vista
How to Hide/Delete/Customize Libraries in the Windows Explorer Navigation Pane
Libraries is a new feature in Windows 7 that allows you to manage files from multiple locations in one place. There are four default libraries that display in Windows Explorer: Documents, Music, Pictures, and Video. If you don't use all these libraries, you can remove individual libraries, and easily restore them at a later time. You can also collapse the list of libraries if you want them still available but temporarily out of the way.
To hide an individual library, right-click on the library you want to hide in the Navigation pane and select Don't show in navigation pane from the popup menu.

The selected library is removed from the list of Libraries in the Navigation pane, but it's still available to select in the right pane. To add it back to the Navigation pane list, right-click on the library in the right pane and select Show in navigation pane.

Hiding individual libraries is not the same as deleting them. If you accidentally or purposely delete a default library, you can easily get it back. Right-click on the Libraries link in the Navigation pane and select Restore default libraries from the popup menu.

If you don't want to hide or delete any libraries, but you want them out of the way temporarily, you can collapse the list. To do this, right-click on the Libraries link and select Collapse from the popup menu. You can also click the arrow to the left of the Libraries link to collapse and expand the list of libraries.

If you discover that you really don't like the Libraries feature in Windows 7, you can easily remove the link to the Libraries link on the Navigation pane in Windows Explorer using a registry hack described in the following article. However, we recommend you read our guide to understanding the Libraries feature in Windows 7 before disabling the Libraries, as the following registry hack doesn't just hide the Libraries. It also disables the shell extension so you can't access the Libraries at all.
How to Enable or Disable the Libraries Feature in Windows 7
 Set the Windows Explorer Startup Folder
When you open Windows Explorer in Windows 7, it defaults to the Libraries view. However, you may want Explorer to open a different folder by default that you use more often. The following article shows you how to change the target path available when you open Explorer.
Set the Windows Explorer Startup Folder in Windows 7
Show the Menu Bar in Windows Explorer
By default in Windows 7, the menu bar in Windows Explorer is hidden, as most of the functionality available on the menu bar is available on other controls. However, the menu bar is still available if that's what you prefer to use.
You can show the menu bar in Explorer on a temporary basis or permanently. To show it temporarily, press the Alt key. After you make a selection from one of the menus, the menu bar disappears. To show the menu bar permanently so it doesn't disappear after selecting an option, click the Start button, enter "folder options" in the Search box, and press Enter, or click the Folder Options link.

On the View dialog box, click the View tab and select the Always show menus check box in the Advanced settings list so there is a check mark in the box. Click OK.

Now the standard menu bar will always be available in Windows Explorer.

Show/Hide Drive Letters in Explorer
By default, the letters for drives in Windows Explorer are shown. For example, your main Windows 7 hard drive is most likely C:, your DVD drive may be D: and other drives and partitions and removable media, such as USB flash drives, have their own drive letters.
If you can tell which drive is which by each drive's volume name and/or media type, and you don't want to see the drive letters in Explorer, you can hide them.
Click the Start button, enter "folder options" in the Search box, and press Enter, or click the Folder Options link.
The Folder Options dialog box displays. To hide the drive letters in the right pane in Windows Explorer, click the View tab, and select the Show drive letters check box so there is NO check mark in the box. To show the letters again, simply select the check box so there is a check mark in it.

When you hide the drive letters in Windows Explorer, they are hidden in the right pane, but they still display in the Computer list in the Navigation pane, as shown below.

Hide Empty Drives
If you have empty drives that you want to display grayed out so they can't be selected in Windows Explorer, click the Start button, enter "folder options" in the Search box, and press Enter, or click the Folder Options link. On the View tab, select the Hide empty drives in the Computer folder check box so there is a check mark in the box.

If you don't just want to gray out the empty drives, you can completely hide them so they are not visible at all. The following article describes a registry hack that allows you to do this.
Hide Drives from Your Computer in Windows 7 or Vista
Use Check Boxes in Windows Explorer to Select Files

You're probably used to the standard way of selecting multiple files or folders in Windows Explorer by holding down the Shift key (contiguous selection) or the Ctrl key (not contiguous selection) while clicking on files or folders. However, Windows 7 introduced an easier way of selecting multiple files and folders. You can display a check box next to each file and folder. Clicking the check box next to an item selects that item. The following article shows you how to turn on this feature.
How To Enable Check Boxes for Items In Windows 7
 Protect the privacy of your Explorer searches
By default, the Search feature in Windows 7 saves the last three recent searches. If you're annoyed by this, or you share your computer and don't want other users to see what you've searched for, you can turn this off using the Group Policy Editor. The following article explains how to do this.
NOTE: The Group Policy Editor is not available in the Home and Starter versions of Windows 7.
Quick Tip: Disable Search History Display in Windows 7
Add Tabs to Windows Explorer in Windows 7

If you want to open multiple locations at one time in Windows Explorer, you must open multiple windows. If you're getting tired of dealing with too many separate windows, you easily add tabs to Explorer to easily navigate among different selected locations, like you navigate among different web pages in most of today's web browsers. The following article discusses a tool, called QTTabBar, that adds tabs to Windows Explorer.
Add Tabbed Browsing to Explorer in Windows 7
We hope the tips and tricks we've provided help you get the most out of Windows Explorer and enable you to work faster and more efficiently.