Windows HomeGroups are great for setting up quick and easy sharing on home and small business networks. Here's what you need to know to use them.
Update: Microsoft removed the HomeGroup feature from Windows 10 in the April 2018 update. You can still use HomeGroups if you're using Windows 7 or 8, but they won't be accessible by computers running Windows 10 (at least with the latest updates) unless you also set up traditional file sharing.
HomeGroups debuted back in Windows 7. They're designed to simplify sharing folders and printers between Windows computers on small, local networks. And, let's face it. Sharing stuff in Windows the normal way can be a little cumbersome when all you really want to do is make sure your family can view your pictures and use your printer.
Getting Started: How to Create a New HomeGroup
If there is no HomeGroup already on your network, you'll need to create one. You can do this on any PC that you want to be part of the HomeGroup. Click Start, type "homegroup," and then click the "HomeGroup" control panel app.

When you first fire up the HomeGroup app, it will perform a quick search to see whether there's already a HomeGroup on the network. When it finds that there isn't, it will let you know and give you the option to create one. Click the "Create a homegroup" button.

Click "Next" on the first page of the "Create a Homegroup" wizard.

Next, you can see all the major folders---along with Printers & Devices---that HomeGroup allows you to share. For each item, you can use the "Permissions" drop-down menu to choose whether the item is shared or not. Share the items you want to share and then click "Next."

Next, the wizard will show you a password that other PCs on the network will need to join the new HomeGroup. Write it down if you need to, but you can always view or change the password later if you forget it. Click "Finish" when you're done.

After setting up the HomeGroup, it can take a few minutes for everything you selected to get shared with the network. You'll then be able to see what you've shared.

You don't need to wait for sharing to finish, though. You can go on using your PC or even go ahead and join the HomeGroup from other PCs. But first...
How to View or Change the HomeGroup Password
Forgot your password already? Or want to change it before you join other PCs? In the main HomeGroup window, click "View or print the homegroup password" to see the password, print it, and find instructions on joining other PCs to the HomeGroup.

You can also click "Change the password" to enter a new password for the HomeGroup. You won't need to know the old password to make this change. Windows assumes that if you have access to the PC, you can make the change. You also won't need to do anything to PCs that are already joined to the HomeGroup. They will stay joined and if you view the password on those PCs, you'll see the new password you set.
How to Join an Existing HomeGroup
If there's already a HomeGroup on your network, or if you just created one, joining it from a new PC follows much the same process as creating a new HomeGroup. When you open the HomeGroup app, Windows will let you know that it has found a HomeGroup on the network. Click the "Join now" button to join the HomeGroup.

On the first page of the "Join a Homegroup" wizard, click "Next."

Next, you can see all the major folders---along with Printers & Devices---that HomeGroup allows you to share from that PC. For each item, you can use the "Permissions" drop-down menu to choose whether the item is shared or not. Share the items you want to share and then click "Next."

Type the HomeGroup password in the box and then click "Next."
You've now successfully joined the HomeGroup. Click "Finish" to exit the wizard.
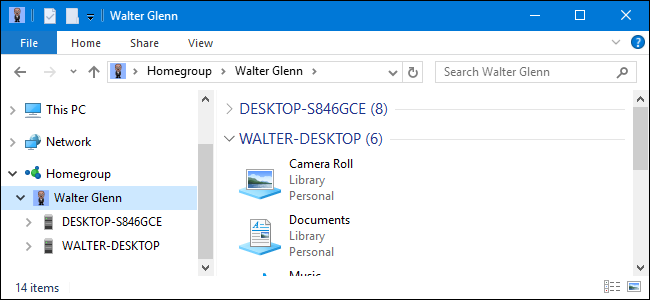
When you're done, you can open up File Explorer, click the Homegroup icon in the navigation pane, and browse anything that's being shared from other PCs in the HomeGroup. Here, you can see that I've got two desktop PCs in the HomeGroup. Both are grouped under my name because I'm signed into both with my Microsoft user account.
Any printers that those other PCs have shared should automatically show up on your PC and be available for printing as well.
How to Change What You're Sharing with a HomeGroup
When you create or join a HomeGroup, you also get to set what you want to share. If you want to change what you're sharing later on, you can fire up the HomeGroup app again and choose "Change what you're sharing with the homegroup." That will get you to the same sharing screen you saw when you created or joined the HomeGroup.

You can also make more fine-tuned changes directly in File Explorer, if you want to share or unshare certain files and folders. For full instructions, check out our article on changing what you have shared with a HomeGroup.

How to Leave a HomeGroup
If you decide for whatever reason that you'd like to leave a HomeGroup, all you have to do is open the HomeGroup app again and choose "Leave the homegroup." It's pretty straightforward.

Hopefully, this is enough to get you started using HomeGroups and simplifying your network sharing life. Be sure to let us know if you've discovered anything else cool you can do with HomeGroups!