Quick Links
If you bought your PC from a vendor, you've likely seen the manufacturer information in the "System" window. But did you know you can change it---or even add it if you build your own PCs?
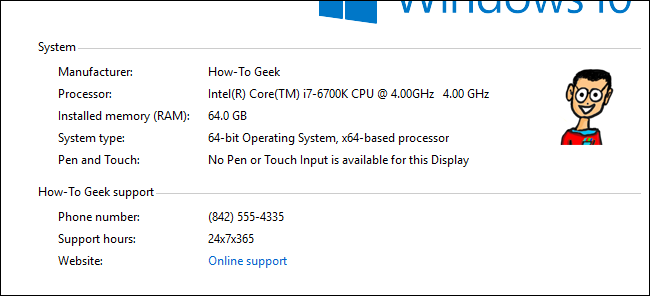
The "System" window on your PC has a lot of useful information, like your processor model, the amount of installed RAM, what version and edition of Windows you're running (and don't forget, you can get even more of this kind of stuff with the System Information tool if you need it). If you're using a pre-built PC, the window also shows manufacturer information like the vendor, support number and web site, support hours, and even a logo. You can customize this information, if it's changed since you bought your PC. Or, if you build your own PCs for family and friends, you can add your own information. All you have to do is take a quick dive into the Windows Registry.
Add Change Manufacturer Information by Editing the Registry Manually
To change the manufacturer information for your PC in any version of Windows, you just need to make a few edits in the Windows Registry.
Standard warning: Registry Editor is a powerful tool and misusing it can render your system unstable or even inoperable. This is a pretty simple hack and as long as you stick to the instructions, you shouldn’t have any problems. That said, if you’ve never worked with it before, consider reading about how to use the Registry Editor before you get started. And definitely back up the Registry (and your computer!) before making changes.
Open the Registry Editor by hitting Start and typing “regedit.” Press Enter to open Registry Editor and give it permission to make changes to your PC.

In the Registry Editor, use the left sidebar to navigate to the following key:
HKEY_LOCAL_MACHINE\SOFTWARE\Microsoft\Windows\CurrentVersion\OEMInformation

If your PC already has manufacturer information, you'll see several string values in the OEMInformation key. If your PC doesn't have these values, you'll need to add them. You can add the following values:
- Manufacturer
- Model
- SupportHours
- SupportPhone
- SupportURL
- Logo
You don't have to add all the values---just the ones you want to show up. To add a value, right-click the OEMInformation key and choose New > String Value. Name the new value using one of the names from the list and make sure it's named exactly as shown, with no spaces.

When you have the values added that want (or if they were already present), double-click each value to open its properties window, type the information you want displayed into the "Value data" box, and then click "OK." If you're replacing information, you may want to write down the information you're removing so that you can put things back the way they were if the need arises.

If you're adding a logo, just type the full path to the image you want to use. Alternatively, if the value already exists and you want to use the current path, you can leave the value at its default, which is typically:
C:\Windows\System32\oemlogo.bmp
Then all you have to do is replace that file with a picture of your own that's named the same. To replace the file, you'll need to have administrative privileges on the PC since it's in a system folder. For the best results, you'll want to use a small logo picture---around 100x100 pixels.
When you've added the information you want, you can close Registry Editor. The changes will take place immediately, so no need to restart your PC. All the information you entered should now show up in the "System" window.

If you ever want to remove the the changes, just go back to the OEMInformation key and delete all the values except for the (Default) value. If you want to restore information that was previously there, you'll need to change each value to put the old information back.
Download Our One-Click Registry Hacks

If you don’t feel like diving into the Registry yourself, we’ve created some registry hacks you can use. The “Add Manufacturer Information” hack adds all of the values you'll need. The "Remove Manufacturer Information" hack removes those values. Both hacks are included in the following ZIP file.
Manufacturer Information Hacks
Of course, since we don't know what information you want to add, you'll have to edit these hacks a bit before you use them. After downloading and unzipping them, right-click the "Add Manufacturer Information" hack and choose the "Edit" command from the context menu.

This opens the hack in notepad. Replace the information in the hack with the information you want to use. For example, you'd want to replace "Manufacturer_Name" with the actual name you want to use. Just make sure you leave the quotes in place. And if there are bits of information you don't want included---like, say, a support phone number---you can just delete that entire line.

When you're done making edits, save the file and then double-click it to apply it to your Registry.
Yes, modifying the hack is almost as much work as just going into the Registry yourself, but if you'd like to create manufacturer information that you can quickly add to multiple PCs, this hack will save you a good bit of time.
These hacks are really just the OEMInformation key, stripped down to the values we talked about in the previous section and then exported to a .REG file. Running the hacks just modifies the value. And if you enjoy fiddling with the Registry, it’s worth taking the time to learn how to make your own Registry hacks.