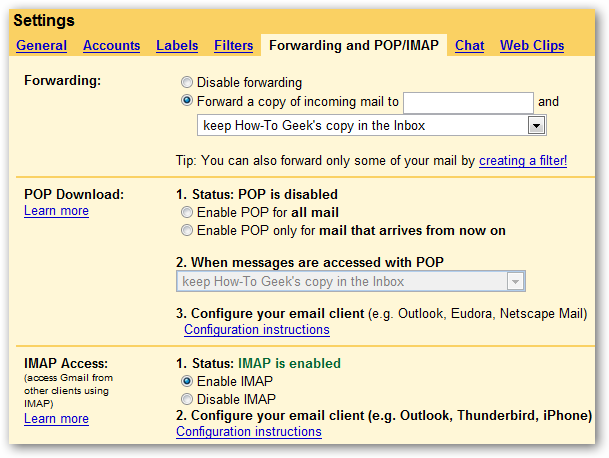
Gmail's IMAP support is one of the biggest things to hit the webmail world since, well, Gmail. We've already covered how to use imap from Outlook, and now it's time to show everybody how to use it from the open-source Mozilla Thunderbird email client. The good news is that Thunderbird has much better support for IMAP than Outlook or most other clients, but there are still quite a few little tweaks that can be made to make it work even better. If you haven't already enabled IMAP in Gmail, open up the settings page and choose Forwarding and POP/IMAP, and then select to Enable IMAP.
Update: These dialogs are from version 2.0 of Thunderbird, which natively supports Gmail as an option, but doesn't work for Gmail hosted apps accounts, so you need to follow a few more steps. If you are using regular Gmail you can use that option and skip down to "Synchronize Sent / Draft messages".
Open up Thunderbird and go to Tools \ Accounts Settings and click on the Add Account button. In the resulting wizard choose Email account.

Enter in your Name and your Gmail email address. You'll note that my email address is not @gmail.com, which is because I'm using the hosted Gmail Apps for your Domain.

On the next screen, choose IMAP, and then enter in the following:
Note: If you are outside of the US you may need to use imap.googlemail.com and smtp.googlemail.com instead of imap.gmail.com and smtp.gmail.com.

Enter in your Gmail email address here:

Click Next and then Finish, and you'll be returned to the Account Settings window, but we aren't done yet. In the "Server Settings" dialog, you'll want to choose the SSL option, which should set the Port to 993 as well.

Choose "Outgoing Server" on the left hand pane, and then click the Edit button next to your Gmail account.

Enter in the port number of 587, and choose the TLS radio button.

Your account should be configured now, but you should keep the Account Settings dialog open and keep reading for additional configuration options. Synchronize Sent / Draft messages To make sure that your sent mail or drafts in Thunderbird are available in Gmail, choose the "Copies & Folders" option on the left hand pane of Account Settings. Very important note: If you are NOT using the Gmail SMTP server from the settings above, then you should check the box for "Place a copy in" and pick your Gmail sent mail folder under "Other". If you are using the default settings, the Gmail SMTP server will automatically place all sent mail into the correct folder in Gmail.

You do, however, want to keep the message drafts in the [Gmail] \ Drafts folder, which you can navigate from the popup menu as shown above. Send Thunderbird Junk Mail to Gmail Spam Folder If you want messages marked as junk in Thunderbird to get pushed to the Gmail spam folder, you'll need to choose the "Junk Settings" item on the left hand pane, and then check the box for "Move new junk messages to". You'll want to select your Gmail account in the list, and then choose the [Gmail] \ Spam subfolder.

At this point you should be able to delete the "Junk E-mail" folder/label, or wait until later and delete it. Download Messages for Offline Use If you'd like to use your account while offline, it would be wise to setup Thunderbird to download the whole message. Choose "Offline & Disk Space" in the left hand pane, and then check the box for "Make the messages in my Inbox available".

You can also select other folders / labels for offline use by clicking the box for "Select folders for offline use" and then choosing them in the dialog:

Important Note: If you've got 47 million emails in your Inbox, you really should think about whether you want to choose this option, because it's going to take forever to download. You should be able to close the Account Settings dialog at this point. Once you click on the Gmail inbox you will be asked to login:

You can choose to store your password in Thunderbird's password manager if you'd like. Once you've logged in successfully you should see all the Gmail folders:

Synchronizing the Thunderbird Trash with Gmail Trash If you want messages deleted in Thunderbird to delete in Gmail you can use this more advanced hack to get it to work. Important note: If you use this hack that means anytime you delete this message it will be gone completely, even if you had the message in two separate folders, because it's only a single message on the Gmail side. If you want to do it anyway, go to Tools \ Options

Choose the Advanced tab/button and click on Config Editor.

Now you'll have to do some sleuthing to figure out what the "number" of your Gmail account is. Filter by mail.server.server and then scroll down until you see your IMAP account in the list, and then note whether the keys start with "mail.server.server2" or some other number.

Right-click anywhere in the listbox and choose New \ String

Now you'll need to enter the following preference name, adjusting the "2" if your number is different:
mail.server.server2.trash_folder_name

Enter in the following as the string value:
[Gmail]/Trash

Now you'll need to restart Thunderbird for the change to take effect. You can also now go into Gmail and remove the unneeded labels by clicking the Edit Labels link:

If you've followed everything so far, you can remove the [Imap]/Trash label as well as the Junk E-mail label.

Note that you'll have to restart Thunderbird yet again for that change to show up. Creating New Folders / Labels When you create labels in Gmail they will show up as folders, and creating folders in Thunderbird will show up as labels on the Gmail side:

You can even create subfolders...

Which will show up in Gmail as ParentLabel/ChildLabel

You can create a subfolder in Gmail by using the same syntax with a forward slash between parent label and child label:

This will now show up in Thunderbird the next time you open the application:

Deleting Folders in Thunderbird You can certainly delete them if you choose to:

But you'll end up with a new label with a weird name in Gmail:

You'll have to delete them from the [Gmail]/Trash folder in Thunderbird as well to avoid doing it in Gmail.

Starring Messages This is so simple it's barely worth mentioning... but you star a message in either Thunderbird or Gmail and it will sync across the two:

Working Offline To work in Offline mode, you can choose File \ Offline \ Work Offline from the menu...

Or you can just click the little icon in the bottom left hand corner.

You'll be prompted to download the messages for offline use, which will download from the folders we specified earlier in this article.

Automatically Check for New Email in Folders Other than Inbox Unfortunately Thunderbird by default doesn't check for new email in any folders other than the Inbox, so if you are using filters and labels you might want to change this by going to the properties of a Folder / Label:

Now just choose the "Check this folder for new messages" option.

Unfortunately you'll have to do this for all the folders/labels, but it's good to know. Are We Really Done? That covers most of what you need to know, so thus ends one of the longest pages I've written. For more usage tips and a lot of helpful comments, you might want to check out the Lifehacker article on this subject.