Key Takeaways
To save a voicemail on your iPhone, launch the Phone app, select the voicemail you want to save, and click the Share button. Choose "Save to Files" from the list of options.
The Visual Voicemail feature on iPhone makes it super easy to access and manage your voicemails, freeing you from the drudgery of dialing a number and doing it the old-fashioned way. Not only that, but it also lets you save important voicemails to your iPhone with just a few steps. Here's how.
How to Save a Voicemail on iPhone
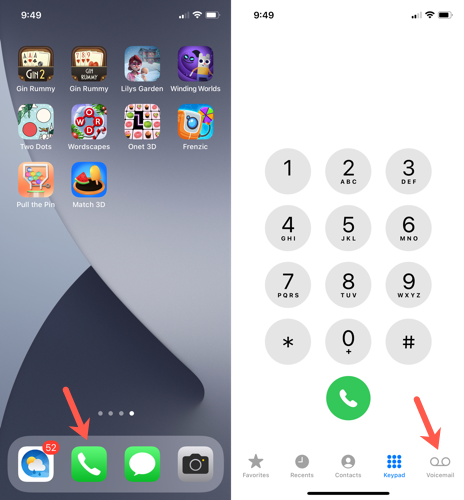
To save a voicemail, open the Phone app and choose the Voicemail tab in the bottom right corner.
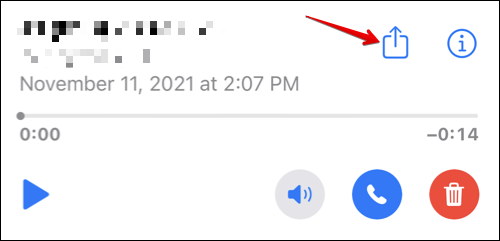
You should see a list of voicemails. Scroll to the message you want to save and tap it. This will bring up a pop-up window with several controls, including a play button, speaker icon, and phone button. On the top right, you'll see a share button --- it looks like a box with an arrow coming out of it. Tap it to bring up the share sheet and see all the possible ways you can save or share your voicemail.
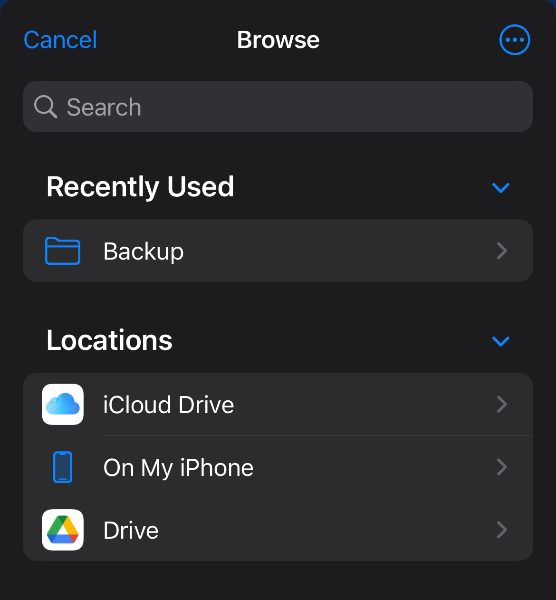
To save the voicemail locally on your iPhone, select "Save to Files" and then "On My iPhone." Choose a folder where you want to store the voicemail and hit "Save."#4
Voicemails displayed here are stored on your cellular carrier's servers until you download them.
You can also save the voicemail directly to a cloud storage service like iCloud. To do so, choose the "Save to Files" option from the share menu and select iCloud Drive or Google Drive under the list of storage locations.
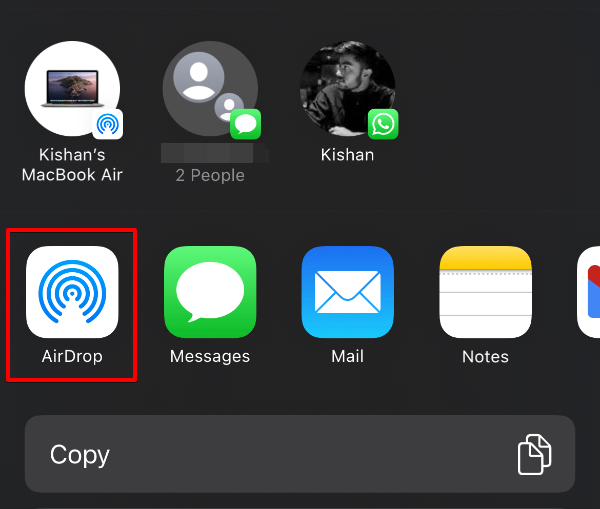
If you wish to export voicemails to your Mac or IPad, you can use AirDrop. From the share menu, tap the AirDrop icon and choose your Mac or iPad. Ensure the receiving device has AirDrop set to receive from "Contacts only" The file will be transferred instantly and saved to the Downloads folder on the receiving device.
Keep in mind that this approach only works if your carrier offers Visual Voicemails support. If you can see a list of voicemails when you open the Voicemail tab, your carrier supports the feature. On the other hand, if your carrier requires dialing in or other methods for accessing your messages, this method won't work.
How to Save Voicemails Without Visual Voicemail
You can also use Screen Recording to save and share voicemails. This is a great workaround if you don't have access to Visual Voicemail and thus can't save messages using the standard method discussed above. This method also comes in handy if you want to capture additional context along with the voicemail contents, such as caller ID and timestamps.
This will also let you save audio "voicemails" and video messages from apps that don't normally let you save or download those mesages.
To screen record a voicemail, use the Screen Recorder. First, swipe down to reveal Control Center and tap the Screen Recording button.
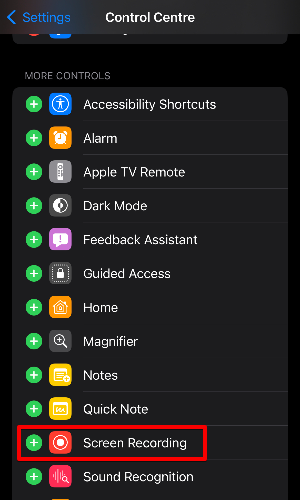
If you don't see the button, go to Settings > Control Center > More Controls and add the Screen Recording toggle by clicking the green + icon.
Also, make sure you've turned on the microphone in the Screen Recording settings, or your recording will have no audio. You can check this by holding the Screen Recording toggle. Lastly, head to the Phone app, play the voicemail through the speaker, and let Screen Recording do its job.
Tap the Screen Recording button when you're done to finish saving the recording. The screen recording will be saved to the Photos app.
After exporting your voicemails to your iPhone, it'll be a good idea to back them up to a cloud storage service such as iCloud or Google Drive#8. This will allow you to easily access your messages from other devices, and you won't have to worry about losing them if you ever lose or reset your iPhone.

