Quick Links
If you're getting into streaming, the money required for a top-tier setup can be intimidating. Fortunately, you don't need to start with the best of the best. You can do plenty well with a budget setup like the NZXT Capsule Mini and NZXT Mini Boom Arm, which cost less than a single pro-level mic.
If the Capsule Mini looks familiar, it's because it's essentially a slimmed-down version of the NZXT Capsule microphone, which has been available for a while. Similarly, the Mini Boom Arm is a smaller version of another boom arm that NZXT makes. If you require a more compact setup, these could be perfect.
Of course, budget is a relative term, and compared to some of the competition, these NZXT offerings are on the higher end of the budget scale. Are they worth the few bucks extra, or should you save your money?
A Sleek Design Made Mini

- Dimensions: 5 × 1.9 × 1.9in (127 × 49 x 49mm)
- Weight: 19.2oz (544.3g)
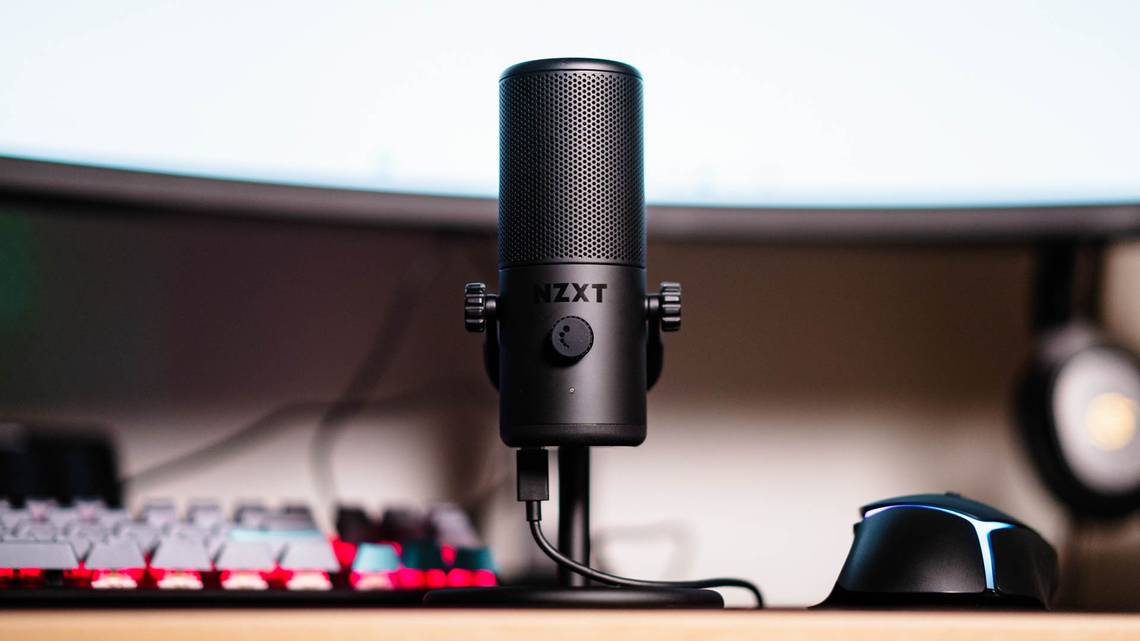
As you may have imagined, the Capsule Mini looks quite similar to the larger NZXT Capsule. This is smaller at just five inches tall compared to the 6.5-inch Capsule, and the Capsule Mini only features a single volume knob on the front. Like the Capsule, the Capsule Mini is available in Matte Black and Matte White color varieties.
Many USB microphones and XLR condenser microphones use a grille that wraps around the entire upper portion of the microphone. This looks nice, but means you need to rely on an icon printed on the microphone body to know where to speak into the mic. The Capsule Mini uses a unique design with a grille on the front and a more uniform pattern of larger holes on the back, avoiding this confusion.
As impressive as the design of the Capsule Mini is, it feels somewhat disconcertingly light. I don't expect a cast metal body on a microphone that retails for well under $100, but at the same time, the plastic here feels on the flimsy side. If you're only setting up the microphone once and leaving it, this won't be an issue. That said, if you intend to travel with this microphone, you'll want to be careful with it.

While we're looking at the NZXT Mini Boom Arm that serves as a companion to the Capsule Mini, the boom arm isn't a necessity as the microphone includes a stand. Not only is the stand included, but it's built out of metal and feels an order of magnitude more substantial than the microphone. If anything, you'll often see this the other way around. Still, if you're using the Capsule Mini on your desk, the included stand may be all you need.
The Capsule Mini is secured to the stand with a thumbscrew on either side. Simply loosen these to take the microphone off the stand, and you're ready to use it with another stand. An adapter included in the box lets you connect the Capsule Mini not just to NZXT's Mini Boom Arm, but to any other boom arm or microphone stand you want to use.
Using the NZXT Mini Boom Arm

- Dimensions: 6.07 × 2.52 × 30.48in (54.2 × 64 × 774.2mm)
- Thread: 3/8"
- Adapter: 5/8"
- Max Desk Thickness: 2.68in (68.1 mm)
If you're going to be using the Capsule Mini in a streaming scenario, any boom arm will work, but the NZXT Mini Boom Arm is meant to be the perfect companion to the smaller microphone. Like the Capsule Mini to the Capsule, the Mini Boom Arm looks like, well, a mini NZXT Boom Arm.
The boom arm comes in two pieces: the arm itself and the section that clamps onto your desk or table. All you need to do is attach the clamp, then place the boom arm inside the clamp. Now attach the microphone to the mount at the top of the boom arm, and you're all set.
There are three points of articulation: one where the mic attaches, and two attaching the other sections of the arm. All of these are easily adjustable, with controls to tighten and hold them in place once you've found the perfect position.

You can, for example, tighten the bottom section of the arm but keep the mic section easily movable. On the other hand, the arm swings freely from the clamp, and there is no way to tighten it.
The boom arm features built-in cable management, with removable plastic panels that let you route the USB-C cable along the back of the boom arm. This goes a long way toward keeping everything neat and tidy. That said, the boom arm is rather short, so if you're planning on attaching it to the back of your desk, it may not reach.
As nice as the Mini Boom Arm is, you'll find cheaper options with longer reach. On the other hand, those options aren't as stylish, and certainly won't match the Capsule Mini as well as this does.
Making the Right Connections

- USB: USB-C
- Included cable: USB-C to USB-A
Connectivity with the NZXT Capsule Mini is a simple affair. The microphone features a USB-C connector on the bottom, and you plug this into your computer using the included USB-C to USB-A cable. The microphone outputs class-compliant USB audio, so there is no need to install any drivers.
The only other connection on the Capsule Mini is also on the bottom of the microphone. On the opposite side of the USB-C cable, you'll find a 3.5mm headphone jack to let you directly monitor from the microphone. We'll look at how well this performs later on in the article.
On the front of the microphone, you get a single knob to control the volume of your headphones. Below this is a single status LED, and that's all there is to the microphone.
Simple Setup and Streamlined Usability

If you want to adjust any settings apart from the volume controlled by the single knob, you'll need to install the NZXT Cam software. You won't find any other bundled software, but considering the price of the microphone, that doesn't come as much of a surprise.
The Cam software isn't just for the Capsule Mini, and you won't even see a section for it in the software if the microphone isn't plugged in. Plug in the mic, and you'll see the Audio section appear in the sidebar of the app. Here, you can adjust the microphone gain, monitoring volume, and sidetone. In case you're not familiar, "sidetone" refers to how much of your own voice you hear coming through the headphones.
There is one other issue here: the NZXT Cam software is Windows-only. Given the gaming-focused nature of the brand, this isn't much of a surprise, but it's worth keeping in mind. Without this software, you won't be able to adjust microphone gain or sidetone.
Granted, simplicity is often a plus in USB microphones, but it's still unfortunate. There are a non-zero number of streamers who use a Windows PC as their gaming machine and a Mac as their streaming computer, so macOS support would have been nice.
In general, the software is limited, even on Windows. If you're looking to get started streaming, you'd do better with free software like OBS for streaming, sticking to the Cam software only to adjust settings.
Crisp Vocal Capture

- Polar pattern: Cardioid
- Frequency response: 100Hz to 10,000Hz
- Max SPL: 110dB
- THD: 0.23% @ 1kHz
The NZXT Capsule Mini is a condenser microphone with a voice-focused frequency range of 100 Hz to 10,000 Hz. This doesn't cover the range of human hearing (roughly 20 Hz - 20,000 Hz), but this actually provides benefits in that you'll need to worry less about the rumble of passing traffic or a high-pitched whine from your graphics card.
While some USB microphones offer multiple pickup patterns, the Capsule Mini sticks to one: the cardioid pattern. This means that sounds in front of the microphone are picked up the best, while sounds from the sides and the back won't register as easily. This is great if you're the only one speaking, but if you're trying to record a group of people with a single microphone, you'll want an omnidirectional mic.

The midrange-focused nature of the microphone means it picked up my voice quite well. There was some slight sibilance with "s" sounds, but you can solve this either with a pop filter or by speaking at a slight angle to the microphone to soften the treble.
Interestingly enough, while NZXT doesn't talk about using digital signal processing (DSP) in its preamp section, the sound has a processed feel to it. My test recordings sounded like I was running the microphone into a compressor to level out the sound, even though I was recording the microphone direct without any processing.
The Capsule Mini delivers a 24-bit/48kHz audio signal over the USB-C connection. This isn't exactly high-resolution audio, but it's the format most typically used for video, and that seems to be the focus of this microphone.
As is the case with the Mini Boom Arm, you'll find plenty of cheaper microphones for sale that offer similar audio quality and a similar feature set. At the same time, the vast majority of them will be much plainer looking, and there is nothing wrong with letting that factor into your decision.
NZXT Capsule Mini Microphone Audio Sample
Effective Onboard Monitoring
Onboard monitoring is important with USB microphones, as it makes it easier to hear what you're saying, as well as any game audio or audio from other sources. With the Capsule Mini, this is a simple, easy process thanks to the NZXT Cam app.
One of the most unexpected aspects of the NZXT Capsule Mini is just how powerful the onboard headphone amplifier is. My Sennheiser HD 650s are relatively power-hungry headphones, but the 3.5mm headphone jack on the Capsule Mini had no problem powering them. In many cases, I have to crank the volume for usable sound through the HD 650s, but that wasn't the case here.
It turns out that, especially if you have the NZXT Cam app installed to manage other settings, the single volume knob on the Capsule Mini is all you really need. It would be handy if the LED changed color to show if your levels are peaking and possibly distorting, but this is rare in budget-oriented USB microphones.
Should You Buy the NZXT Capsule Mini and Mini Boom Arm?
The NZXT Capsule Mini is a solid microphone for the price, a statement that is equally true for the NZXT Mini Boom Arm. Sure, the plastic build of the mic doesn't feel as tough as it could, but if the mic spends most of its time on the boom arm, this won't be an issue at all. The stand doesn't feel flimsy at all.
The only issue with these two products is the price. They're priced slightly higher than the competition while offering essentially the same results when it comes to audio quality. That said, most of the budget alternatives don't have the same sleek look as the NZXT designs, and if the mic will be on camera for hours at a time, the look matters.
If you're looking for the best bargain you can find to get started streaming or podcasting, you can save money by opting for other budget options. That said, while you may achieve the same results without the NZXT Capsule Mini and Mini Boom Arm, you likely won't look as cool while doing it.

NZXT Capsule Mini and Mini Boom Arm
- Great look
- Sturdy stand is great for quick recording
- Boom arm feels sturdy and is easily adjustable
- Quick and simple plug-and-play operation
- Good sound for the price
- Plastic body feels like a weak point
- Pricier than microphones with similar features