Quick Links
Windows 11 is famous for its strict hardware requirements. Those requirements require you to take some extra steps when you're setting up a Windows 11 virtual machine --- here are all the things you need to do to get it running.
Windows 11's Virtual Machine Requirements
Virtual Machines let you run an operating system --- like Windows 11 or Ubuntu --- without needing a different physical computer. You can create a virtual computer that runs on your existing PC. Virtual machines are extremely handy for testing out new operating systems, beta releases of operating systems, testing out software in a sandbox, or any number of other things.
You have to meet the regular Windows 11 hardware requirements in order to run a Windows 11 virtual machine, those are:
- 1 GHz Two-Core Central Processing Unit (CPU)
- 4 Gigabytes of Random Access Memory (RAM)
- 64 Gigabytes of Storage Space
- A 720p Display or better
- Trusted Platform Module (TPM) 2.0
- Secure Boot
- Windows 11 Installation Media
The CPU, RAM, storage, and display requirements are all pretty easily met on most modern computers. Even solid-state drives --- which are ideal for running virtual machines --- aren't all that much more expensive than conventional hard drives. The real problematic requirements tend to be TPM 2.0 and Secure Boot --- either (or both) will often prevent a Windows 11 virtual machine from being installed.
How to Install Windows 11 in a Virtual Machine
There are a few different ways to run Virtual Machines on Windows. The two most popular options are VMWare Workstation Player and Oracle VirtualBox. The user interfaces are entirely different, and they have slightly different requirements. You can use whichever you like --- it doesn't really matter here --- but don't install both unless you want to use both.
It is possible to use TPM within VMWare Workstation Player, and Oracle Virtualbox's 7th edition will support it too. However, we've just disabled it here since it is much easier.
If there is other virtualization software you like to use it'll probably work --- you'll just need to adapt these steps to your software.
Download Windows 11
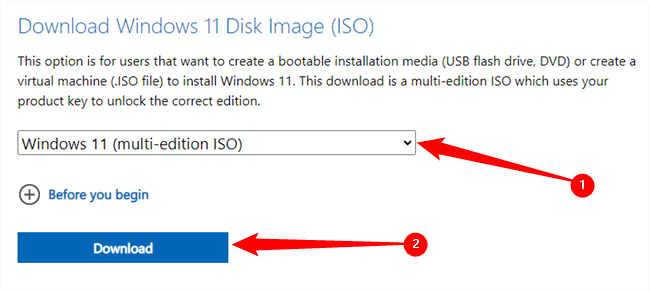
The first thing you need to do is download a Windows 11 ISO. Select "Windows 11 (multi-edition ISO) from the dropdown box, then click "Download."
Start this download as soon as you can. The Windows 11 executable is about five gigabytes, and unless you have gigabit internet, it'll take at least a few minutes to download.
Make sure you know where the Windows ISO was saved when you downloaded it. You'll need that location later.
Install Windows 11 in VirtualBox
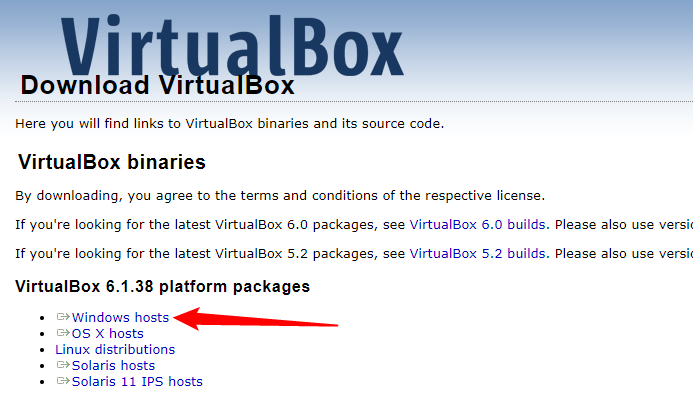
If you'd like to use VirtualBox, download the latest version of VirtualBox from its website and install it. At the time of writing, that is version 6.1, but be sure to keep an eye out for version 7 if that is available.
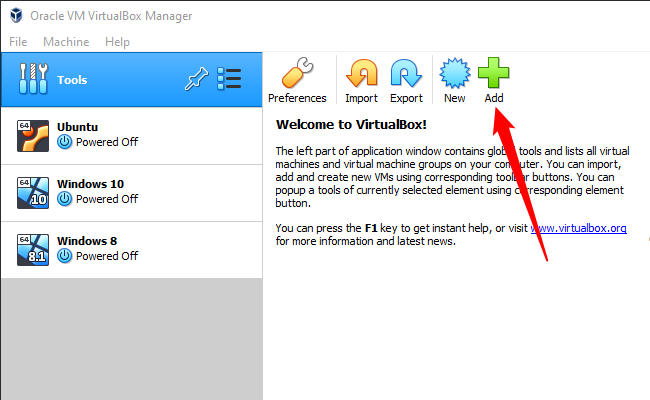
Launch VirtualBox after it is installed, click on "Tools," then click the "Add" button.
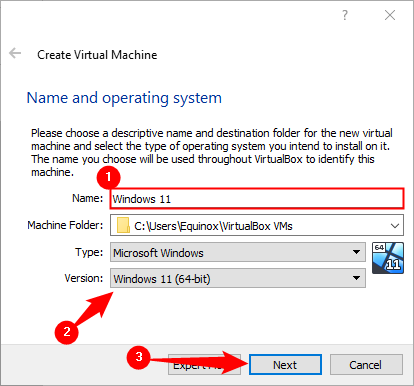
Name the virtual machine something reasonable and descriptive so you can recognize it in the future. Also, ensure that the OS version is set to "Windows 11," then click "Next."
You can put the Machine Folder anywhere you want, but try to put it on an SSD. Running a virtual machine on a conventional hard drive is extremely slow by comparison.
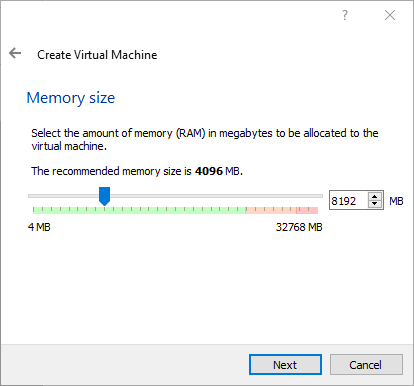
Windows 11 only technically requires four gigabytes of RAM, but if you can spare eight gigabytes it could help.
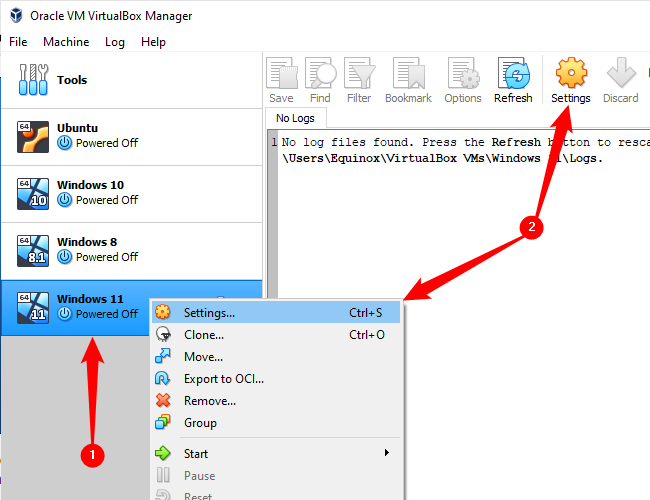
Click next repeatedly through the rest of the settings. The default options should be fine for general use. After configuring the virtual machine, select your Windows 11 (VM) from the list, right-click it, and then select "Settings." You could also select the VM and click "Settings" in the menu bar at the top.
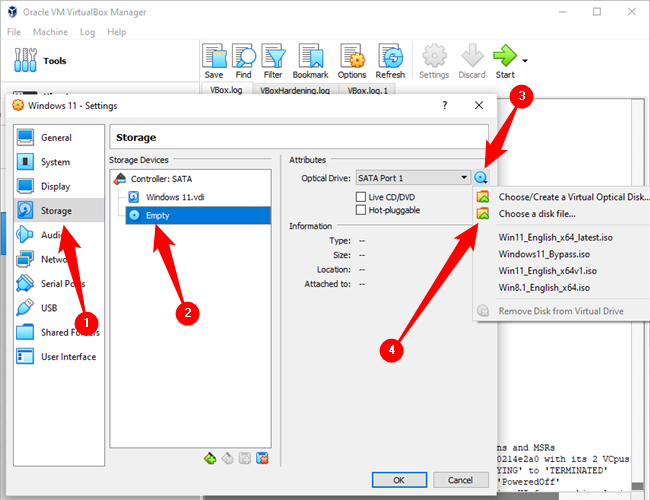
Click on the "Storage" tab. Select the "Empty" SATA device, click the small disc icon near the right-hand side, then select "Choose A Disk File." Navigate to the Windows 11 ISO that you downloaded and select it.
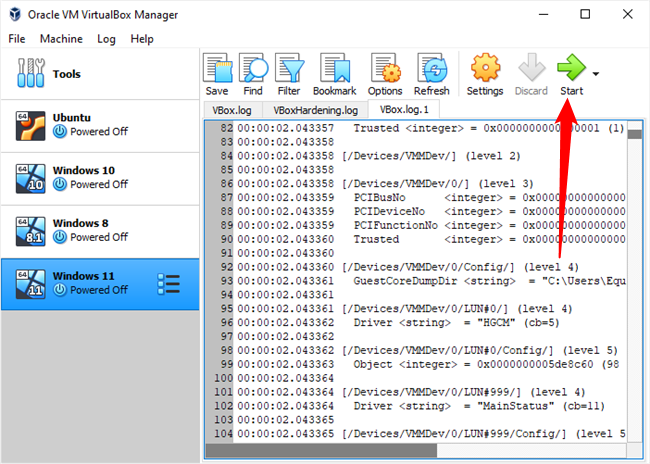
Click "OK" to close the Settings window, then click the big green "Start" button.
You'll see a black screen with "Press any key to boot from CD or DVD....." The Windows ISO we selected earlier is currently mounted in a virtual DVD drive. When you press any key, you're telling your virtual machine to boot from the virtual DVD drive.
Go down to the section titled "Disabling TPM 2.0 and Secure Boot" once you see the familiar Windows logo.
Install Windows 11 in VMWare Workstation Player
The second option you can choose is VMWare Workstation Player. It's the other major hypervisor that is popular for everyday applications. Download it from VMWare's website and install it.
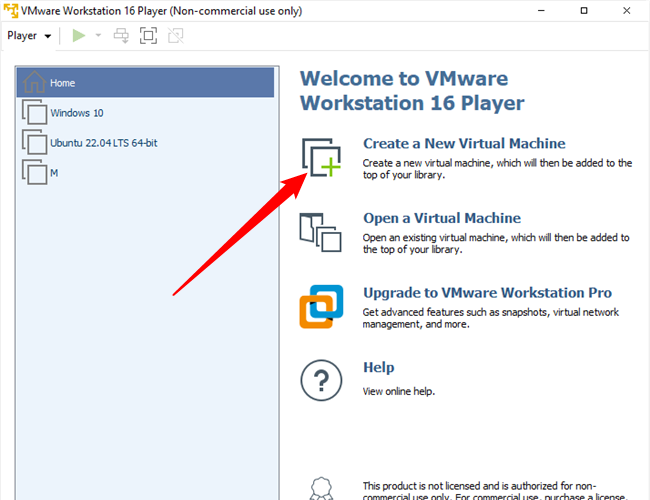
Launch VMWare Workstation Player, then click "Create New Virtual Machine."
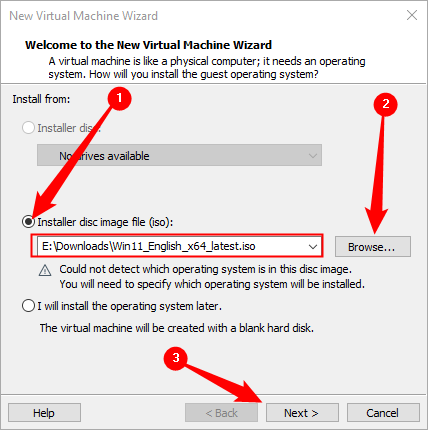
The first thing you need to do is select the Windows 11 ISO that you downloaded earlier for the installer image. Select the "Installer Disc Image File" option, then click "Browse" to locate your ISO. Once you've done that, click "Next."
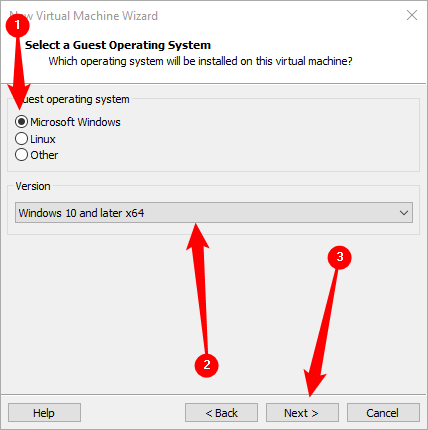
VMWare Virtualbox Player probably won't detect that it is a Windows ISO; change the operating system type to "Microsoft Windows" and set the version to "Windows 10 and Later x64."
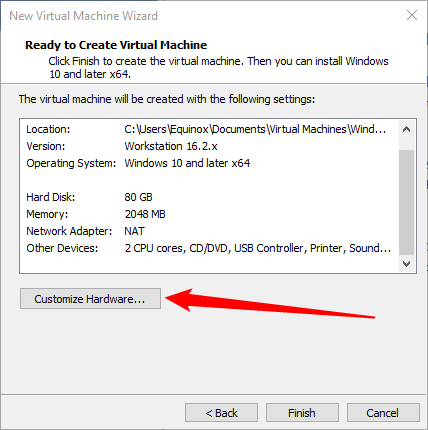
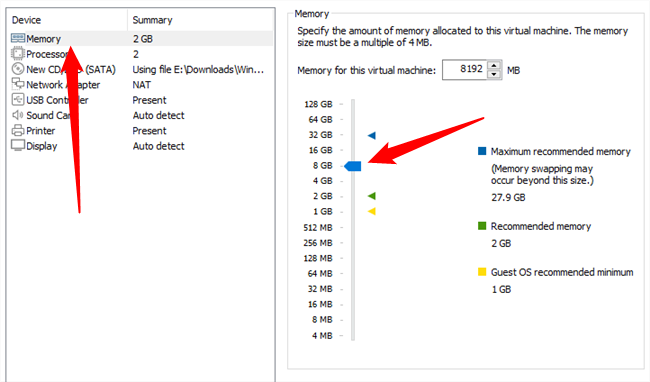
Name the virtual machine whatever you want and set the virtual drive to be at least 64 gigabytes. Stop at the "Ready to Create Virtual Machine" window. You must add additional RAM to the virtual machine, or Windows 11 will not function correctly. Click "Customize Hardware."
You need to assign a bare minimum of 4 gigabytes of RAM, though if you can spare 8, you should do that instead.
Click "Close" on the customization window, then click "Finish." Your virtual machine will boot immediately, and you'll see "Press Any Key to Boot from a CD or DVD." Hit any key as instructed, and you'll be greeted with the familiar Windows installation screen.
Disabling TPM 2.0 and Secure Boot
There are two small tweaks we need to apply before the installation will work correctly. Windows 11 requires TPM 2.0 --- by default, neither VMWare Workstation Player nor Oracle VirtualBox will meet that requirement, so it must be disabled. Additionally, VirtualBox doesn't support Secure Boot, so that'll need to be disabled as well.
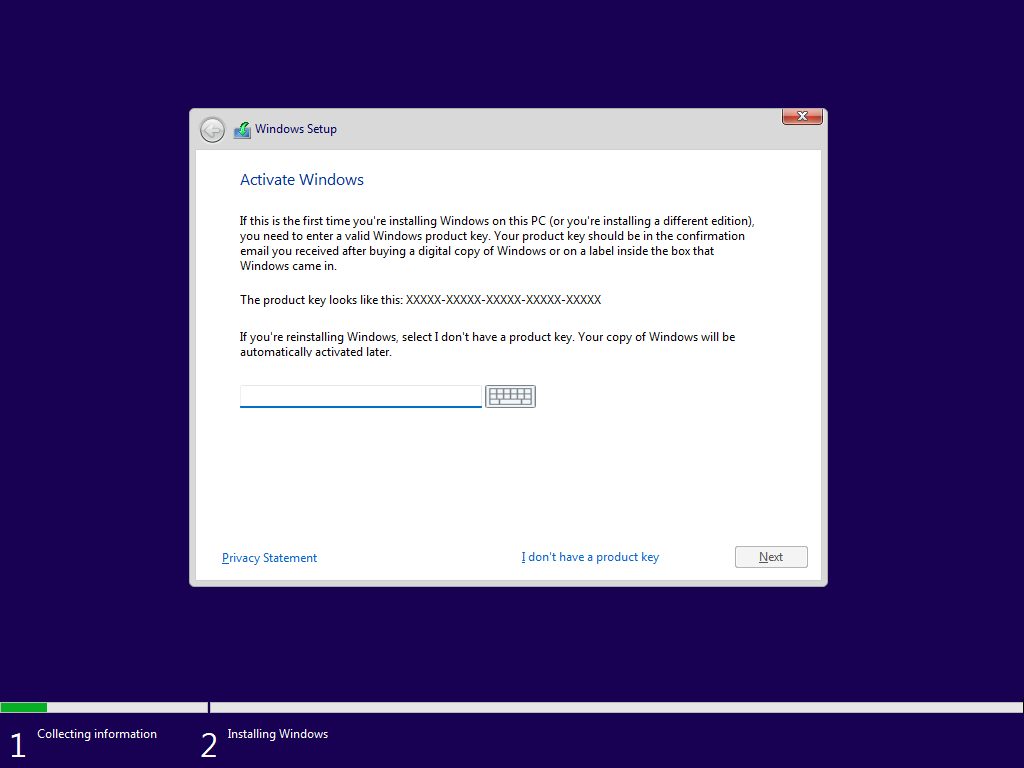
Click through the first few pages until you reach this window:
Hit Shift+F10 to open up Command Prompt, type "regedit" into the prompt, and then hit Enter.
This is the exact same Registry Editor that comes with all Windows installations. It lets you modify most of the options available the Windows operating system. In this case, we're going to use it to disable the TPM 2.0 and Secure Boot requirements. Normally you need to be extremely careful editing the Registry since a changed value or deleted key can cause serious issues. However, since this is a virtual machine that hasn't even been installed yet, you don't have to worry so much --- in the worst-case scenario, you just restart your VM before you install Windows, and all the changes you've made will be undone.
Navigate to
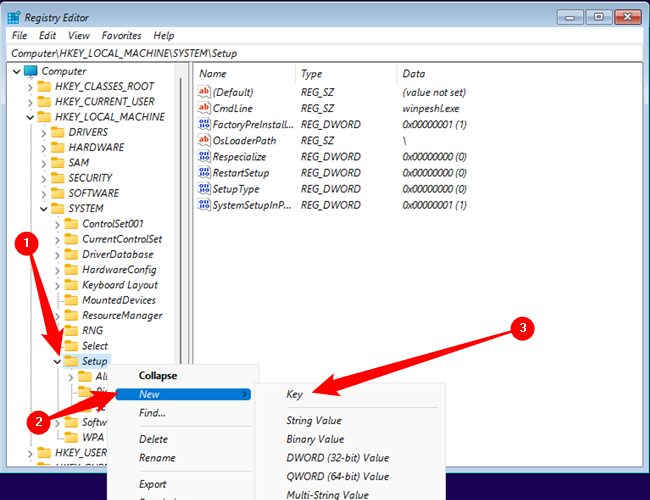
HKEY_LOCAL_MACHINE\SYSTEM\Setup
, then right-click "Setup," mouse over "New," and click "Key." The new registry key must be named "LabConfig" --- it isn't case sensitive but using mixed cases can help readability.
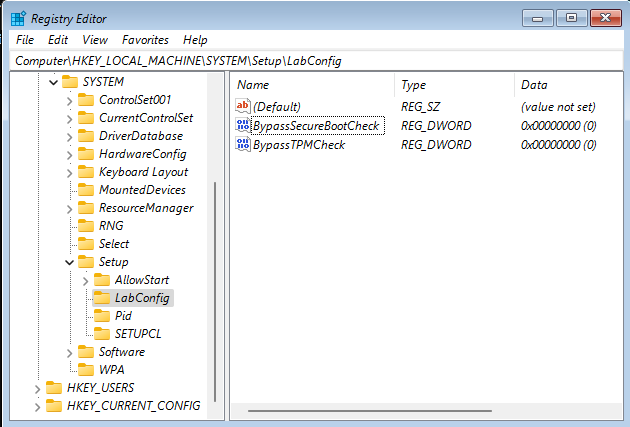
We need to create two DWORD (32-bit) values within the LabConfig key. Select the "LabConfig" key, right-click empty space in the right-hand pane, then click New > DWORD (32-bit) Value. Name one DWORD:
BypassTPMCheck
and name the other:
BypassSecureBootCheck
If you've done everything correctly you should have two DWORDs that look like this:
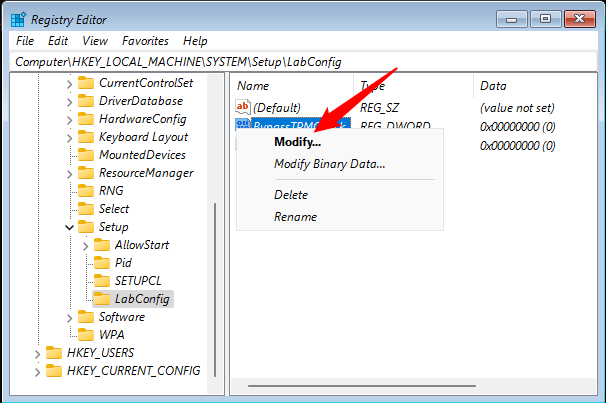
The value must be changed from 0 to 1. Right-click "BypassTPMCheck" and click "Modify."
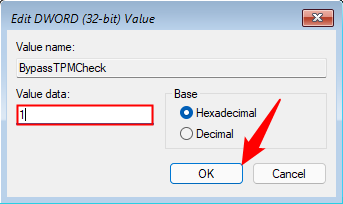
Set the "Value Data" to 1 and hit "OK."
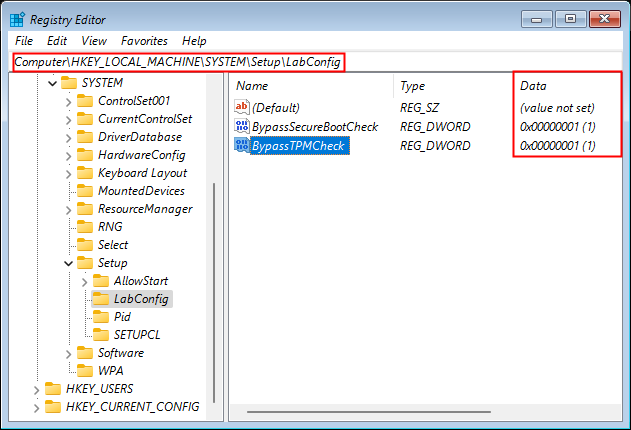
Repeat the exact same process with the "BypassSecureBootCheck" DWORD. When everything is done you should see two DWORDs in the LabConfig Key, and both should have a value of 1.
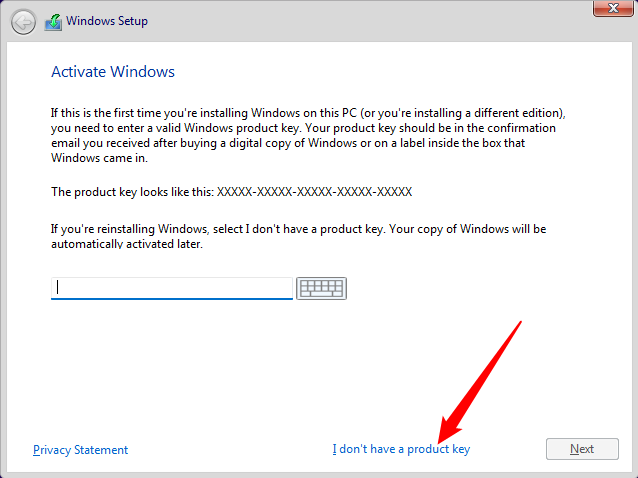
That's it --- you're done and ready to install Windows 11. Hit the "X" in the top right corner of the Registry Editor and the Command Prompt, then click "I don't have a product key."
You can also enter a product key if you have one to use. Windows 11 will eventually start complaining that Windows needs to be activated if you don't use a key, however. Whether or not that is a problem depends on what you're using the virtual machine for.
All you need to do now is click through the normal Windows 11 installation prompts and wait for everything to install.

