Quick Links
Google Docs is useful for more than just words. You can insert tables to structure data and embed drawings for helpful visuals. So, if you want to add an image, you should know how to crop, rotate, and adjust it.
The nice thing about using Google Docs' image editing features is that you can make the changes you need right within your document. This saves you from opening an external image editor. Plus, you can adjust the photo or picture so that it fits your document the exact way you want.
Crop an Image in Google Docs
You might be used to opening the Image Options sidebar in Google Docs to adjust an image. But the Crop tool doesn't currently reside in those settings.
Select the image and click "Crop Image" in the top toolbar or right-click the image and select "Crop Image" from the shortcut menu.

When the border displays around the image, drag it to surround the part of the image you want to keep. As you do this, you'll see the portion of the image that will be removed dimmer than the rest. This lets you retain the precise part of the image you want.
When you have the image the way you want, press Enter or Return, or click another spot in your document. You'll then see your cropped image.
If you want to return your image to its original state in your document, you don't have to press the Undo button over and over. Instead, select the image and click the Reset Image button in the top toolbar.
Rotate an Image in Google Docs
The rotation feature does reside in the Image Options. You can open this sidebar by selecting the image and clicking "Image Options" in the top toolbar. Then, expand Size & Rotation.
Alternatively, go directly to the setting by clicking the three dots in the floating toolbar below the image and choosing "Size & Rotation."
You then have four ways to rotate your image.
Flip the image 90 degrees using the 90-degree button. You can click the button multiple times to continue flipping the image if necessary.
You can also enter an exact number of degrees in the Angle box. This is a quick way to turn an image if you know just the right angle you need.
Increase or decrease the number of degrees by small increments using the arrows. For tiny adjustments to the rotation angle, just use the up and down arrows to the right of the Angle box.
To freely rotate without the Rotation settings, drag the handle at the top of the image right or left to turn it. As you do, you'll see the angle for the number of degrees.
You can also use a combination of all the above rotation options if you like.
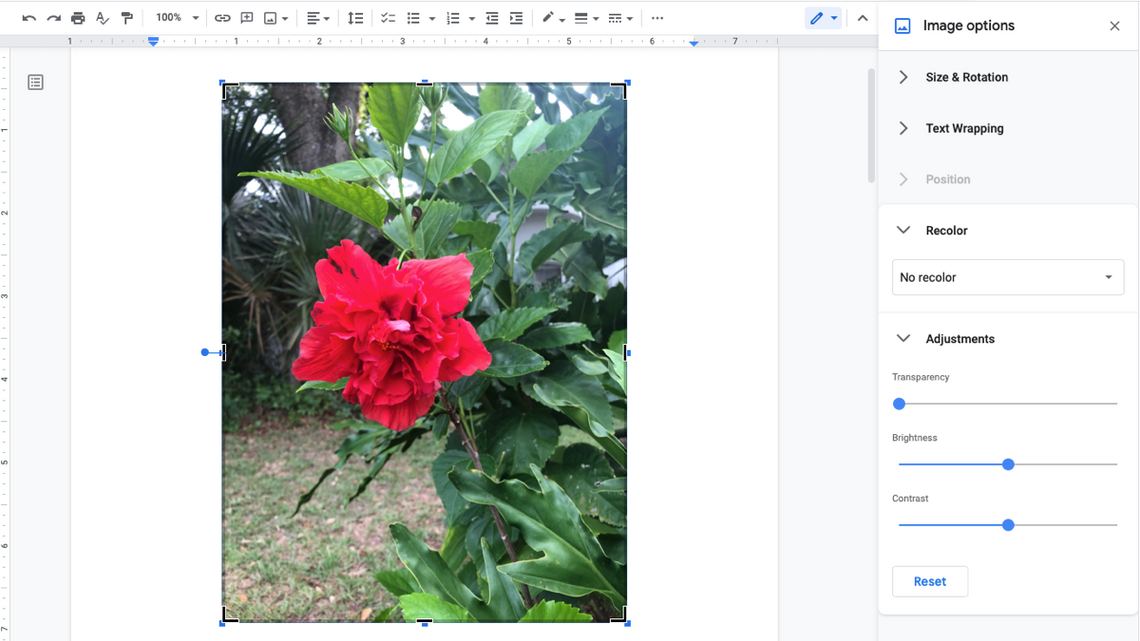
Adjust the Contrast, Color, and Brightness of an Image
Another way to edit your image in Google Docs is to make adjustments to the contrast, brightness, transparency, and color scheme.
If you closed the sidebar, click "Image Options" in the top toolbar or "All Image Options" using the three dots in the floating toolbar. Then, check out the adjustments below.
Recolor: Expand the Recolor section of the sidebar and use the drop-down list to change the color scheme. You can pick from options like light or dark colors, grayscale, negative, and sepia.
Adjustments: Expand the Adjustments section to change the transparency, brightness, or contrast. Simply use the sliders to make your adjustments. If you change your mind, click "Reset" to return the image to its original settings.
The image editing tools in Google Docs aren't intended for robust editing like Adobe Photoshop. But they do give you the basics you need for simple changes to your photo or picture.
For additional help with images in Google Docs, take a look at how to add captions, move images, or how to position images within your text.