Quick Links
An easy way to share your computer is to use a dedicated guest account. They can have their own space without access to your personal stuff. We'll show you how to create a guest account in Windows 11.
Unfortunately, it's not as easy as it once was to create a guest account in Windows. There are two ways we can get around this. Both methods will create password-free local accounts that anyone can use. We'll show you each method works.
What Is a "Guest Account" in Windows 11?
Guest accounts in Windows have changed a lot over the years. Windows 7 and Windows 8 made it easy to create dedicated "Guest" accounts. These accounts had limited access to your computer. For example, guest accounts couldn't install software or change system settings.
Starting with Windows 10, Microsoft hid the guest account feature. Microsoft still reserves the "Guest" name for guest accounts, but it's not possible to create the same type of guest accounts that were available pre-Windows 10.
Windows 11 is the same as Windows 10 before it. The "real" guest account feature is not easily accessible. Instead, we'll be creating a local account that doesn't require a password. This will still be a place where guests can go, but it doesn't have the same limitations. They can install software and adjust settings, but it won't affect your profile.
Create a "Guest" Account Through Settings
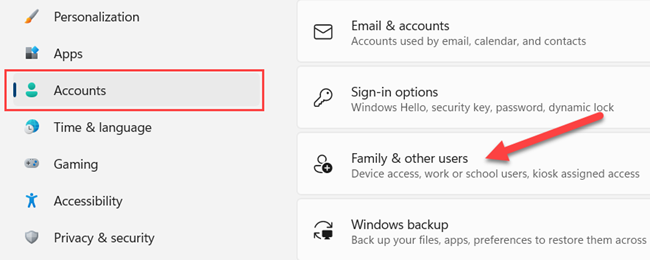
First, open the Settings app on your Windows 11 device and navigate to the Accounts > Family & Other Users.
Under the "Other Users" section, click "Add Account."
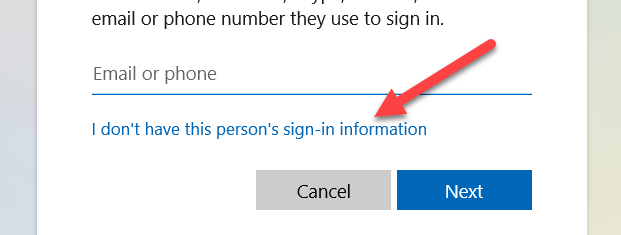
Windows is going to want you to sign in with a Microsoft account. Click "I don't have this person's sign-in information" instead.
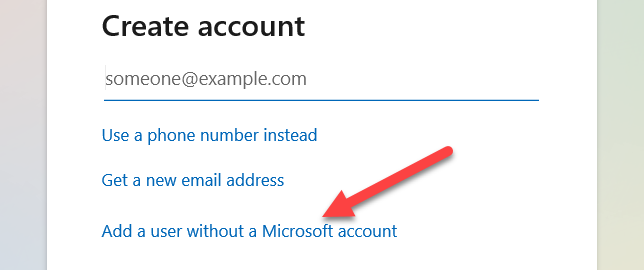
Next, select "Add a user without a Microsoft account."
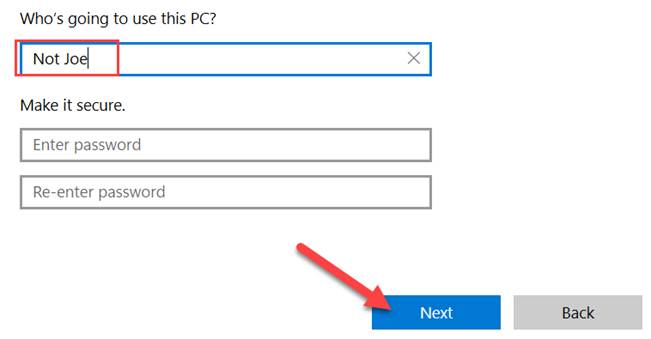
Now enter the name for the guest account. It can't actually be "Guest" but anything else will work. Leave the password fields empty and click "Next."
That's it! The account will now appear alongside the other accounts and it won't require a password to sign in.
Create Guest Account Through Command Line
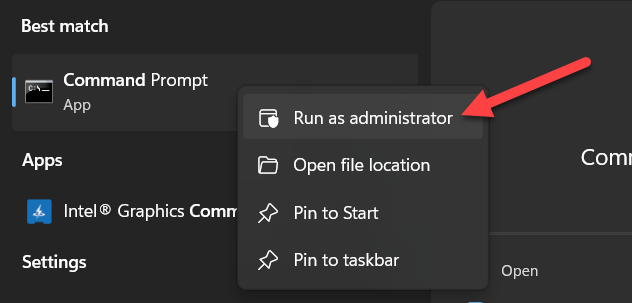
This method is a little more technical but requires fewer steps. To begin, find "Command Prompt" in the Start Menu and right-click to run it as an administrator.
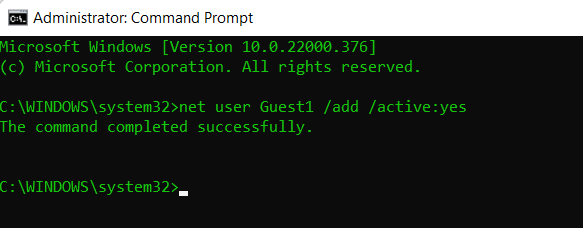
Type this command and hit Enter:
net user Guest1 /add /active:yes
You can replace "Guest1" with any other name, but you can't use "Guest."
That's it! It will say "The command completed successfully" and you'll see the account listed under Settings > Accounts > Family & Other Users > Other Users.
It's strange that Microsoft removed the ability to create real guest accounts. True guest accounts had better restrictions, but if you just want to let someone use your Windows 11 PC without being able to mess with your stuff, this does the trick.


