The Event Viewer allows you to diagnose system and application problems in Windows. It has been enhanced in Windows 7; however, it still does not provide much information about the events in the interface.
You can find out more information about an event by looking up its Event ID in a database containing a list of Event IDs and their descriptions. When using the default Windows Event Viewer, you would have to search for the Event ID on the internet to try to find more information about it.
We found a tool that is free for personal use, called Event Log Explorer, that is a replacement for the default Windows Event Viewer. It displays the same amount of information as the Event Viewer, but it provides a quick and easy method for looking up Event IDs on the internet. A simple right-click on an event allows you to look up the Event ID in the EventID.Net database or the Microsoft Knowledge Base.
To install Event Log Explorer, extract the .zip file and double-click the .exe file. Follow the instructions in the setup wizard.
If you didn't choose to launch Event Log Explorer at the end of the setup wizard, start the program from the desktop or the start menu.
If the User Account Control dialog box displays, click Yes to continue.
NOTE: You may not see this dialog box, depending on your User Account Control settings.

A dialog box displays saying you are running in evaluation mode. The evaluation expires 30 days after you install it; however, you can get a free license key. Click the Get FREE License Now link.

A web page opens in your default browser. Fill out the form to receive your free license key. Once you see a web page containing the seven-line key, select the seven lines between, but not including, the BEGIN KEY and END KEY lines and copy them.
To enter the license key before starting the program, go back to the Event Log Explorer dialog box. Select the Enter license key radio button and click OK.

On the Registration Key dialog box, paste the copied key into the edit box and click OK.

The following dialog box displays, even if the program is not open. Click OK to close it.

If you didn't select to enter the license key before starting the program, you can do so within the program by selecting Enter registration key from the Help menu.

When Event Log Explorer opens, click the plus sign next to the item in the Computer Tree to expand the list.

There are two methods for viewing multiple event logs, tabs and multiple document interface (MDI). To change the view, select Preferences from the File menu.

On the Preferences dialog box, make sure General is selected in the tree on the left. Select Multiple document interface or Tabbed document interface in the User interface box. Click OK to save your changes.

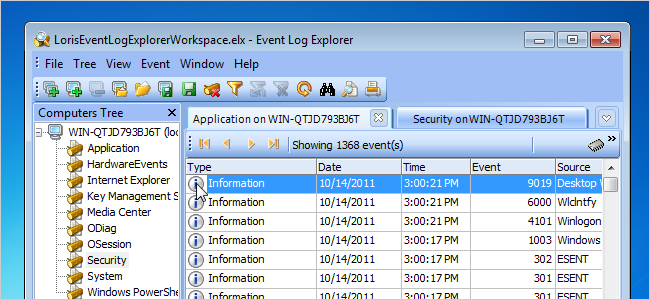
The Multiple document interface looks like the following image. Each document is a separate window within the application.

You can also choose whether to open a log by single-clicking or double-clicking on it by selecting an option on the General screen on the Preferences dialog box.

One of the most useful features of Event Log Explorer that makes it more useful than the default Windows Event Log Viewer is the ability to easily look up event IDs in two different databases online. To do this, right-click on an event in the right pane and select Lookup in Knowledge Bases from the popup menu. Two options display on a submenu. Select an option depending on whether you want to look up the event ID in the EventID.Net database or the Microsoft Knowledge Base.

For example, the following image shows Event ID 1000 displayed on the EventID.Net website.

You can also filter the logs. To do this, click Filter on the toolbar.
NOTE: You can also select Filter from the View menu or press Ctrl + L.

Use the Filter dialog box to specify which logs to apply the filter to and to select and enter your filter criteria. Click OK to accept your changes and view your filtered list on the Event Log Explorer main window.

You can also backup event logs. To do this, select Save Log As | Save Event Log from the File menu. Enter a name for the backup file and select .evt or evtx as the file type. Use .evt for event log backup files you want to be able to open in Windows XP or earlier. The .evtx extension applies to event log backup files to be opened in Windows 7 or Vista.

If you want to view event log information outside of the Event Log Explorer, you can export logs as other formats. To export the currently open log, select Export Log from the File menu.

The Export Log dialog box displays. Select the format for the exported log file from the Export to box and whether you want to export all or just selected events from the Export scope box. You can also specify to export event descriptions and data, if desired. To automatically close the Export Log dialog box when the export is finished, select the Close this dialog when export is done. Click Export to start the exporting process.

If you want to view event logs from other computers accessible from your current computer, click Add Computer on the toolbar.
NOTE: You can also select Add Computer from the Tree menu.

Select the Another computer option and use the ... button to select a computer in your network. Enter a description, select a group, and click OK to connect to the computer.

To change properties for the currently selected event log, select Log Properties from the File menu.
NOTE: You can also right-click on an event log in the tree on the left and select Properties from the popup menu.

The Log Properties dialog box displays. The event log that these properties apply to displays on the title bar of the dialog box.
We have previously discussed how to change the maximum size for logs. You can do the same thing in Event Log Explorer. Enter a size in the Maximum log size edit box or use the arrows to select a size. The same three options are available for what to do when the maximum log size is reached. However, there is one extra option. You can have Event Log Explorer backup the log automatically when the maximum size is reached. For more information about automatically backing up log files, click the More info link to open the corresponding help topic. The help file describes where the files are saved and the file naming convention used.
NOTE: Make sure you don't let too many backed up log files collect too long, as they will take up a lot of space on your computer's hard drive over time. Monitor the files and move them to another drive or delete them from time to time.

To close Event Log Explorer, select Exit from the File menu to close Event Log Explorer. The following dialog box displays making sure you really want to quit. If you don't want to see this dialog box every time you close Event Log Explorer, select the Don't ask me again check box. Click Yes to continue closing the program.

Event Log Explorer saves your workspace to a file so when you open the program the next time, the same tabs (or documents) open and other settings you have changed remain the same. If you made changes to the current workspace in Event Log Explorer, the following dialog box displays. If you haven't saved your workspace yet, the file name is listed as Untitled.ELX. If you want to save your workspace changes, click Yes.
Again, the Don't ask me again option is available. If you select that option for saving changes to your workspace, any changes you make while in Event Log Explorer next time are automatically saved.

If you selected to save your workspace changes, and this is the first time saving your workspace, the Save Workspace As dialog box displays. Navigate to a location where you want to save your workspace settings, enter a name for your workspace in the File name edit box, and click Save. You can have multiple workspaces in Event Log Explorer.

Event Log Explorer is a useful tool to add to your software toolbox. The only limitation of the free version is that it does not allow you to connect to more than three computers. If that is not a problem for you, it should fulfill your needs.
Download Event Log Explorer from http://www.eventlogxp.com/.