So you've just unpacked that spiffy new monitor, and it sits fresh and new on your desk putting your other little displays to shame. Now you have to give it some sartorial splendor: a kick-ass wallpaper from the online repository of your choice. But now comes the conundrum---what if you want to use different images on different screens?
Unfortunately, Windows 7's default wallpaper handler is pretty primitive for multiple displays. (Windows 8 and 10 are much better, so check out these instructions if you're using a later version of Windows.) In Windows 7, you have two options for using different wallpapers: you can create your own combined image, using your favorite image editor, or you can use a third-party tool like DisplayFusion or UltraMon.
First, we'll look at the manual way to make your own multi-monitor wallpaper. If you want something a bit more automated (that requires extra software), or you want to rotate through many wallpapers on your two monitors, skip to the end, where we'll discuss third-party options.
The Manual Method: Grab an Image Editor
In order to show a different wallpaper on each monitor, you need to trick Windows and merge your two wallpapers into one big image file. To do this, you'll need some kind of image editor. Paint, Microsoft's pack-in tool for Windows, isn't really complex enough to handle the task; you'll want something like GIMP, Paint.NET, Photoshop, Photoshop Elements, or Corel Paintshop Pro.
Step One: Arrange Your Monitors
Windows treats all the monitors on your desktop as one combined space, at least in terms of the wallpaper. You can adjust the position and spacing of the monitors' virtual location on the Display Settings screen.
To do this, right-click an empty area on your desktop and click "Screen resolution." You'll be greeted with something like the following screen.

Here, you can see the relative position of the monitors in the virtual space of the desktop. My setup uses two monitors, with one being slightly higher resolution than the other. You can move the monitors around to make them match your desk's setup. The wallpaper will "stop" at any edges that extend past the usable space. For example, here's how it looks with the secondary monitor on the lower-right side:

And here's the same setup with the secondary monitor on the upper-left side:

Note how the "empty" space appears wherever the larger monitor extends past the smaller one. This space isn't accessible in Windows itself---you can't move your mouse cursor or applications there---but it's important to think about it for the purpose of managing the wallpaper.
Set up your monitors however you'd like on this screen, then click "Apply." It's possible to arrange them in vertical rows or horizontal columns, anchored at the corners or "floating" on the sides for more precision. For the purposes on this guide, just stick to the corners as above; it'll be simpler.
Step Two: Find Some Images
You can choose more or less any image you want for your wallpaper, but you generally want the image to match the native resolution of your monitor. Of course, You can always resize or crop a large wallpaper with your image editor to get it to match your monitor's size. We just don't recommend choosing a wallpaper smaller than the monitor it will go on. If you need to resize or crop, do that now.
For our example, I've chosen two images from Interfacelift.com: one 2560x1440 image to match my larger monitor and one 1920x1200 image to match my smaller one.

Once you have both images at the right resolution, continue to the next step.
Step Three: Create a Custom Image
Now things get tricky. Open your image editor of choice. We're going to use Photoshop as our example, but if you're more comfortable with something else, you should be able to match these instructions to most similar programs.
Create a new blank image the size of your total desktop resolution. For a standard side-by-side setup, that's the width of both monitors put together times the height of the biggest monitor---in my case, 4480 (2560 + 1920) x 1440 pixels.

Now open the two images you downloaded in the section above as separate images.

Copy and paste the images from their own windows into your custom workspace, and arrange them in the same way that your monitors were arranged in step one. In my case, I'll put the smaller image in the upper-left corner and the larger image filling the remaining space on the right.

Note how the "blank" space in my Photoshop work area matches the "blank" space from the desktop resolution screen. Your two images should be ideally sized, but make sure there aren't any remaining pixels on any edges.
Save the image file as a JPG (for a smaller size) or a PNG (for better quality) in any folder you like.
Step Four: Enable Your New Wallpaper
You're almost there! It's time to set your new image as your wallpaper. Right-click an empty area of the desktop and click "Personalize." Click "Desktop Background" at the bottom of the window.
Click "Browse." Select the folder you saved the image to in step three. Click the specific image if there are more than one in the folder.

Here, you'll see that in addition to selecting a specific background image, you can select how it's applied. We have a lot of options here, but for applying different images to different monitors, what we want is "Tile." (There are other ways to do this, but "Tile" is typically the easiest for multiple disparate setups.)

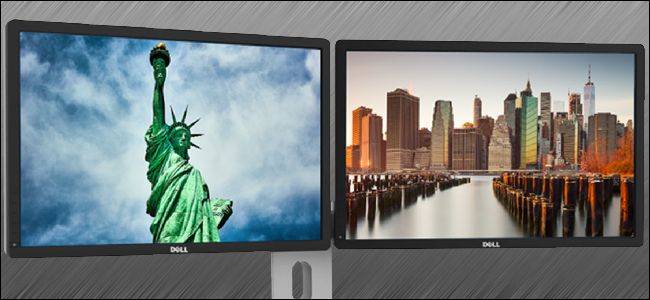
Below is the newly-made combined wallpaper applied to my multi-monitor desktop. You can see that the single combined image spans perfectly across both monitors. Close it up, you're done...but you might want to keep a copy of your original images, in case you ever change your monitor setup and need to create a new customized multiple-monitor image.

The Automated Method: Use a Third-Party Tool
The above process isn't exactly intuitive---Windows has had the same generally poor attitude towards multiple-monitor wallpaper for a long time now. If you're uncomfortable with the steps above, or you just don't want to use an image editor, there are a few third-party tools that make it much easier.

Here are a few we recommend:
- UltraMon: my personal favorite, because it sounds like a Digimon. It offered taskbars on multiple monitors, which isn't available in Windows 7 by default. The software includes easy options to select individual images for specific monitors, or span a single large image across them. It costs $39.95.
- DisplayFusion: very similar to UltraMon, with a few added features like a mobile remote control. It's a bit cheaper, too, at $25. It's also available with packaged programs from Binary Fortress.
- Dual Monitor Tools: a freeware program that includes a dual wallpaper manager.
- MultiWall: another freeware program that also has a "crawler" for downloading and applying wallpaper from certain websites.
If you enjoy frequently switching things up, keep a folder full of high-resolution wallpapers for use with one of these tools. Several of them even allow you yo cycle through images on a timer.
Image Credits: Oliver Buettner/InterfaceLift, Davidvash/InterfaceLift