Quick Links
If you cut out a lot of objects from photographs, chances are you’ve run across a few rough, ugly looking edges. They can be easy fixes, and here’s three great (GIMP friendly) tips to help in three different scenarios.
We’ve covered lots of ways to remove the background from images, but given the right situation, the easiest way will be using “fill” tools like the Bucket Fill, Magic Wand, or Magic Eraser. Using tools like these to create transparent GIFs, PNGs, or just to simply swap out backgrounds can give horrible edges that look really obvious and can ruin the hard work you’re putting into your image. Here’s how to get the right look and make sure your image looks great on any background.
Using Proper Fill Settings


|

|
Let's start with some basics. First we’re going to assume you’re using one of the “fill” methods to remove your background, and not one of the many other ways we’ve covered, including using the eraser, layer masks, and the pen tool. The paint bucket, magic wand, and magic eraser all have various settings that can make them better or worse, depending on the situation. "Anti-Alias" and "Tolerance" are the key players here.
As we learned last month, Anti-aliasing is the naturalistic softening of images. In this case, using it with the paint bucket, wand, or magic eraser will give you a smoother edge in most circumstances.
Tolerance adjusts how sensitive the fills are. These three tools all work by filling or selecting colors approximately like the ones you click on, and this adjusts the precision of that fill. Lower numbers are very precise, while higher numbers will fill, select, or delete colors that are less similar to the color you clicked on.
The difference is pretty obvious; the left image uses a Tolerance of 5 and no anti-aliasing, while the right uses a tolerance of 40 with anti-aliasing. Simply using the right settings will help you isolate your objects better, if not perfectly.
Removing Fuzzy Objects From The Background

One of the flagship features of Photoshop CS5 is the tools for refining masks with "Smart Radiuses," to help mask objects accurately and quickly. Some objects, like this butterfly, have soft edges, and are notoriously hard to cut out.

Let's take a quick look at the tool for editing masks, and see how we can improve the selection and keep those fuzzy edges.

To start, we'll keep things rough. This mask obviously is doing a horrible job of actually cutting out this butterfly.


Here's our layers panel with our mask. This was done with the paint bucket, and simply gives horrid results. We can refine our results with the Mask Panel and "Mask Edge" but it's a little bit like getting blood from a stone.

The computer struggles to mask out the proper parts of the butterfly and properly isolate the object. While the Edge Detection in Photoshop can be very useful, it's not a magic, one-size fits all solution. You can safely ignore using the “Refine Mask” tool in the Mask Panel if your results are as poor as this one. For our demonstration purposes, we’re going to use it and show you how we can successfully get a good image out of this bad mask.


There is a handy trick to take a rough selection like this one and turn it into a convincing fuzzy-edged object. You'll want to find the smudge tool buried in your toolbox. Click and hold down the Blur Tool until you can switch to the Smudge Tool.
There are a lot of settings, and you may have to experiment with the ones that suit you best, but the most important is the "Strength" of the Smudge Tool. You may need significantly less than 100% if you're using the mouse--if you're using a pressure sensitive tablet, you'll be able to control the strength much more accurately, and will likely want a high setting.

Here's the butterfly isolated into its own layer. The mask has been "Applied" so that the layer is rendered this way, so that we can make changes to the edges.You won't be able to smudge the edges this way unless the Layer Mask has been applied. Save yourself the frustration and make sure you do this!

Simply click and drag to smudge and paint a fuzzy edge, recreating the softness of the butterfly, without all the ugly white pixels.

If you do this around all of the edges that need to be fuzzy and soft, you'll get a very convincing cutout of the object that will look good on all colors and backgrounds. It may not be exactly the way the original image looked, but it does look similar effects in a fraction of the time it would take to properly use channels to remove the image.
Quickly Compensating for Rough, White Edges

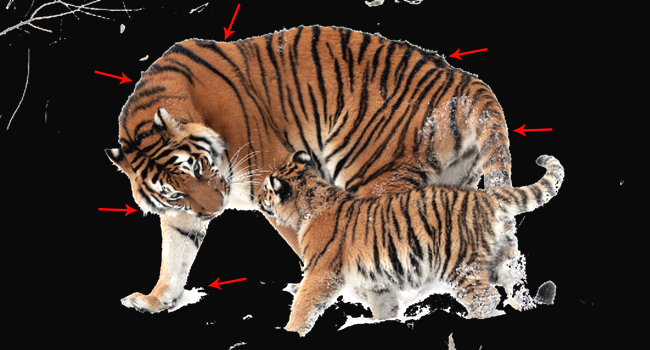
One of the toughest challenges is taking an object that was photographed on a white background and putting it seamlessly on a dark one. Let's take a look at some tricks to do just that.

The magic wand was used here to delete the white background, and then the layer with the tigers was put on top of a solid black background to test the edges. Yikes.

Depending on the situation and how simple the object is, setting a "Blending Option" can hide a lot of these ugly edges. Right click your layer (in this case, the layer with the tigers) to pick "Blending Options."

This is the effect you want: "Inner Glow." Click the check-box to turn it on, then we'll make adjustments to use it properly.


You can use either "Blend Mode" of Normal or Darken to do this properly. The basic idea is to use a color in the image itself, and use the "Inner Glow to darken or mask out the white pixel border, making it more invisible.

This can work for simple objects. These tigers are improved by this layer effect, but aren't perfect--note how the white leg is turning orange-brown in inappropriate areas. If your object doesn't have trouble spots like this, you can simply stop here. But, for this how to, we'll undo our Inner Glow effect and try something slightly different.

We’ll start over again by reverting back to our roughly cut out tigers. We'll create a layer and selectively paint in color to improve those edges on the dark background.


We create a layer (Ctrl + Shift+ N) on top of our cut out tiger, then set that layer to a Clipping Mask for the tiger layer. You can do this by going to Layer > Create Clipping Mask. Then set your Blending Mode (shown on the right) to "Darken" for best results.

We grab the eyedropper tool to pick a color from within the artwork.

Then paint over the edges that look too white and obviously out of place. Use darker colors to paint if necessary, particularly if you're intending your image to be on a dark background.

Use the eyedropper to grab lighter colors when you're working on areas that need to look lighter--use your own discretion on what looks better.

While many will defend the Pen Tool (to the death, even) as the perfect way to remove objects, the fact remains that a combination of the Wand, Bucket Fill, or Magic Eraser are the most user friendly way to remove a background. And when using those tools, you can almost be certain to have to use the eraser or paint brush to clean up ugly mess like this from your edges. This can give you an opportunity to further improve those edges by using a soft brush to delete out the worst, most jaggy parts of them. See below.

With the combination of these techniques, you can remove the background from your image fairly quickly, and get a nice result as well.
Got questions about the techniques, or have your own methods you care to share? Tell us about them in the comments, or send them to ericgoodnight@howtogeek.com.
Image Credits: Darter Anhinga Melanogaster by Fir002, available under GNU license. Graphium Macleayanus by JJ Harrison, available under GNU License. Panthera Tigris at the Buffalo Zoo by Dave Pape, in public domain.