Keeping your data safe by performing regular backups is important. However, how many of us actually remember to stop what we're doing and back up our data manually? An easy-to-use, automatic backup solution would solve that problem.
Create Synchronicity is a free backup and synchronization tool that allows you to manually or automatically keep your data backed up. You can use it to copy almost any type of file, including documents, pictures, videos, and music, to any USB flash drive, external drive, or even a connected network drive.
See the link at the bottom of the article to download Create Synchronicity. You can download an installer or a .zip file containing the program in a portable format that needs no installation.
We downloaded the portable .zip file. To run this, simply extract the files from the .zip file and double-click the .exe file. If you would rather install the program, download the installer and follow the instructions in the setup wizard.

Select the language for the program from the drop-down list and click Ok.

The first time you run Create Synchronicity, you are asked if you want to check for updates when the program starts. Answer Yes or No to continue.

Before performing a backup in Create Synchronicity, you must create at least one profile. You can have multiple profiles for backing up different sets of files at different times.
Click New profile.

The text "New profile" is selected. Type a name for your profile and press Enter.

The profile settings dialog box displays. Specify the main directory to be backed up and the directory to which the files will be copied using the … buttons in the Directories box. Select subdirectories as desired and the Synchronization method.
You can also select to include or exclude certain files and some Advanced options.

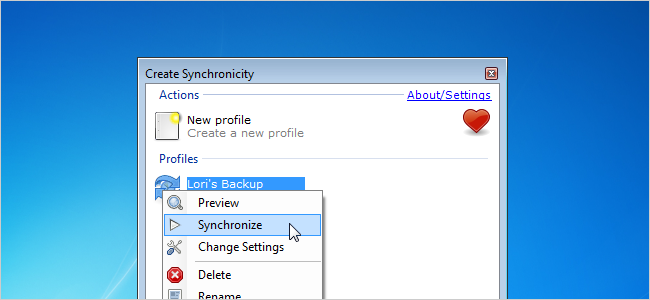
Your new profile displays in the Profiles section of the main Create Synchronicity window. You can manually back up the files in your profile at any time by clicking on the profile and selecting Synchronize from the popup menu.

A dialog box displays showing the progress of each step in the backup process.

If you want to back up your files automatically, you can schedule a specific time to run the backup process in the background. To do this, click the profile you want to schedule and select Scheduling from the popup menu.

The Scheduling dialog box displays. There is a warning at the top of the dialog box telling you that Create Synchronicity has to register itself as a startup program to enable scheduling. This is done automatically, once you turn on scheduling.
Select the Enable scheduling for this profile check box and choose other options to specify how often you want the backup performed.
NOTE: When entering a time in the At edit box, use a 24-hour clock. For example, 3:00 pm would be entered as 15:00.
If your computer is off periodically when the backup process is supposed to run, you might want to turn on the Catch up missed backups option. This option tells Create Synchronicity to run any backup profile that was scheduled to run, but was postponed by more than two days. For example, say a backup was supposed to run on September 27 at 5:00 pm, and the computer was not on at that time. As of September 29, Create Synchronicity will periodically try to start the backup until it has been successfully started.

When a profile has been scheduled, a clock is added to the profile's icon.
You can see what profile is supposed to run next and when by moving your mouse over the Create Synchronicity icon in the system tray.
When a scheduled backup runs, Create Synchronicity displays a message on the system tray icon saying the backup is running. Another message displays when the backup job is done.

If you close Create Synchronicity using the X in the upper, right corner of the window, it still runs in the background so scheduled backups can run. However, to open the program again, you need to start it using any shortcuts you created or the .exe file.
Create Synchronicity has many more handy features. For example, when backing up to a network drive, you can use the UNC path for that drive, such as \\192.169.0.25\MyBackupFolder\MySubFolder.
Create Synchronicity is fully portable. The settings for the program are stored in individual configuration files in a config directory located in the same directory as the program.
There are some advanced features such as a command line interface and the ability to change some hidden settings using the configuration files. For more information about these features and about using Create Synchronicity, see their manual at http://synchronicity.sourceforge.net/help.html.
Download Create Synchronicity from http://synchronicity.sourceforge.net/.