D7 is a very useful, free tool for maintaining, repairing, and tweaking Windows, assisting in the removal of malware, and backing up all the user profiles on your computer. It can aid PC technicians in performing many tasks.
NOTE: D7 is intended for use by experienced PC technicians only, not for "end users." It can be dangerous if not used very carefully. We recommend you also make a backup of all your data before using D7. You can use the DataGrab tool in D7 to make a backup.
D7 runs on Windows 7, Vista, and XP, and server operating systems and does not need to be installed. Simply extract the files from the .zip file you can download using the link at the end of this article.
Set Up D7
Many of the functions in D7 do not require third party tools to use. However, if you want to take advantage of all of D7's capabilities, we recommend you install the extra tools. They are not distributed with D7, but the procedure is straightforward to install them.
Ketarin is the first tool we'll install. This small application maintains a compilation of all important setup packages on your computer, which can be burned to a CD or put on a USB flash drive. Note that Ketarin is not meant to keep your system up-to-date.
To install Ketarin, download it from http://ketarin.org/. Extract the .zip file and copy the files to the 3rd Party Tools\Ketarin directory in the directory into which you extracted D7. If the directory does not exist, create it.

Next, download the command line version of 7-Zip from http://www.7-zip.org/download.html. Extract the 7za.exe file into the same directory into which you copied the Ketarin files.

Go to the directory into which you extracted D7 and double-click on the D7.exe file to run the program.

If the User Account Control dialog box displays, click Yes to continue.
NOTE: You may not see this dialog box, depending on your User Account Control settings.

The License Agreement dialog box displays. Select the I have read the EULA check box and click I DO Agree. A confirmation dialog box displays saying that you accepted the license agreement. Click OK to close the dialog.

The first time you run D7, the following dialog box displays. If you want to look at the many options available in D7, click OK.

Change any options you want to change, if desired. If you made changes, click Save & Close. If you don't want to make any changes to the options right now, click Cancel & Close. You can always change the options later.

Also, the first time you run D7, the Shell Extension Config dialog box also displays. You can choose to change these options now or wait until later. Click Save & Close to close the dialog box.

Once the D7 main window displays, click the blue question mark icon in the upper, right corner of the window. Select Update 3rd Party Tools from the popup menu.

When the Update 3rd Party Tools via Ketarin dialog box displays, click Update Default Profile.

You should see the following dialog box if the update was successful.

D7_DefaultApps should display in the edit box below the Update Default Profile button. Click Start Ketarin.

To update all the third party tools listed in Ketarin, click Update all.

The update progress for each tool displays. When the updates are all finished, select Exit from the FIle menu to close Ketarin.

Information About Your Computer
The Info tab in D7 displays information about your computer.

D7's Menu Options
The icons in the upper, right corner of the D7 window represent the menus that would be available on a menu bar. Simply click the icons to access the menu options. Moving the mouse over an icon displays the name of the menu.
If you would rather use a menu bar, you can display one easily. click the blue question mark icon and select Show Menu Bar from the popup menu.

The menu bar displays at the top of the D7 window.

D7's Tabs
The Maint tab allows you to perform maintenance on your system, including tasks such as clearing event logs, deleting all temp files, emptying the recycle bin, syncing the time with internet time, and checking the Desktop and Start menu shortcuts. D7 also uses some Piriform software tools (CCleaner, Defraggler, and Recuva) to perform some tasks. Select the check boxes next to the tasks you want to run and click Start.

When you click Start on the Maint tab, D7 starts D7 Auto Mode and runs each item that is checked in the order listed. Some items run fully automated, not requiring user interaction to perform their tasks. Other items require you to select options when they run. Some items are not included at all in the Auto Mode run. These items have no check boxes next to them. See the Online Manual for more information about what is fully automated and what is not.
If you regularly run certain items, you can save the what you have checked as the default settings in a configuration file that you can load easily. Click the blue Save Config link to save your selections.

When you click the Save Config link, the following dialog box displays to make sure you want to save the current configuration as the default configuration. Click Yes to save your configuration as the default.

The Repair tab provides tools for easily repairing parts of your system on your PC. You can perform tasks such as examining your hosts file, releasing and renewing your IP address, repairing and resetting the Windows Firewall, repairing Internet Explorer, and repairing system restore. Click the right arrows next to each item to repair that item.

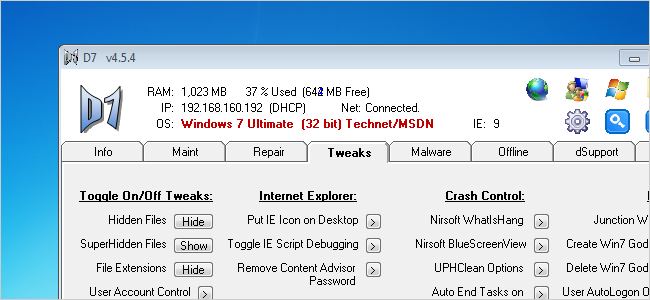
D7 allows you to tweak many Windows settings. You can easily show and hide hidden files and file extensions, set the User Account Control level, and you can enable and disable the Taskbar balloon tips, the Indexing Service in Windows XP, and the Windows Search Service in 7 and Vista. You can also put the Internet Explorer icon on the desktop, create and delete the Windows 7 God Mode, disable Windows Defender, and set automatic logon options for the current user. Click the Show or Hide button to toggle the tweak, or click the right arrow button next to the item to change the setting.

The Malware tab allows you to scan your computer for malware and remove it when found. You can select Pre-Removal programs to run, select tasks to perform, select scanners and manual inspections to run, set up custom apps and D7 Originals to run, and select Post-Removal tasks to perform. Select the check boxes next to the items you want to run and click Start.
Again, just like on the Maint tab, when you click Start on the Malware tab, D7 starts the D7 Auto Mode and runs each item that is checked in the order listed. See the online manual for more information about the D7 Auto Mode on the Malware tab. One different feature about the D7 Auto Mode on the Malware tab, as opposed to the Maint tab, is if D7 crashes or the system restarts for some reason, D7 automatically picks up where it left off when the system is started again (as best it can) and D7 is run again.
As mentioned earlier, if you regularly run certain items on the Malware tab, you can save the what you have checked as the default settings in a configuration file that you can load easily. Click the blue Save Config link to save your selections.

Use the Offline tab to work with offline Windows installations. The tools on this tab operate on Windows installations that do not boot by themselves, or can't be repair from within their own environments. Select a Target Partition from the drop-down list and select the check boxes for the items you want to run.
Again, you can save the items checked on this tab as a default configuration to easily run using the Start button on the tab.

End-users like having an application they can use to fix their registry, check computer health, tweak Windows, etc. You, as a PC technician, can provide your clients with a specially branded tool that satisfies their desire for a maintenance application and also provides a "business card" in the tool. The dSupport tab creates a custom maintenance tool for each of your clients with your logo and contact information so each client is reminded of you when they need further assistance with their computer. The makers of D7 describe dSupport as a "business card with a purpose."
Generating a dSupport tool for your clients is not free, but does not cost much. For a one-time fee of $50, you can register dSupport and fully brand it with your company name. You have unlimited use of dSupport and can distribute it to as many clients as you want for the one-time fee.

The DataGrab tab provides a way to backup all your system and profile data, and other miscellaneous data on your computer. This is a handy feature if you are setting up another computer, or you need to redo your current computer. As a PC technician, you can backup your clients' data before tweaking or repairing their computer as a safety measure. It uses Roadkil.net's Unstoppable Copier tool that was installed using Ketarin. From the Roadkil.net site:
[Unstoppable Copier] Recovers files from disks with physical damage. Allows you to copy files from disks with problems such as bad sectors, scratches or that just give errors when reading data. The program will attempt to recover every readable piece of a file and put the pieces together. Using this method most types of files can be made useable even if some parts of the file were not recoverable in the end.
We recommend installing the third party tools using Ketarin as described at the beginning of this article so you can take advantage of the features of Unstoppable Copier when backing up your clients' or your own data.

Closing D7
To properly exit D7, use the Close button. D7 uses various files and settings in various locations when executing its functions and the Close button is the only way to shut down D7 safely and remove these files and settings.
If you are working on a client's computer, use the Close & Delete D7 Directory button to safely close D7 and have it clean up all the tools it uses and delete itself.

NOTE: Although it isn't displayed on the titlebar of the program, D7 should be considered a BETA product, until further notice, according to their own website. Some features of D7 are not fully tested on all platforms.
Download D7 from https://sites.google.com/a/obxcompguy.com/foolish-it/d7.
There is a manual available on the above website that provides more information about each of the tabs in D7.