Quick Links
Microsoft announced that System Image Backups will be deprecated in Windows 10's Fall Creators Update. The feature is still available, but it is no longer actively being developed and may be removed in a future release of Windows 10. Instead, Microsoft recommends you use a third-party tool to create full system images of your PC.
What System Image Backups Are Good For (and What They Aren't)
System Image Backups should continue to work for now, but you may have trouble restoring them in the future if the ability to restore a system image backup is removed from future versions of Windows.
Full system image backups contain a full image of the entire operating system drive, including all the Windows system files and installed programs. These can be very large, depending on how many files are on the drive. If you have 500 GB of files on your system drive, your system image backup will be 500 GB in size. They also can't be restored on another PC without some work. You must restore the system image backup to the same PC hardware you originally created it on or Windows won't work properly.
Microsoft is deprecating this feature because most people don't really need to create and use full system image backups. Most people are better off simply backing up their personal files with something like File History rather than creating a snapshot of the PC's entire drive. Just backing up your personal files will get you a smaller backup, and Windows can create it faster. You can just start with a fresh Windows installation, reinstall the programs you use, and then recover your personal files.
However, system image backups are still a useful tool in some situations. You may prefer to create a complete backup image of your entire system so you can restore to its exact state---even if it takes more space, is slower to create, and can't easily be moved to another PC. This can be especially useful if you've spent a lot of time setting up your PC just the way you like it, or if you're about to do something you're concerned might mess up your system and you want the insurance policy. They're also useful when you want to create a customized Windows system image and deploy it on one or more PCs without any additional configuration. But, for most people, simple personal file backups are better.
There are quite a few solid applications for creating full system image backups. If you're looking for something free, we like Macrium Reflect Free. For paid software, you have a lot more choices, including Acronis True Image. We'll cover using Macrium Reflect Free here.
How to Create a Full-Disk Backup With Macrium Reflect Free
Download Macrium Reflect Free to get started. When you're asked to select an edition, just select the "Free" edition. It will download and launch the appropriate installer.

Launch the Reflect application from your Start menu once it's finished installing. You will be prompted to create rescue media you can use to actually restore a backup. You can do it now, if you like, but we'll skip that for now and cover doing it later.
To begin creating your system image backup, click Backup > Image Selected Disks. You can also just select Backup > Backup Windows if you want to exclude separate data drives and only back up your Windows system drive.

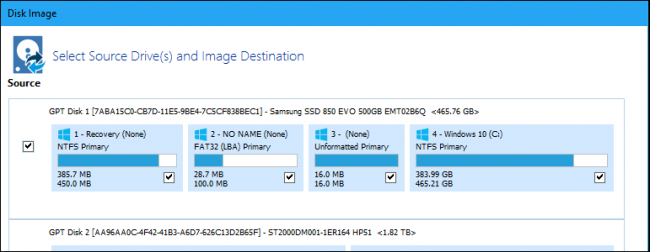
Chose the individual disks and partitions you want to create a backup image of. To back up everything, select all the disks and partitions.

Under Destination, select the destination you want to back up to. It must have enough space to hold your full backup. For example, if you want to back up to an external drive, insert an external drive with enough storage space and choose it under the Folder box.

Click "Next" and Macrium Reflect will prompt you to set up a backup plan. If you're just making a one-time system image backup, you can ignore all the options here and click "Next" to continue.
If you want to automatically create system image backups on the schedule here, you can click the "Add Schedule" button here to set up your schedule.

The other options here affect how many backups Macrium Reflect keeps when you run it multiple times. If you're just creating a one-time backup, you can ignore them. If you've previously created a backup, adjust the options to control what Reflect does with your previous backups.

You'll see a summary window with a list of the options and operations Reflect will use. Feel free to look over what Reflect will do. if you're happy with the options you selected, click "Finish".

Once you've set up your backup configuration, ensure the "Run this backup now" option is checked and click "OK". Reflect will save your backup options so you can use them in the future.

You'll see a progress window while the operation completes. When you're informed that the process is finished, click "Close" to continue.

Your backup will be saved as one or more .mrimg files in the location you specified.
This contains a complete disk image you can restore. You can also mount the backup image file to manually extract individual files from it.

How to Create Rescue Media With Macrium Reflect Free
These .mrimg file can be restored with the Macrium Reflect WinPE recovery environment. To create recovery environment media, click Other Tasks > Create Rescue Media.

Go through the wizard to create the recovery environment. If you'll be restoring the disk image on the same PC hardware, you can accept the default options while clicking through the wizard.
A Windows installation can't normally be moved to another PC's hardware. However, Macrium Reflect's ReDeploy feature helps you move a PC's Windows system to another hardware configuration.

When you get to the end of the wizard, you'll have to either burn a CD or DVD containing the recovery environment or create a bootable USB drive containing the recovery environment. This should be separate from your backup drive. For example, you may want to use a larger external hard drive for your backups and a smaller thumb drive (or a CD) as your rescue media
Click "Finish" and Reflect will create your bootable media.

How to Restore a Full-Disk Backup With Macrium Reflect Free
To restore a backup, you will need to insert your rescue media into your computer and boot from it. Depending on your PC, you may have to adjust settings in its BIOS or UEFI firmware or select the device from a boot menu to boot from it.
Once you have, your PC will boot into the recovery environment. Click the "Browse for an image or backup file to restore" and select the .mrimg file.

Information about the backup file you've selected will appear in the window. Confirm that everything looks like you expect it to, including the sizes of the partitions, and that you've selected the correct backup file. Click "Restore Image" to restore the image to your hard drive.

Under Destination, click "Select a disk to restore to" to select a disk. Be very careful when selecting the disk you want to restore to, as its contents will be erased. If you select the wrong disk---such as a secondary files drive, for example---you'll lose your data.
In some cases, Macrium Reflect may automatically select the appropriate target disk for you. You can always click "Select a different target disk" if you want to change it.
Select the partitions you want to copy---they'll all be selected by default---and then click "Copy selected partitions" to tell Reflect you want to copy them to the drive. Click "Next" to continue.

Macrium Reflect will display information about the options and operations it will use for the restore process. If everything look good, click "Finish" to start copying the partitions from your backup to your drive.

You'll be prompted to confirm that you want to overwrite any existing partitions on your target disk and the process will begin.

When the process completes, you're finished. You can now click the "Shut Down" button at the bottom left corner of your screen to shut down your PC. Remove the Macrium Reflect recovery image and restart your PC. It should boot up normally without any problems and be in the state it was in when you created that full system backup image.
