Screen recording on Mac was vastly improved with macOS Mojave (first introduced in 2018). With nothing but a built-in application, you can capture sound, mouse clicks, portions of your screen, and more. Here's how to screen record on your Mac.
Open the Screenshot Utility on Mac
You can use the same tool to screen record that you do to take screenshots. Open up the Screenshot app using one of these methods:
- Press Command+Shift+5.
- Use Spotlight (Command+Space), search for "Screenshot," and choose the app from the results.
- Open the Applications folder using Finder and then click Go > Utilities from the menu bar at the top of your screen and select "Screenshot."

Set Your Screen Recording Options
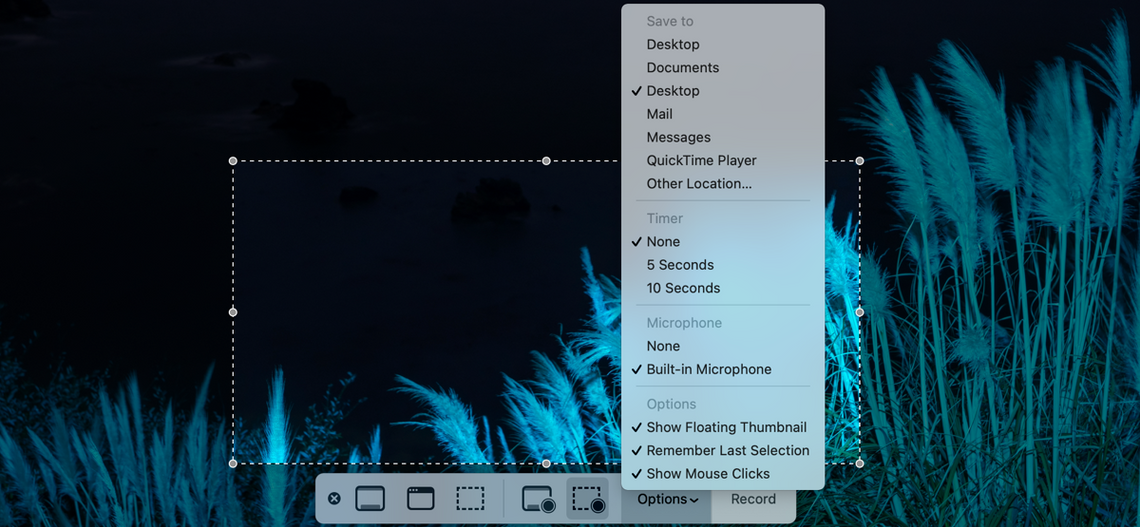
When you open Screenshot, you'll see a toolbar at the bottom of your screen. The three options on the left of the toolbar are for screenshots, so you'll start with the middle two for recordings.

One option is for recording your whole screen. Click "Record Entire Screen" to do this.
The other option is for selecting just a portion of it. If you only want to capture part of your screen, click "Record Selected Portion." Then, drag the dotted shape where you want it to go and resize it by dragging an edge or a corner.

Before you start recording, click "Options." At the top of the list, you can pick a spot to save your recording. Then, you can get into some handy recording features.

When you need a few moments to prepare what's on your screen for the recording, use the Timer. You can pick 5 or 10 seconds from the time you hit Record until the recording begins.

If you want to include audio with your recording, select "Built-in Microphone." This is ideal for explaining what you're recording.

The "Show Floating Thumbnail" option is useful if you'll be demonstrating how to take a screenshot. As you know, a thumbnail appears in the corner of your screen by default.

Need to show the steps that you're taking on the screen? Use the "Show Mouse Clicks" option. When you enable this, each click of your mouse displays as a circle. That way, your audience can see the steps in a sequence, or even in a single, helpful click.

If you change your mind about recording your screen, you can simply close the Screenshot app. Either click the "X" on the left of the toolbar or press your Escape key.
Record Your Screen
Once you have your options set, it's time to record. Hit the "Record" button in the Screenshot toolbar. If you turned on the timer, you'll see how much time you have left to get ready on the Record button.

A small Stop button will appear in your menu bar as you capture your screen. Click that button to stop recording.

Then head to the location that you chose to save the recording in to view the video. You can then open the recording using the built-in Preview program your favorite video editing application.
If you've got an iPhone, it's a cinch to record your iPhone screen too.