The heavy, stylized shadows of HDR Photography are a professional, very dramatic look many photographers use. Here's how a few moments with Photoshop or freeware Raw Therapee can get you a similar effect with your photos.
Beginner: The Photoshop Method

We'll begin by firing up Photoshop to work with a photo with good detail. Blurry photos or images lacking detail are reasonably okay for this technique, but are not ideal. Pick one with good detail and a good value range for best results.
Your image should be flattened (no layers) to begin with. Save an alternate version of your image before you start working to make sure you don't accidently overwrite your original.

Our first move is to switch our color mode to "Lab Color" by navigating to Image > Mode > Lab Color.

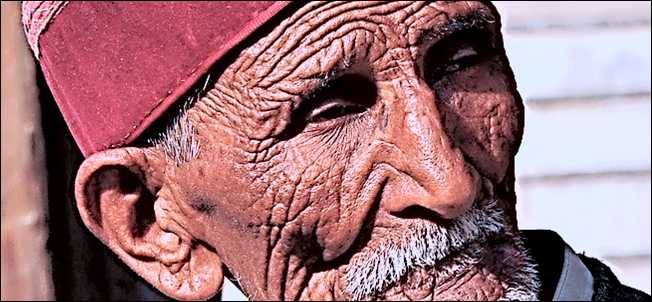
The next step is simple as well. We have to go to our channels panel and pick the "Lightness" channel. Your image should transform into this sort of grayscale image, since it's displaying on the "Lightness" channel.

This is how your Channels panel should look with this channel selected. If you don't have a Channels panel on screen, turn it on by going to Window > Channels.

With your Lightness channel still selected, navigate to Filters > Sharpen > Unsharp Mask.

While this is an acceptable setting for Unsharp Mask, this is a very obvious and overdone setting. You can use different, more subtle settings if you prefer. When you're satisfied with your preview, press OK.

Your lightness channel should now be transformed. The benefit of using Lab Color (as opposed to RGB) is that your shadows are transformed, leaving your colors untouched and uncorrupted from your filter.

We'll flip our color mode back to RGB by navigating to Image > Mode > RGB Color. Your image should jump back to color.


Create a "Levels" adjustment layer, either by using the Adjustment panel, as shown above left, or by going to your Layers panel and clicking the

icon. You'll want to adjust your levels to suit your image specifically. For some tips on using the Levels adjustment tool to fix your image, you can check out this older article on how to adjust your contrast like a pro. You can simply copy the five values above, if you prefer.


Our next move is to simulate a white balance adjustment, so that our final product looks like it is being lit with a harsh blue or white light. This is an optional step, if you're already happy with your image.
Since we're working with JPG (not Raw), we have to use a "Photo Filter" adjustment layer. Create one as shown above left in the Adjustment Panel, or click the

in your Layers Panel. "Cooling Filter (80)" is the best option for this particular image, and should work for most photos with this same warm, yellow cast.

There's no "one size fits all" setting that will work, but try this one and see if it appropriately cools your image as shown.

With our photo filter simulating a white balance shift, our stylization is complete.

We can see obvious stylization in both our highlights and shadows, giving our Faux HDR image great, sharp details ideal for print. But what about those of us that want to replicate this with a freeware graphics solution? Despite this How-To being GIMP friendly (Unsharp Mask and Levels work out of the box), here's a few tips on how to get a similar effect in freeware Raw Therapee, an excellent way to play with camera Raw without paying for Adobe Photoshop or Lightroom.
Advanced: The Raw Therapee Solution

If you've not tried Raw Therapee, it's an excellent program, and very similar to both Photoshop Camera Raw and Adobe Lightroom, except for free and cross platform. While it is primarily for adjusting Camera Raw files, Raw Therapee can also open and adjust JPG images (as can Lightroom and Photoshop Camera Raw). Simply open your image in Raw Therapee to start stylizing it.

Raw Therapee starts you with the "Exposure" sidebar. For our example below, we've used these settings. "Exposure" controls the bulk of your tones, simulating adding and subtracting light to your photo. We've also added a lot of black to our image and also included a lot of Shadow Recovery to shift our midtones away from our darkest blacks. To stylize our image, we've also shifted the saturation to appear more muted.

White balance can be adjusted on the "Color" tab on the right sidebar. This will allow you to adjust the yellow/blue cast light, like we did in our photoshop how-to.

"Detail" tab adjustments will allow us to stylize our blacks, since Raw Therapee uses a similar Unsharp Mask filter to Photoshop's. You may find that "Halo" control looks best turned on.

Our final result is slightly different from our Photoshop image. It's personal taste as to which one is better; we also weren't really trying to create the same image again. It does give us a pretty good idea of the program's ability to stylize an image.

If you've not downloaded it already, give Raw Therapee a shot. It's cross platform and free, apart from being excellent.
Have questions or comments concerning Graphics, Photos, Filetypes, or Photoshop? Send your questions to ericgoodnight@howtogeek.com, and they may be featured in a future How-To Geek Graphics article.
Image Credit: Old Man at Manali by Nanda Kishore, available under Creative Commons.