Quick Links
Thanks to Developer Mode on the Xbox Series X and S, you can install emulators like RetroArch. Turn your Xbox Series X or S into a retro gaming powerhouse and emulate the PS2, GameCube, Dreamcast, and more, all without impacting your ability to play retail games.
First, Activate Developer Mode
The first thing you have to do is activate Developer Mode on your Xbox. To do so, you'll need a paid Microsoft Partner developer account. This requires a one-time fee of $19 (pricing is different in other regions). Once you've activated your account, you can add your Xbox as a developer console.
With a valid developer account, you can download the Xbox Dev Mode app, activate your console in Partner Center, and then reboot in Developer Mode. From there, it's just a matter of configuring your network connection, and then accessing the Xbox Developer Mode web interface via a browser.
For this guide, we'll assume you've followed the full setup procedure and your console is already booted in Developer Mode.
Installing the RetroArch Emulator
RetroArch is an emulator that works on virtually every platform and has a UWP package made just for Xbox One (and the Series X and S, by extension). This multisystem emulator uses plugins or "cores" to expand support for lots of different systems. You can choose which cores you want to use and switch between them for the best performance.
RetroArch makes it possible to play games from a huge variety of platforms right on your Xbox. This includes arcade machines, retro consoles (like SNES and Genesis), modern handhelds (like PSP), and early 3D home consoles (like Sony PlayStation, Nintendo N64, and Sega Dreamcast).
To get going, you first have to download and install RetroArch. On a computer, just head to the RetroArch Downloads page and grab the Xbox One version and the "Microsoft Visual C++ 2015 UWP Runtime Package" dependency file.
Then, access the Xbox Developer Mode web interface by visiting the web address in the "Remote Access" section in Dev Home on your console.
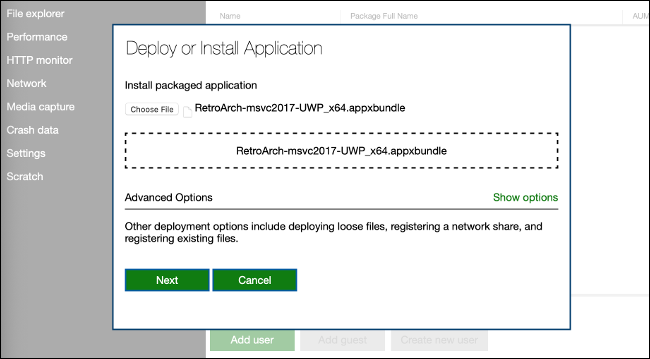
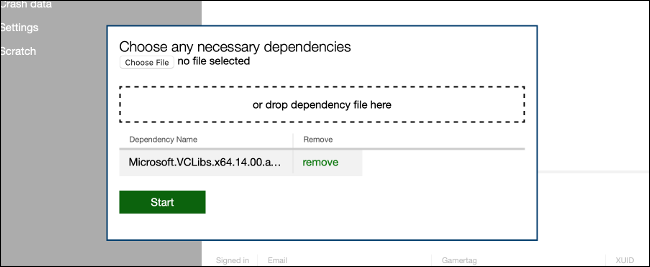
Select "Add" on the Home page to access the file upload interface, and then drag and drop the APPXBUNDLE file you downloaded into the box (or click "Choose File" and locate it). Select "Next," and then locate the dependency file you downloaded.
Click "Start," wait for the process to complete, and then select "Done" after everything is transferred.
Now, under Dev Home, you should see RetroArch listed as "Not running" in the available apps and games. Highlight it, press the Views button on your controller (the two squares), and then select "View Details." On this menu, change the "App type" drop-down to "Game."
Back out of that menu, and then press A to launch RetroArch. When you're asked to sign in, type your Xbox Live account details if you haven't yet done so.
Setting Up RetroArch
After RetroArch is installed and running on your console, you can finish setting up the emulator, add some ROMs, and get to playing some games. Before you jump in, though, there are a few things you'll probably want to do.
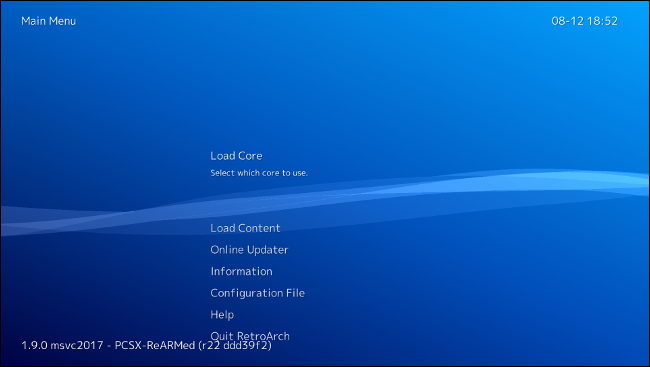
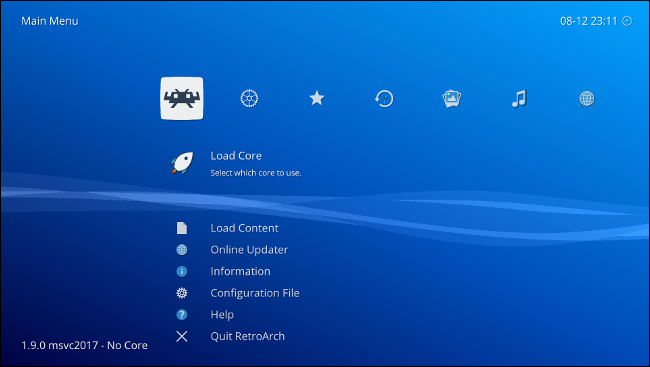
RetroArch's interface is modeled on Sony's X-media bar. This first appeared on the PS3 and, later, the PS4. There's a horizontal and vertical menu, but you won't see the icons representing the horizontal menu when you first launch the UWP version of RetroArch.
After the interface loads, press left and right on the d-pad to see the other options.
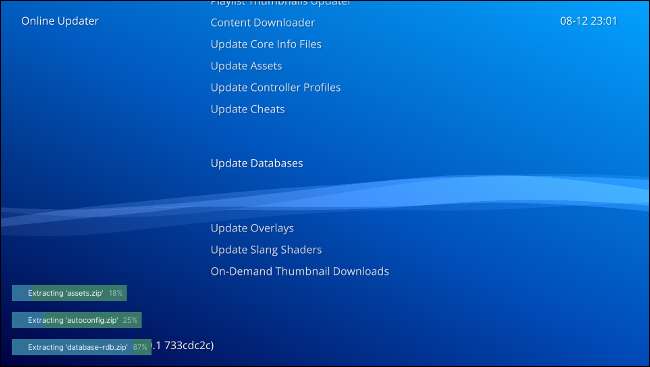
You can fix this by installing missing assets and switching the video driver. To do so, select "Main Menu" at the top left, scroll down to "Online Updater," and then select "Update Assets." While there, you can also update core info files, controller profiles, databases, overlays, and anything else you need to.
After this process is complete, a black screen will appear and the menu will reload.
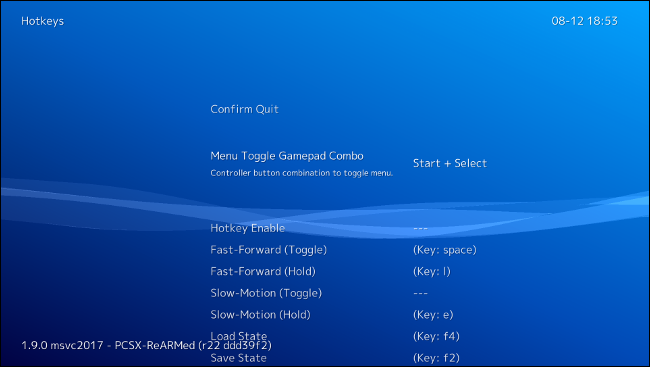
Now, you'll have to define a button combination that will allow you to access the in-game Pause menu. To do that, just return to the "Main Menu" and move horizontally to select "Settings" at the top left.
Scroll down to "Input" and select "Hotkeys." Define the "Menu Toggle Gamepad Combo" shortcut by pressing left and right on the d-pad until you find a shortcut that works for you ("Start + Select" or "R3 + L3" are both good options).
Finally, save your settings by returning to the "Main Menu" and selecting "Configuration File." Click "Save Current Configuration," and then quit and reload RetroArch. You should then see a much cleaner interface with all the icons visible.
Adding ROMs and BIOS Files
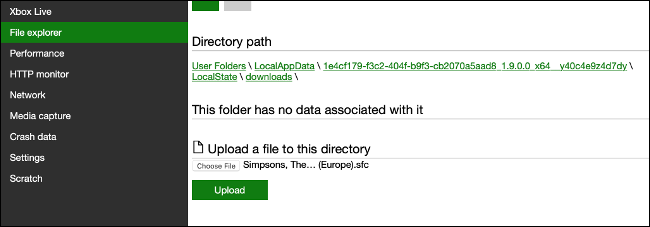
ROMs should go in the "Downloads" folder on the local disk space accessible by RetroArch. To do this, open the Xbox Device Portal in a browser on your computer, and click "File Explorer." Navigate to LocalAppData > RetroArch > LocalState > Downloads, and then use the file picker at the bottom to add any ROMs you've legally acquired.
Be sure to follow all relevant laws when acquiring ROMs and BIOS files. A law professor provided us with a detailed analysis of the legalities surrounding emulating retro video games.
It should be possible to add ROMs to an external drive, but unfortunately, due to the temperamental nature of RetroArch in its UWP app form, we couldn't get this to work during testing.
You'll have to put any BIOS files you want to use in the LocalAppData > RetroArch > LocalState > System folder.
Playing Games
To play a game, select "Load Core" in the "Main Menu." Be sure to choose a core that matches the system type you're playing. You might have to do some research to find out which are best for the job.
With a core selected, choose "Load Content" in "Main Menu" to locate your ROM file. Keep pressing A until your ROM file loads. In the future, you'll be able to find your core and ROM file in the "History" menu.
To pause a game, save a gameplay state, or return to the main RetroArch menu, use the hotkey shortcut you defined earlier. From there, you can also quit RetroArch. To return to Retail mode, just select "Leave Dev Mode" from the "Quick Actions" menu in Dev Home.
The Best Backward Compatibility Yet
The Xbox Series X and S not only have the best backward compatibility of this generation, but they're also incredibly powerful emulation machines. Since this version of RetroArch has been thrust into the spotlight, developers will hopefully pay a bit more attention to the UWP build in the future.
RetroArch is a fantastic multisystem emulator, regardless of which system you run it on. If you're interested, there's much more to learn that will help you get the most out of RetroArch.

