Quick Links
Have you ever taken a photo with your smartphone and thought the colors looked nothing like those in front of you? Maybe it was way too orange or a bit too blue. Here’s why they look off, and what you can do about it.
The Problem With Our Eyes
Unike a camera, our eyes don’t record an exact record of what’s in front of us. Instead, everything we see is interpreted by our brains. Yes, this is based on what’s in front of us, but also on what the brain thinks it should see. This is why optical illusions are so effective---our eyes aren't tricked, but our brains are.
One of the areas in which this is really clear is when you stop and think about the color of light. Specifically, how orange or blue is a "white" light source?
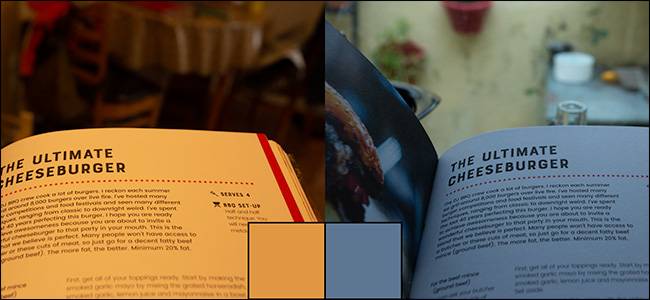
Imagine you’re reading a book next to a fire. What color are the pages? They're white. How about outside on a bright sunny day or under a fluorescent bulb? They're still white, obviously.
This is the thing, though: we only see the pages of the book as white because we know they’re white. In different situations, the light reflecting off a book and into our eyes is a different color. What we think we see isn’t what’s really there.

When I took the photos above, the pages looked white to me. Now, however, on your blueish computer screen, you should see which color of light the pages were really reflecting.
While this effect is most obvious with white and other neutral colors, it affects all of them.
White Balance and Photography
The "temperature" of a light source refers to how white, orange, or blue it is. This is measured in kelvins, which equates to how hot an ideal black body radiator has to be to give off that color light.
For example, candlelight has a color temperature of about 1,850 K, while daylight is around 5,900 K. To confuse matters a bit, orange ("warm") light is given off by sources with a lower color temperature than cooler or bluer sources of light.

When you take a photo with your smartphone, it attempts to correct for the temperature of the light. It also attempts to correct for the green-magenta tint axis, but the orange-blue axis is more important.
If you’re taking a photo next to a warm light source, it automatically makes the image a bit bluer so everything will look more neutral when you look at it later. It will do the opposite if you’re near a blueish light. Everyone knows the pages in books are white, not orange or blue.

This is called white- or color-balancing, which is an important aspect of photography. Professionals do this manually or correct it in postproduction (the images above were corrected in Adobe Photoshop Lightroom). Your smartphone, however, mostly does this automatically.
The problem is, unless you're working with controlled studio lights and balancing from a color-reference chart, achieving truly accurate white balance is impossible. For example, if there are two sources of light in a scene, you can’t balance both of them without doing a lot of work in Photoshop. Both of the photos above look more accurate than the originals, but neither is truly right.

Also, a truly neutral white balance isn’t necessarily what will give you the best, most interesting, or even the most accurate images. If you’re taking a photo of someone lit by a candle, you'll need a bit of an orange glow in the image for it to look natural.
Automatic white balance overcorrecting the orange glow from the wildfires in the U.S. was a big problem for people trying to accurately share what they were seeing. Managing white balance is one of those things that requires a more artistic than scientific approach to photography.
Controlling White Balance With Your Smartphone

Generally, white balance isn’t something you have control over when you shoot with a smartphone. If a scene you’re shooting throws the camera’s automatic white balance algorithm wildly off base, you’ll have to take more manual control.
On an iPhone, you can use a third-party app; we recommend VSCO (free) or Halide ($8.99).
If you have an Android phone, things get a bit more complicated. On a Samsung phone, you can control white balance in Pro mode. Others might also have the option built-in to their camera apps; if not, you might need to use a third-party camera app, like Open Camera (free).
Generally, in a camera app that supports it, the white balance option will have presets for different lighting conditions, like cloudy, daylight, shady, tungsten, and so on. If not, there might be a slider you can adjust to shoot in a custom kelvin value.
Correcting White Balance After a Shot

Getting the white balance accurate while you shoot is one option, but it’s easier to shoot, and then correct it afterward.
When your smartphone saves photos as JPEG or HEIC files (which they almost all do, by default), the white balance is baked into the final image. You can make rough adjustments later, but you can’t change it too much. Fortunately, there’s another format you can use if you want to be able to edit later: RAW.
In a RAW file, the white balance information is saved along with the image. Then, in a RAW editor (like Adobe Lightroom or Photoshop), you can change the white balance to any value you want. The only drawbacks are you have to process the images before you can share them and they also take up more hard-drive space.
Both iOS and Android support RAW photos, but again, you might have to use a third-party camera app to shoot them.
If this all seems like a lot of hard work, it is. As soon as you start digging into manual controls, photography gets a lot slower because you need a deeper understanding of what’s going on to get decent results.
The easiest option is to let your smartphone handle things as much as possible. However, if you want more accurate white balance (or more creative control over it), install a third-party camera app to use when you need it.