Want to easily control your Hue lights? You don't have to pick up your phone or yell across the room at Alexa, Google Assistant, or Siri. Here are some easy ways to control your Hue lights right from your Mac.
We'll cover a few solutions here: The built-in smarthome features in macOS and a convenient third-party utility for controlling Hue lights from your Mac's menu bar.
Option 1: Use the Home App
Your Mac has a version of the same "Home" app you can use on iPhone and iPad. It can control all your HomeKit-enabled smarthome devices.
To open it, press Command+Space to open Spotlight search, type "Home," and launch the Home app. Your Hue lights will appear here if you've already set up the integration to control them with Siri on iPhone or iPad.
To turn Hue lights on and off, click their tiles. For more options, right-click or Ctrl-click one of the tiles here and select "Show Controls."

This window provides an easy way to turn lights on and off, choose brightness levels, and change their color. However, it's not as fully featured as the Hue app itself.
(If you haven't set up the Hue integration yet, open the Hue app on your iPhone or iPad and head to Settings > HomeKit & Siri.)
Option 2: Talk to Siri
Assuming you've already set up the HomeKit integration, you don't even need to open the Home app. You can control your Hue lights from your Mac with Siri just like you would from an iPhone or iPad.
To use this, either click the SIri icon at the top right corner of your Mac's menu bar or press and hold Command+Space. Speak into your Mac's microphone and say a command like "Turn off the lights" or "Turn on [a specific light]"---any Siri command for turning lights on and off, adjusting brightness, or changing colors will work on your Mac just like they do on an iPhone or iPad.
You can type out commands for Siri on a Mac, too.

Option 3: Install Colors for Hue
Okay, the integrated features on a Mac are great, but they really aren't perfect. Wouldn't it be great to control your Hue lights from your Mac's menu bar with just your mouse and have access to all the color options Hue offers?
Colors for Hue, a free app available in the Mac App Store, offers all these features. The app has in-app purchases, but only for donations if you feel like supporting the developer---you can use everything in the app for free with no ads.
Once installed, launch the Colors for Hue app. The first time you use it, you'll have to connect to your Hue Bridge. Use the "Connect" tab in the app's settings window to scan for the Hue Bridge on your network.

You can also manually enter your Hue Bridge's IP address. (You can find this information from within the Hue app. Head to Settings > Hue Bridges and tap the "i" to the right of the bridge's name.)
Can't see the "Scan by IP" box? We ran into an odd bug with that---to reveal it, click the "Support Us" icon at the top of the window and then click the "Connect" icon once again.

Press the button on your Hue Bridge when prompted to finish the connection process.

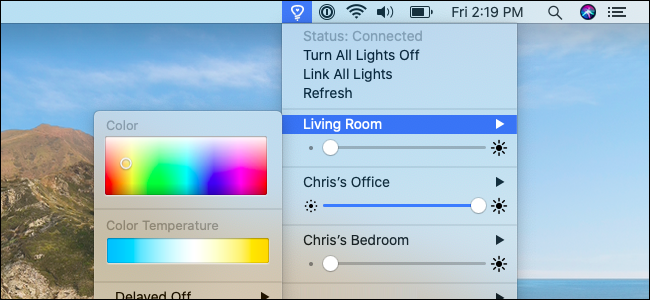
You now have a light bulb icon on your Mac's menu bar. Click it for easy access to your Hue lights: You can turn them on, turn them off, adjust brightness, change colors, and even use a "Delayed Off" feature to have a light automatically turn off after a certain period of time.

You can use the Colors for Hue preferences window (click "Preferences" in the menu) to rearrange the list of lights and set up groups. Click the "Lights" tab to find these options.
That's it---you'll still have to use the Hue app for many features like adding new lights and setting up routines, but Colors for Hue provides quick access to standard controls you'll need.