Quick Links
It’s a classic effect: the black and white photo with the stark, isolated red. Here’s how to knock out that effect in Photoshop in ten seconds with our (GIMP friendly!) method.
This is a great, simple how-to for the entry level Photoshop user. This method also translates easily into a GIMP technique, as the tools used are similar in both programs. More advanced users can check out our bonus method, or leave their own methods in the comments to help out beginners.
One Method: Lighting Fast Selection of One Color

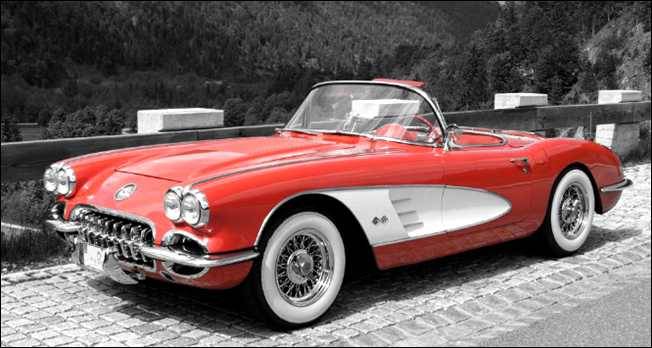
We’ll start with a good quality photograph. You can use any photo you like and even isolate any color you want—it doesn’t have to be red. But pick a photo that has a good focal point or something you can highlight with your isolated color.

You can grab your eyedropper with shortcut key

. Pick the a color that represents the “average” color you’re trying to isolate. In other words, there are multiple “reds” in this red car, but I pick the sort of “middle red” in the area shown above. Left click the color you want and continue on.

Navigate to Select > Color Range.

You can create a selection here based on wherever Photoshop finds the color you just selected. Take a close look at your preview image as you play with the “Fuzziness” slider. You want most of the color you’re trying to isolate (in this case, the red in the car) to appear as white in the preview. Press “OK” when you feel you’ve isolated the parts you want to stay colorful.

As an aside for advanced users, you can isolate all of the primary colors using this same tool and method by changing the drop down menu to any of the options shown above. You can safely ignore this screenshot if you’re simply following the beginner how-to.

When you press OK on the Color Range dialog, you’re given a selection of your reds (or whatever color you have chosen to use).

Press


to invert that selection—instead of selecting the reds in the car, we now have the entire rest of the image selected.


to instantly Desaturate this selection. Navigate to Select > Deselect to see what you’ve done. Since this has all been done in a single background layer, make sure you use Save As to save an alternate copy of your photograph, and not overwrite your precious original!

Note for GIMP users: You can achieve similar selections and effects by using the “Select by Color” tool, which can be found under Tools > Selection Tools > By Color Select. You can set your Threshold in your toolbar, shown above right, and get similar results in the “Selection Editor” panel, shown above. Open this panel by navigating to Select > Selection Editor.
Method Two: Isolating Complex Colors With Layers

I’d bet most readers have come across this image once or twice, even in casual browsing. Let’s give Jimmy a makeover by isolating the color in his eyes. This second method assumes you have a slightly higher comfort level with Photoshop.

Make a rough selection with your Quick Selection Tool, shortcut key “W.” It doesn’t have to be very good, as you can see above, although you can be as precise as you like, or even use any method that suits you.

We’ve created selections on both eyes. Press

to create a new layer from them.

Note that we’re using the background layer in our how-to: many purists hate modifying the background layer, so before the next step, Save As to create a new copy or simply right click your background layer to duplicate it. After doing that (or ignoring that advice) go to either your Background or Background Copy layer in your Layers Panel.

Press

to desaturate the background part of the image, leaving the eyes on a separate layer.

Press

to get the eraser tool. If you know how to use layer masks, you can always create one to mask out the parts of your isolated color (eyes, in our example) layer. However, beginner Photoshop users may find it easier to simply use the eraser. Make sure you jump to your “eyes” layer in your Layers Panel to begin erasing. Eliminate any part of the selection you don’t want to be colorful.

Jimmy’s eyes are very subtle, so we can increase the saturation. Still in our isolated color layer, we can bring up Hue/Saturation and adjust it by itself.

Press

to bring up the Hue/Saturation slider.

We adjust our color layer as shown above right. The “Colorize” option is on, and the sliders are changed to make his eyes a colorful, saturated blue that stands out from the gray of the background.

And here’s our final image. There are likely to be a hundred different ways to accomplish this same effect, including using layer masks and adjustment layers. If you’ve got a favorite method to do this trick, leave it in the comments below to share with the other readers!
Image Credits: Corvette 1958 by Softeis, available under Creative Commons. Jimmy Wales by Manuel Archain, available under Creative Commons.