Storing important and or sensitive documents in Google Drive isn't the most secure way to protect your data, but if you are, your iPhone and iPad can help keep everything safe. Here's how to add a Face ID or Touch ID lock to the cloud storage's mobile app.
Unfortunately, at the time of writing, Google doesn't offer enhanced security options on its Drive app for Android or on the web. Enabling two-factor authentication on your Google account is your best bet for keeping people out of your cloud files.
Start by opening the "Drive" app on your iPhone or iPad. Use Apple's built-in Spotlight Search if you can't find it on your home screen.

Next, tap on the three-line hamburger menu icon.
From the slide-over menu that appears, select the "Settings" option.

Tap on the "Privacy Screen" button found in the middle of the screen.

You can now read more about the Privacy Screen feature. If it's something that you'd like to enable, toggle on the "Privacy Screen" option.

Your iPhone or iPad will display a pop-up asking for you to give the Google Drive app permission to access Face ID or Touch ID on your device. Tap on the "OK" button to permit it.

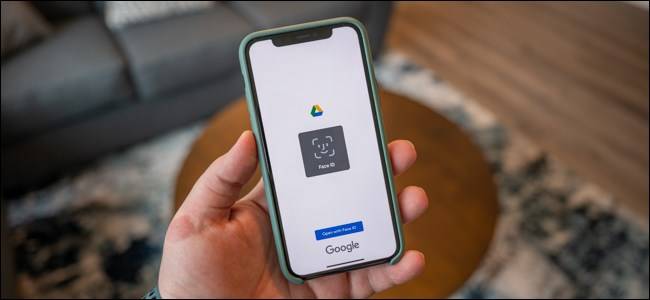
The next time you exit and reopen the Google Drive app, you will see a screen similar to the one below. Authenticate using your face or your fingerprint to access the cloud storage application.

Now that the Privacy Screen setting is enabled, you will see several new options to customize the feature further.
By default, the Privacy Screen feature locks the Drive app the moment you lock your iPhone's or iPad's display or leave the app. If you want to add a time delay, tap on the option that corresponds to the "Delay" listing.

Here, you can choose from "Immediately," "After 10 Seconds," "After 1 Minute," and "After 10 Minutes." Choose one of the options and then tap on the Back arrow.

If you don't trust Face ID or Touch ID to protect your files stored in Drive, you can require your phone or tablet's lock screen passcode to enter the app.
Back in the "Privacy Screen" settings menu, tap on the blue "Open System Settings" link.

You will be taken to Drive's section of your iPhone's or iPad's Settings menu. Here, you can toggle off permission to use Face ID or Touch ID.

With the security setting disabled, the next time you open the Google Drive app, it will require you to enter your device's lock screen passcode.
