Quick Links
Maybe you've changed your mind about what you want to share with your HomeGroup. Or maybe you just want to double-check what you're sharing. Either way, it's not too hard to do. Let's take a look at how.
HomeGroups are designed to simplify the sharing of files, folders, and printers on a home or small business network. They allow you to quickly share major folders like Documents, Pictures, and Videos, as well as all the printers attached to your PC. If you created or joined a HomeGroup in the past, you might find it useful to check up on what you're sharing with the network and limit that sharing if you need to.
Change What You Share from the HomeGroup Control Panel App
Click Start, type "homegroup," and then click the "HomeGroup" control panel app.

The main "HomeGroup" window provides an overview of what you're currently sharing. To change that, click "Change what you're sharing with the homegroup."

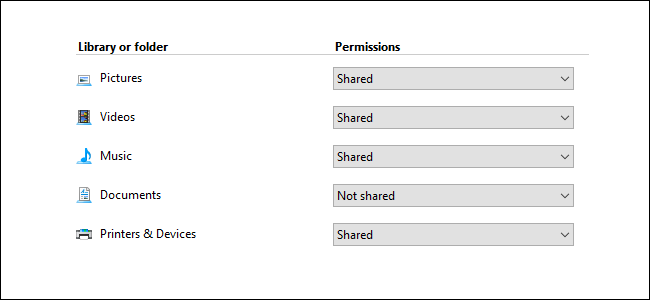
In the "Change Homegroup Sharing Settings" window, you can see all the major folders---along with Printers & Devices---that HomeGroup allows you to share. For each item, you can use the "Permissions" drop-down menu to choose whether the item is shared or not. Make the changes you want and then click "Next."

When the changes are made, click "Finish."

If you find the sharing features of HomeGroup a little simplistic, that's actually the point. It's designed to be super simple to use. That said, you can gain a little more control over what folders and files you share in File Explorer.
Change What You Share from File Explorer
If you want to share something other than the major folders you see in the HomeGroup app---or you want to share only certain subfolders or files---you can do that in File Explorer. You'll manage this stuff on the "Share" tab in any File Explorer window. In the example below, the Documents folder is shared with the HomeGroup. However, you can click on any folders or files and then click "Stop Sharing" to make them no longer accessible to the HomeGroup---even though the parent folder is still shared.

You can also share individual folders or files that are in a parent folder that is not shared with the HomeGroup. For example, say that you do not have the Documents folder shared with the HomeGroup, but you do want to share a folder that's inside the Documents folder. Select the folder you want to share and then choose an option in the "Share with" section on the "Share" tab.

For sharing with HomeGroups, you have two options:
- Homegroup (view). Gives users on other PCs in the Homegroup the ability to view folders and files and also copy them to their local PC, but not edit or delete the shared folders and files on your PC.
- Homegroup (view and edit). Gives users on other PCs in the HomeGroup the ability to view, edit, and delete the shared folders and files on your PC.
Unfortunately, File Explorer itself doesn't really give you any confirmation or visual indication about sharing changes you make to a file or folder. But you can find out that information by selecting a file or folder and then clicking the "Specific people" option on the "Share" tab.

In the window that opens, you can see that the selected folder is shared with the HomeGroup with Read/Write permissions.

Even though sharing with HomeGroups is simplified, it can still do most of what people need when sharing files and printers on a small network. And without all the hassle that accompanies setting up advanced file sharing in Windows.