Quick Links
Syncing files between your computer and your iOS device via iTunes can be tedious and requires that you tether to your computer. Break free and enjoy wireless access to shared files from anywhere on your network---and beyond.
One of the great things about the iPhone, iPod Touch, and iPad is how portable they. As a result, however, it's really easy to find yourself upstairs, out in the backyard, or somewhere far from your computer when you want access to files that are elsewhere on your network. Rather than put off reading that ebook, watching that movie, or listening to that music, you can easily access the files over your wireless network and save yourself the hassle of dragging yourself to your computer. As an added bonus you'll also be circumventing your device's limited storage by temporarily caching the files (and only copying them over if you want to have permanent access to them on device).
What You'll Need

For this tutorial you'll need the following:
- An iOS Device
- A copy of the iOS application FileBrowser (iPad/$3.99) or NetPortal (iPhone, iPod Touch/$2.99)
- A computer on your Wi-Fi network to host the file shares
Both FileBrowser and NetPortal are products of Stratospherix. This tutorial will focus on the iPad and FileBrowser but the steps we go through to set everything up should translate almost identically to NetPortal (the scaled down version of Filerowser suited for the smaller iPhone/iPod Touch screen).
In addition to an iOS device running one of the aforementioned applications you will also need a computer somewhere on your network with simple Samba file shared enabled. This could be a Windows, Mac, or Linux computer or even a stand alone NAS computer with simple file sharing. This tutorial won't provide step-by-step instructions for configuring file shares. If you need help configuring file sharing on your machine we'd suggest checking out our past tutorials for Windows, Mac, and Linux simple file sharing. Take a moment before we go any further to make sure you have at least one folder shared for testing purposes.
One final note before we continue. FileBrowser and NetPortal are designed to help you access shares on your local network (or remotely access those shares if you have configured your router to allow outside access). If you're looking for access to your Dropbox files we'd recommend grabbing a copy of the excellent and free Dropbox app for your iOS device (we have a walkthrough of the iPhone version here).
Alternately if you're interested in accessing a variety of cloud-based and server-based sources like Dropbox, MobileMe, WebDAV, and FTP, you should check out Air Sharing ($2.99-6.99). (Although if you're just in it for Dropbox, use the native Dropbox app as it's just as good and completely free.)
Installing and Configuring FileBrowser

If you haven't already downloaded FileBrowser to your iPad (or NetPortal to your other iOS device so you can follow along) now is the time to do so. Once installed, tap the icon for the initial launch---seen in the screenshot above.
Tap on the + symbol to add a machine to your list of local machines. The right pane will fill in with the New Machine menu like so:

Here you need to fill in the the host name such as \\MyComputerName or (as we opted to do) you can use the IP address. Toggle Show More Settings on, enter a display name, a user name, and a password. You can opt to leave the username and password slots blank but you will be prompted to enter them every time you access the share. You can skip messing around in the Advanced Settings menu, in all our testing we didn't run into an instance where it was necessary to mess around with some of the more arcane Samba settings you'll find there.
When you're done, tap Save in the upper right corner. You should then see your new machine listed under Remote Files in the left hand column. Time to start exploring files.
Accessing and Saving Files

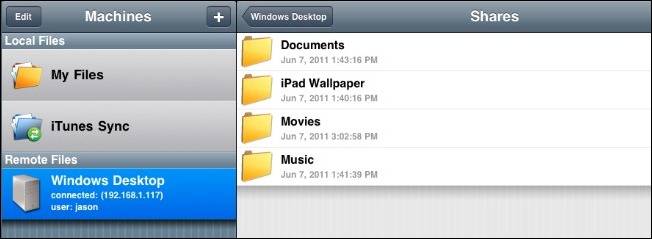
If you tap on the new machine entry you created in the previous step, you'll be greeted with all the shared folders on that machine.
If we explore inside we find the sub-folders and files we shared. Let's take a look at how Filebrowser handles files. It can natively view a wide number of files including text, rich text, and PDF documents as well as Office documents such as Word, Excel, and Powerpoint. All the audio and video formats natively supported by the device will display in the application, and for any file type that it can't open natively it will suggest and alternative application.
When we open up a movie file that is natively supported either by the OS or by FileBrowser it opens right within the application as it does when we open this QuickTime movie:

When you attempt to access a file that isn't natively supported (such as an AVI file) FileBrowser asks you if you want to download the file even though it's not natively supported. When you run into this, tap on the blue arrow on the right side of each file entry. A menu will pop up with options for file renaming, deletion, and---most important for our purposes---Open in..., tap Open In to begin downloading the file. The file will then be cached locally to your device.

When the file has finished downloading, tap again on the blue arrow and select Open In. This time you'll see a selection of applications that are suitable matches for opening the file.

Suitable matches, it would sometimes seem, is open to a wide interpretation. Here FileBrowser gives us four choices, three of which are video players and the fourth of which is another place to store our files. Let's fire it up in VLC and see how it looks:

Looks beautiful to us, the playback was silky smooth as though we'd previously synced the video to our device instead of shuttling it remotely over the network.
Copying Files to Your Device

In the last example, where we played an unsupported video file, we simply cached the file locally for playback. If you want to store files on your device for later use you'll need to copy them over to FileBrowsers local structure.
First you need to create some folders. Tap on My Files as seen in the screenshot above. At the bottom of the file browsing pane you'll see a a small square with an arrow. Tap that arrow to add a new folder.

We're going to create a movie folder to copy over the movie we just watched. Locate whatever file it is you want to copy over and tap on the blue arrow beside the file name again. From the list of available options select Copy. FileBrowser will prompt you to confirm you wish to copy the file, click Confirm. Now click on My Files again to navigate to the folder you wish to dump the file into. Since we're copying a movie file we'll head back to the folder we just created and tap the square with the arrow again.

If the file has been locally cached (because you already watched it) the transfer is almost instant. If you're selecting files you haven't opened on the device then it will transfer from the remote share. If you're on iOS 4.2+ Filebrowser will transfer files in the background so you can get back to playing Angry Birds.
One last note before we leave the section on transferring files. If you have a lot of files to transfer, especially large files like movies or big PDFs, FileBrowser does support synching with iTunes. Load up iTunes, dump all the files you want to transfer into the FileBrowser directory into the File Sharing section under the Apps tab in iTunes, and then sort the files on your device once the sync is complete. The focus of this tutorial was to get away from being tethered to iTunes all the time, but there are some instances where a USB-based transfer makes more sense.
That's all there is to it! You can access, stream, copy, and enjoy your files anywhere your Wi-Fi network reaches (and beyond, with properly forwarded ports).