Quick Links
Boingboing.net has a cool set of meticulously drawn pixel art portraits for their key writers. If you're a lover of pixel art, why not try and recreate a similar avatars for yourself with a few simple filters in either Photoshop or GIMP?
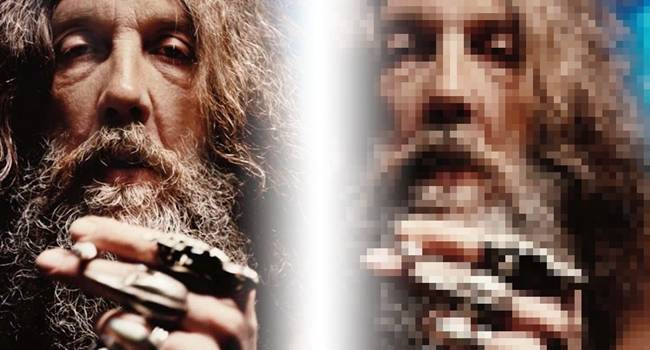
How-To Geek has covered a few different ways to create pixel art from ordinary graphics, and this simple method is more simple pixel art, but using a different technique. Watch as we transform two ordinary photographs into blocky masterpieces, as well as compare the techniques used between Photoshop and the GIMP. Read on!
Photo Editing and Pixel Art Filters in Photoshop


Start with a picture you want to be your new avatar---it could be a picture of yourself, or whatever graphic you want to use.
Press

to select the crop tool, and hold down the shift key to click-drag a perfect square for your avatar. Press enter to render your crop.

Let's assume your photograph isn't a perfect one for pixel-art, and might require some tweaking. As an optional step, bring some bold contrast to your detail using the Unsharp Mark filter, and sort of overdo it. Unsharp Mask is located under Filters > Sharpen > Unsharp Mask. Feel free to go even beyond the amounts here, and create an image with a huge amount of contrast---you'll probably need it by the time you reach your end result.

Resize your square photograph to the target size for your avatar. Many websites and forums will tell you what the maximum file width and height are. For demonstration purposes, we'll use a common size of 128 x 128 pixels.

You'll understand how your image is going too look once you shrink it to avatar size.

will bring up the Levels tool, which is one of the best tools for adjusting contrast like a pro. Use it to bring out strong highlights and great contrast as an optional step, if you feel your photograph could use a little more pop.

The final filter will turn your basic graphic into pixel art before your eyes. Go to Filter > Pixelate > Mosaic to bring up the mosaic filter.

The mosaic filter allows you to control your level of detail by adjusting the tile size in your image. While we've covered other methods for turning ordinary graphics into pixel art, this method will allow you the most control. This is particularly critical if your image is not ideal for this sort of low detail image.

Press "OK" to render your mosaic filter, and save your image, preferably as a PNG to preserve the blocky goodness of the tiles and avoid JPG artifacts or using an 8 bit color palette.
Simple Pixel Art Filters Using The GIMP


Some pictures, you might guess, already have the appropriate contrast needed to create a great low detail image, like pixel art. In situations like these, you'll be able to get by with less photo editing filters or added contrast.
Start by grabbing the Rectangle selection tool from your toolbox, shortcut key

. Hold down shift and click and drag in your image to create a perfect square.

Once you're done selecting your square area for your avatar, navigate to Image > Crop to Selection to trim your image down to a perfect square.

Navigate to Image > Scale Image to change the size of your image to the appropriate avatar size.

For the sake of demonstration, we'll assume the target size is the common value of 128 x 128 pixels. When you've entered that (or your own values) into the Scale Image menu, click "Scale" to finalize your adjustment.

Check that your image looks good shrunk down to this size. You can always add contrast at this point with GIMP's Levels Tool or Curves Tool, or you can simply skip that step and finish up your pixel avatar. You can also find GIMP's Unsharp Mask tool to add contrast to your detailed areas under Filters > Enhance > Unsharp Mask. Make either of these adjustments here to prep your image for pixelating, or simply skip this step.

GIMP's Pixelize filter can be found under Filter > Blur > Pixelize. Adjust your "pixel" size until you're happy with your avatar, then click OK to render.

Remember to save your new avatar in an internet friendly PNG, and avoid the problems with lossy JPGs, which can ruin the pixel art look of your final image.
Have questions or comments concerning Graphics, Photos, Filetypes, or Photoshop? Send your questions to ericgoodnight@howtogeek.com, and they may be featured in a future How-To Geek Graphics article.
Image Credits: Apologies to Alan Moore and Neil Gaiman, used without permission with the utmost respect, assumed fair use.