
Do you need to pump large amounts of data to a multitude of clients simultaneously, while only using a single IP address? By using "link aggregation" we can join several separate network cards on the system into one humongous NIC.
Overview
Link aggregation was designed to give you the option of increasing available network bandwidth and resiliency, without completely changing your infrastructure to do so (with the cost that such a move would entail).
Beyond that, as system administrators, we usually have little to no affect over the inner workings of the applications running on our servers. So if such a time comes that we need to increase the available network bandwidth to the application we may be facing a complete redesign of the system. You probably know that changing the client-server interaction, funding a targeted feature requests from the application’s vendor or upgrading to a new generation of network equipment, is either a lot of work or requires a budget or both. So a second before you fork out the time and $$$, consider that the upshot of using the “Link aggregation” technology, is that because this is done at the infrastructure level (OS, NICs and switches) the application can remain completely oblivious to the change while suddenly getting the combined bandwidth of multiple network connections.
Moreover, nowadays this technology is a standard part of most network equipment, you just have to be a “geek” to use it. So, “Remember the fires of hell that forged you!” and let show everyone what we’re made of by squeezing every ounce of performance available from the current infrastructure

.
Image by renjith krishnan
Prerequisites
- This guide was written using Ubuntu server9.10 x64, therefore it is assumed that you have a Debian based system to work with as well.
- your system has more then one network card.
- You will see me use VIM as the editor program, this is just because I’m used to it… you may use any other editor that you’d like.
Linux side of things
We will be using the “ifenslave” (interface enslave) package, which is able to take the system’s network cards and in the darkness bind them. One thing to note that while on windows this type of configuration is done at the NIC’s driver level and thus is limited to only the interfaces available on that card, with the ifenslave package it is possible to take any NIC in the system and bond it (assuming they are of the same speed grade i.e. 1000Mb/s).
While in this guide, we will be setting up the link to use the 802.3ad standard, on both the switch (using LACP) and the server, It is noteworthy to say that the "ifenslave" package enables aggregation modes that do not require the cooperation of the switch. However I had not personally used them yet so I can't vouch for them. Just keep this in mind in case your unable to get the network infrastructure to cooperate or if your network card doesn’t have driver support for “Ethtool”.
Installing the ifenslave package
This procedure was created on Ubuntu 9.10 which had an outstanding bug in the "ifenslave" package that doesn't bring up the bonded interface on startup (documented here). If you install the ifenslave on a 10.10 release, you will automatically get the version with the bug fix. However for those of you not running the latest and greatest, you will need to manually install a newer version of the ifenslave package.
*Thank you Alexander Usyskin for helping to figure this out.
To normally install the package (for 10.10 and above users):
sudo aptitude install ifenslave
To manually install the newer version, download the version that suits your OS (x86 or x64), put it in the tmp directory and install using the dpkg command.
For a 32-bit OS:
sudo dpkg -i /tmp/ifenslave-2.6_1.1.0-15ubuntu1_i386.deb
For a 64-bit OS:
sudo dpkg -i /tmp/ifenslave-2.6_1.1.0-15ubuntu1_amd64.deb
Configure the bonded interface
Now that the ifenslave package has been installed we can configure a bonded interface. To do this, edit the interfaces configuration file:
sudo vim /etc/network/interfaces
Comment out all the interfaces that will be part of the bond and add the following:
auto bond0

            iface bond0 inet dhcp

             bond-slaves all

             bond-mode 4

             bond-miimon 100

             bond-primary eth1 eth2 eth3 eth4 eth0
The above example sets the bond to: use mode 4 (802.3ad), get the IP from DHCP and use all the NICs on the server for the bond (the server in question had 4 interfaces from a quad-headed NIC and the on-board NIC).
Infrastructure side of things
As said in the overview, we are using "mode 4" (802.3ad) in this guide, so we must set the switch on the receiving end to use aggregation on the ports we are connecting the server on.
Now obviously I can’t go over every conceivable device configuration out there, so I’ll give two examples and hope that it will give you enough to go on when looking for the information on the vendors documentation or Google for your specific device.
Juniper J-web
This segment explains how to configure interfaces (ports) on a Juniper device to use "Link aggregation" (LACP) using the J-web management GUI.
Note: I used the EX3200 for the screen captures and instructions detailed below, however the J-web is fairly similar for other Juniper devices that use JUNOS.
Dis-associate the interface
This step is necessary because out-of-the-box, every interface on a Juniper device is associated with the default Vlan called "unit0". While Juniper does have documentation on how you should configure link aggregation, I have found this first and basic step , to be missing. Without performing this step, the rest of the steps described by the documentation will simply not work and you will be scratching your head as to what are you missing.
Thanks for the Juniper support staff for providing this GUI solution (eventually).
- On the J-web main screen, click Configure.
- Then click "CLI tools".
- Select "Point and Click CLI".
-
Then click on "edit" near the "Interfaces" headline.

-
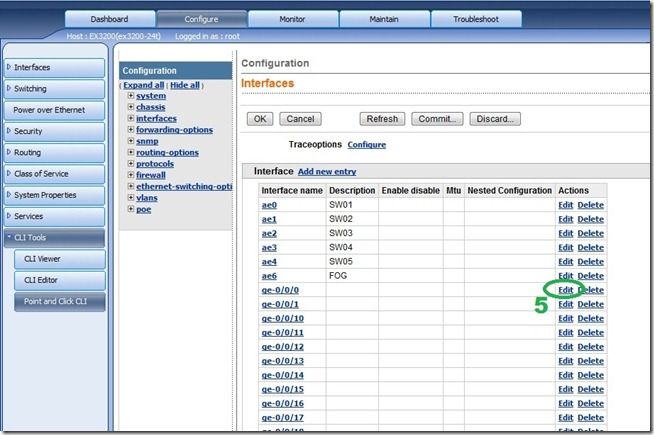
Select the interface you want to be part of the aggregation and click the "Edit" next to it.
-
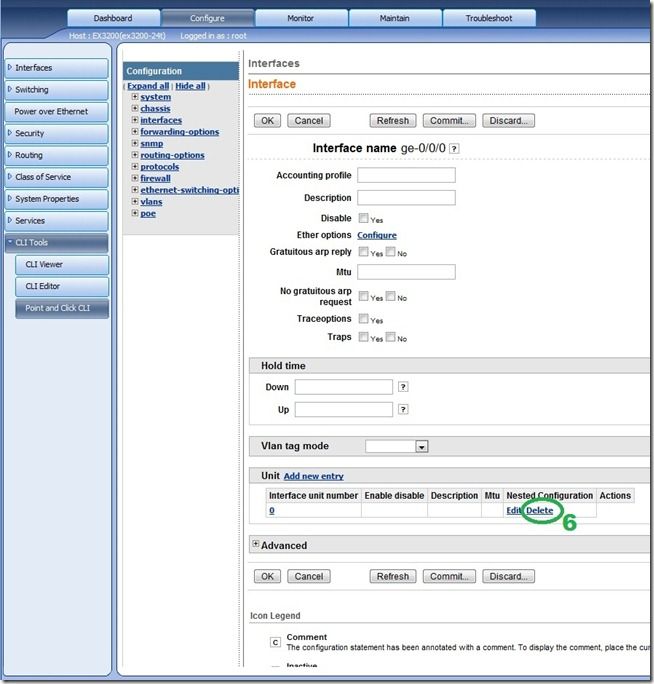
Under the "Unit" section delete the association as shown in the picture.
- Click OK.
- Repeat for all the interfaces that you want to be part of aggregations.
- When done use "Commit" to apply the changes.


Grouping interfaces into aggregations
Now that the interfaces have been dis-associated, we can create aggregation links by “grouping” them.
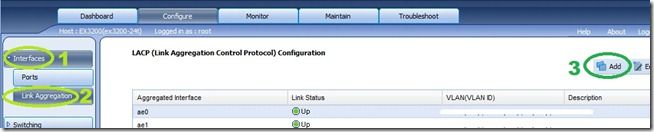
- On the J-web main screen, click "Interfaces".
- Then click "Link Aggregation".
-
Select "Add".
- When the pop-up window comes up, select "active".
-
Click on "Add".
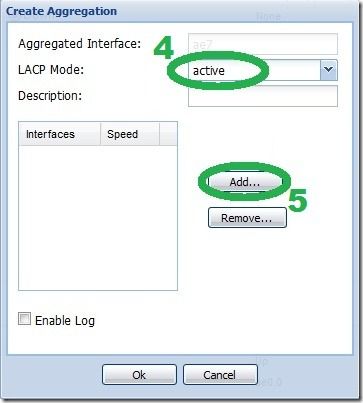
- In the sub-pop-up window, select the interfaces that will be part of the link (hold Ctrl for multiple).
- Click "OK" until all the configuration windows are gone.
- Done.


HP’s web managed ProCurve switches
Complimentary to the Juniper instructions, here are the instructions for HP’s ProCurve web managed devices.
HP 1800G
- Click on "Trunks".
- Click on "LACP Setup"
-
Select the checkbox for ports that you want to be aggregation capable, in this example I used ports 3 and 4.

- Click Apply at the bottom of the page.
- Done.

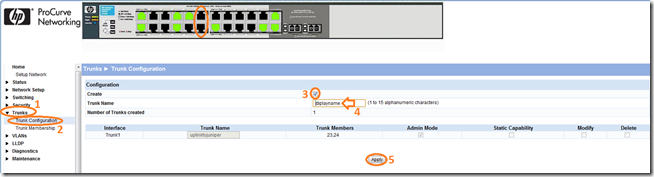
HP 1810G
- Click on "Trunks".
- Click on "Trunk Configuration".
- Select the "Create" checkbox.
- Give the Link a name.
-
Click "Apply".
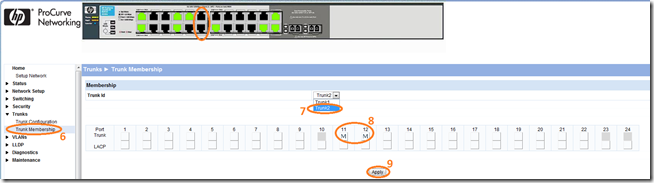
- Click on "Trunk Membership".
- Select the "Trunk id" from the drop-down-list, in our example we use "Trunk2".
- Click on the Ports you want to be part of the aggregation, in our example we used ports 11 & 12.
-
Click "Apply".
- Make the changes permanent by going to “maintenance”.
- Then into the "Save configurations" sub-menu.
-
Click on the "Save Configuration" button.
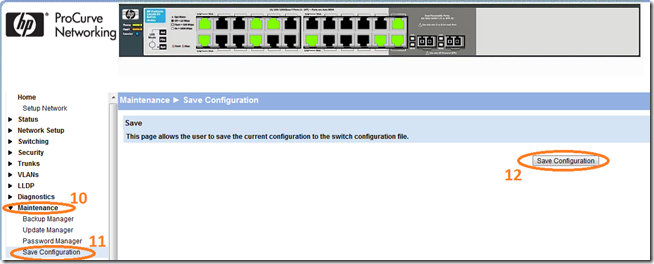
- Done.


Show’m the white light you're made of