One of the more popular tools of the Sysinternals suite among system administrators is BGInfo which tacks real-time system information to your desktop wallpaper when you first login. For obvious reasons, having information such as system memory, available hard drive space and system up time (among others) right in front of you is very convenient when you are managing several systems. A little known feature about this handy utility is the ability to have system information automatically saved to a SQL database or some other data file. With a few minutes of setup work you can easily configure BGInfo to record system information of all your network computers in a centralized storage location. You can then use this data to monitor or report on these systems however you see fit.
BGInfo Setup
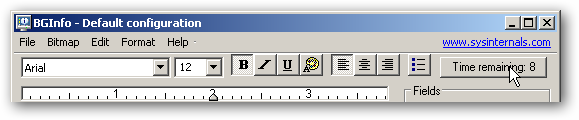
If you are familiar with BGInfo, you can skip this section. However, if you have never used this tool, it takes just a few minutes to setup in order to capture the data you are looking for. When you first open BGInfo, a timer will be counting down in the upper right corner. Click the countdown button to keep the interface up so we can edit the settings. Now edit the information you want to capture from the available fields on the right. Since all the output will be redirected to a central location, don't worry about configuring the layout or formatting.

Configuring the Storage Database
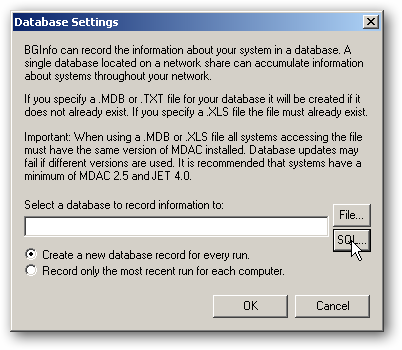
BGInfo supports the ability to store information in several database formats: SQL Server Database, Access Database, Excel and Text File. To configure this option, open File > Database.

Using a Text File
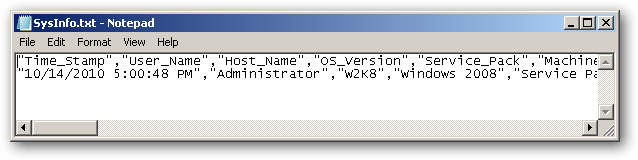
The simplest, and perhaps most practical, option is to store the BGInfo data in a comma separated text file. This format allows for the file to be opened in Excel or imported into a database. To use a text file or any other file system type (Excel or MS Access), simply provide the UNC to the respective file. The account running the task to write to this file will need read/write access to both the share and NTFS file permissions.

When using a text file, the only option is to have BGInfo create a new entry each time the capture process is run which will add a new line to the respective CSV text file.

Using a SQL Database
If you prefer to have the data dropped straight into a SQL Server database, BGInfo support this as well. This requires a bit of additional configuration, but overall it is very easy. The first step is to create a database where the information will be stored. Additionally, you will want to create a user account to fill data into this table (and this table only). For your convenience, this script creates a new database and user account (run this as Administrator on your SQL Server machine):
@SET Server=%ComputerName%.
@SET Database=BGInfo
@SET UserName=BGInfo
@SET Password=password
SQLCMD -S "%Server%" -E -Q "Create Database [%Database%]"
SQLCMD -S "%Server%" -E -Q "Create Login [%UserName%] With Password=N'%Password%', DEFAULT_DATABASE=[%Database%], CHECK_EXPIRATION=OFF, CHECK_POLICY=OFF"
SQLCMD -S "%Server%" -E -d "%Database%" -Q "Create User [%UserName%] For Login [%UserName%]"
SQLCMD -S "%Server%" -E -d "%Database%" -Q "EXEC sp_addrolemember N'db_owner', N'%UserName%'"
Note the SQL user account must have 'db_owner' permissions on the database in order for BGInfo to work correctly. This is why you should have a SQL user account specifically for this database.

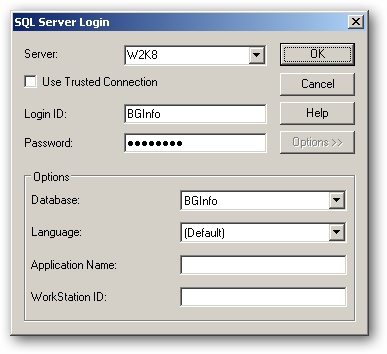
Next, configure BGInfo to connect to this database by clicking on the SQL button.

Fill out the connection properties according to your database settings.

Select the option of whether or not to only have one entry per computer or keep a history of each system.

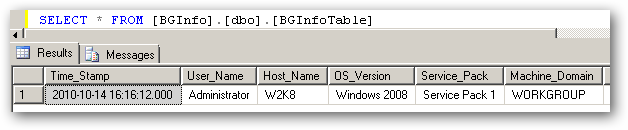
The data will then be dropped directly into a table named "BGInfoTable" in the respective database.

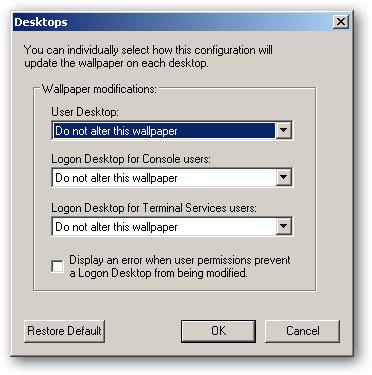
Configure User Desktop Options
While the primary function of BGInfo is to alter the user's desktop by adding system info as part of the wallpaper, for our use here we want to leave the user's wallpaper alone so this process runs without altering any of the user's settings. Click the Desktops button.

Configure the Wallpaper modifications to not alter anything.

Preparing the Deployment
Now we are all set for deploying the configuration to the individual machines so we can start capturing the system data. If you have not done so already, click the Apply button to create the first entry in your data repository. If all is configured correctly, you should be able to open your data file or database and see the entry for the respective machine.

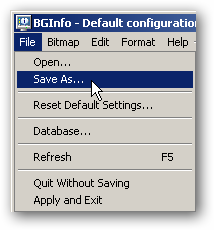
Now click the File > Save As menu option and save the configuration as "BGInfoCapture.bgi".

Deploying to Client Machines
Deployment to the respective client machines is pretty straightforward. No installation is required as you just need to copy the BGInfo.exe and the BGInfoCapture.bgi to each machine and place them in the same directory. Once in place, just run the command:
BGInfo.exe BGInfoCapture.bgi /Timer:0 /Silent /NoLicPrompt
Of course, you probably want to schedule the capture process to run on a schedule. This command creates a Scheduled Task to run the capture process at 8 AM every morning and assumes you copied the required files to the root of your C drive:
SCHTASKS /Create /SC DAILY /ST 08:00 /TN "System Info" /TR "C:BGInfo.exe C:BGInfoCapture.bgi /Timer:0 /Silent /NoLicPrompt"
Adjust as needed, but the end result is the scheduled task command should look something like this:
