You can use Mail Merge in Word 2003 to create mailing labels for a database full of customers.
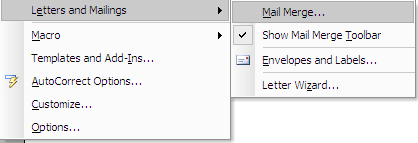
Open Word 2003 and click on Tools \ Letters and Mailings \ Mail Merge...
In the Mail Merge menu on the right under Select document type, select Labels. Then click Next: Starting document.

From step 2 Click on Label options...

This will bring up a menu allowing you to select the brand and style of the labels you want to print. Here I am using Avery 4013 on a Dot Matrix printer. Of course you will want to select what you have, Avery is the most popular in business from my experience. If you have oddball labels you can always choose custom settings as well. When your done with the label options click OK.

Now you are going to want to choose your data source. Under Use an Existing List; click on Browse... Use Explorer to find the data source you want to use and double click it. (Creating a data source will be covered in another how to).

You will click on a confirmation screen verifying your data source (I used an Excel spread sheet that I had imported from Access) and get to Mail Merge Recipients window. Here you can change the order of your information, delete certain users, and validate information. Since I know the data source is what I want I chose Select All. Now hit OK.

Ok, we're almost complete, just a couple more steps. Click on Next: Arrange your labels.

Here Click on More items...

Now we can choose the order of the data we want presented on the labels we are creating. Just double click on each field you want to include.

Now if you look over at your document you will notice these fields are being added to your labels. You can edit them by highlighting the field and moving it to where you want. For instance on this label I would want the First Name before the Last Name.

Now over on the Mail Merge menu bar you will want to select the "update all labels" button. This will populate each label with the fields from the fist label. Then click on Next: Preview your labels.

Your document screen will look similar to this.

Now, on the mail merge menu you can click through the Recipients by clicking the back or forward arrows. If you doing hundreds of labels ... I would just spot check them. If you're satisfied with how they look let's move to step 6 and complete the merge.

The Merge is complete! Make sure your labels are set up in the printer and hit Print...

You will be presented with the print select screen. Choose all, or a specific number to print. You will get a different record for each contact from your data source on each label.
