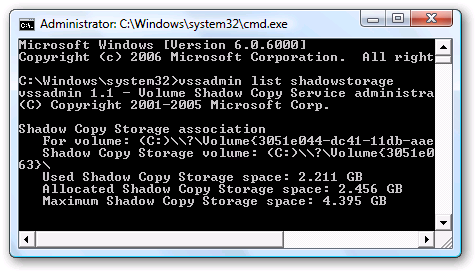
The System Restore feature in Windows Vista is very important to keep enabled, what with all the problems Vista users are having with compatibility. Even so, the disk usage can get out of hand if you install a large amount of software.Update: We've also covered how to limit system restore's disk usage in Windows 7.The utility to change the settings is a command line utility called vssadmin. You'll have to open a command prompt in administrator mode by entering cmd into the start menu and hitting Ctrl+Shift+Enter, or right-clicking the command prompt and selecting Run as Administrator. Show Allocated System Restore Size Type in the following command into the prompt:
vssadmin list shadowstorage
As you can see in the screenshot, System Restore is taking up 2.2 GB on my system.. and I just reinstalled! Changing the Allocated System Restore Size To change the maximum size on the disk that System Restore will use, you will need to type in the following command:
vssadmin Resize ShadowStorage /For=C: /On=C: /Maxsize=3GB
You can change the /for and /on to match the drive that System Restore is enabled on, and you can set a different size for the max size. I chose 3GB for the sake of this example, but you could also limit it to 500MB or something else if you wanted to. If you have plenty of disk space, I'd recommend leaving the values alone, but if you are running low on space, this is a quick way to help the problem.


