Quick Look on Mac is an incredibly useful way to preview a file without completely opening it. In macOS Mojave and above, you can perform quick edits on files in the Quick Look popup without needing to open a third-party app.
How to Edit and Mark Up Images and PDFs
All of Preview's editing and markup features are now available directly in the Quick Look menu. This means you can crop an image, rotate it, mark it up with text, and even add a signature, all without opening the image in Preview. The same goes for PDFs.
Start by opening the Finder app (file explorer) and locating the image or PDF. If it's on your Desktop, click it to select it. After selecting the image or PDF, press the Space bar to open it in Quick Look.

The Quick Look window will open up above everything. You can press the "Esc" key to go back if you select the wrong item or you no longer want to edit it.
You'll see two buttons next to the "Open with Preview" button. The first button is a quick shortcut to the "Rotate" feature. Click on it and the photo will rotate by 90 degrees (in the left direction) instantly. This is an incredibly quick way to fix a picture with the wrong orientation.
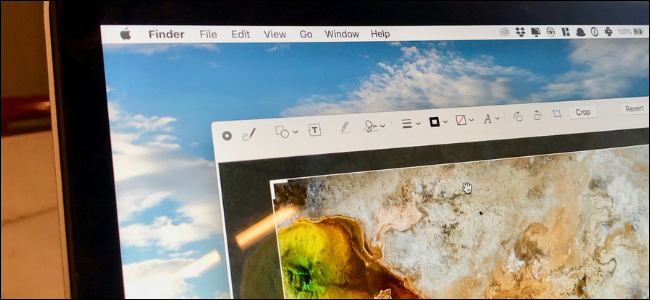
Next to it, you'll see the "Markup" button. Click on it, and you'll see a new toolbar appear at the top. If you've used the Preview app before, you'll recognize the editing options.

From the left, you'll find the Sketch, Draw, Shapes, Text, Highlight, Sign, Shape Style, Border Color, Fill Color, Text Style, Rotate Right, Rotate Left, and Crop buttons.

If you want to crop a photo, click on the "Crop" button and then use the handles to reduce the size of the picture. To insert a signature in a PDF document, click on the "Sign" button, and then select your saved signature.
To add arrows or a box, click on the "Shapes" button and select a shape from the drop-down menu. You can then click on "Shape Style" to make it thinner or thicker. Click on "Border Color" button to change the color of the shape.
Once you're done with your edits, click on the "Done" button.

All your edits will be saved to the image or the PDF. Quick Look will also close, taking you back to a Finder window or the Desktop.
How to Trim and Rotate Videos
Quick Look on macOS also integrates a Rotate and Trim feature for videos. Find a video in Finder and press the Space bar.
You'll see two icons in the top toolbar next to the button for opening the video in the default app. The first is a "Rotate" button that quickly rotates the video by 90 degrees (in the left direction). The second is a "Trim" button that reveals a video editing tool.

You'll see a video timeline and a scrubber in the bottom part of the window with two yellow handles at either side of the timeline. Click and hold on the handle on the left side of the timeline and pull it to where you want to start the video.

Do the same with the right handle for where you want to end the video. If you make a mistake and you want to go back, click on the "Revert" button.
Now, click on "Done." The part of the video that's outside of the yellow handles will be removed. The video will be trimmed to the new start and end points.
If you want to perform more specific edits, you can use the QuickTime app on your Mac.