You can use GUI windows, sliders, radio buttons, progress bars, and more in your Bash scripts. Learn how to use the zenity toolkit and give your Bash scripts a facelift. We'll show you how.
Bash scripting is a powerful programming language and, because it's built into the Bash shell, it's readily available to everyone. It's an easy language to start programming in. Because it's interpreted, you don't need to compile your scripts. As soon as you've edited the script file and made it executable, you can run it. This makes the coding, running, and debugging cycle quite efficient.
There are two main complaints people have with Bash scripts, and the first is speed. Because the Bash shell interprets the commands in the script, they don't execute as quickly as compiled code. However, this is like complaining that a tractor isn't as fast as a car; they're meant for different things.
There are two kinds of speed, though. You can often knock together a quick script and use it to perform a task much more quickly than developing a solution in a compiled language, such as C.
The second complaint people have with Bash scripts is the user interface---it's a terminal window. Of course, sometimes the interface doesn't matter. If the only person who'll ever use the script is its author, the interface probably isn't that important. Nor does it matter for scripts that perform background and batch type processing. Typically, such scripts don't need much (if any) user interaction.
There are occasions when you do need something a little more intuitive and modern than the terminal window. Most people are familiar with a graphical user interface (GUI). To give people an experience that's as frictionless as possible, you have to create and use GUI elements from your scripts.
The zenity Application
zenity allows you to incorporate a wide range of graphical interface elements in your Bash scripts. It's a powerful toolkit that gives your scripts a modern feel and a contemporary, familiar appearance.
zenity is preinstalled on Ubuntu, Fedora and Manjaro distributions. It's part of GNOME. If you use KDE, you might want to check out
kdialog
instead, although zenity does run on any desktop environment.
The examples in this article show you how to create the different dialog windows from the command line, how to capture their return values and user selections in variables, and how to use the dialog windows in scripts.
We finish with a small application that makes use of all three types of dialog windows.
The Calendar Dialog Window
A calendar dialog window allows someone to select a date. To create one with zenity requires a single command of two words:
zenity --calendar
The calendar dialog window appears. This has all the functionality you'd expect from a standard date-picker. You can change the month and year, and click on a day to select that date. By default, today's date is highlighted when the window appears.
Click "OK" to close the dialog window and select the highlighted date. Double-clicking a date does the same thing.
If you don't want to make a date selection, click "Cancel," press the "Esc" key on your keyboard, or close the dialog window.
In the example above, August 19, 2019, is selected. If the user clicks "OK," the calendar closes, and the selected date prints in the terminal window.
You can ignore the line, "GTKDialog mapped without a transient parent. This is discouraged."
GTK stands for GIMP Tool Kit, which is the toolkit used to develop the GNOME interface. It was originally devised by the authors of the GNU Image Manipulation Program (GIMP). GNU stands for GNU's Not Unix.
The GTK engine is warning the authors of zenity that they've used a GTK component in a nonstandard way.
Capturing the Date Value
Printing the date to the terminal doesn't do a lot for us. If we're going to call this calendar from one of our scripts, we need to capture the selected date value so we can do something useful with it in our script. We'll also customize the calendar slightly.
We'll use the following options with the calendar. They must all be used with the double-dash "--" flag:
--text: Specifies a string of text to display in the calendar. It replaces the default, "Select a date from below."
--title: Sets the title of the calendar dialog window.
--day: Sets the day that's selected when the calendar opens.
--month: Sets the month that's selected when the calendar opens.
--year: Sets the year that's selected when the calendar opens.
We're using a variable called ChosenDate to capture the date returned from the calendar. And we're using echo $ChosenDate to print that date to the terminal window.
Yes, we achieved the same result in the previous example, but here, we have the selected date stored in a variable. In the previous example, it was printed and forgotten.
Now, the calendar displays our prompt and our window title. The date is set to our chosen start date rather than today's date.
We can also customize the format of the date string returned when a selection is made. The --date-format option must be followed by a format specifier. This is a string of tokens that define the data and formats that are to be included in the output. The tokens are the same as those used with the strftime()C language function and there's a huge selection of them.
And the date is returned using our format. It shows the name of the day of the week, followed by the date in European order: day, month, year.
The File Selection Dialog Window: Choosing a File
File selection dialog windows are quite complex. People can browse through the file system, highlight a file or files, and then click "OK" to select those files or cancel the selection altogether.
zenity provides all this functionality, and more. And it's just as easy to use as the calendar dialog window.
The new options we're going to use are:
--file-selection: Tells zenity we want to use a file selection dialog window.
--multiple: Allows someone to select more than one file.
--file-filter: Tells the file dialog window which file types to display.
The file selection dialog window is as functional as any other file selection window.
The user can browse through the file system and select the file of her choice.
We've browsed to a new directory and selected a file called "button_hybrid.png."
When you click "OK," the file selection dialog window closes, and the filename and path print in the terminal window.
If you need to use the filename in any further processing, you can capture it in a variable, just as you did for the date from the calendar.
The File Selection Dialog Window: Saving a File
If we add one option, we can turn the file selection dialog window into a file save dialog window. The option is --save. We're also going to use the --confirm-overwrite option. This prompts the person to confirm he wants to overwrite an existing file.
The file save dialog window appears. Note there's a text field where someone can type a filename.
The user can browse to the location of his choice within the file system, provide a name for the file, or click an existing file to overwrite it.
In the example above, the user highlighted an existing file.
When he clicks "OK," a confirmation dialog window appears asking him to confirm he wants to replace the existing file. Note the name of the file appears in the warning dialog. That's the sort of attention to detail that gives zenity its professional appearance.
If we hadn't used the --confirm-overwrite option, the file would have been silently overwritten.
The name of the file is stored in the variable Response, which prints to the terminal window.
Notification Dialog Windows
With zenity, including slick notification dialog windows in your scripts is effortless. There are stock dialog windows you can call upon to provide information, warnings, error messages, and questions for the user.
To create an error message dialog window, use the following command:
zenity --error --width 300 --text "Permission denied. Cannot write to the file."
The new options we're using are:
--error: Tells zenity we want to use an error dialog window.
--width: Sets the initial width of the window.
The error dialog window appears at the specified width. It uses the standard GTK error icon.
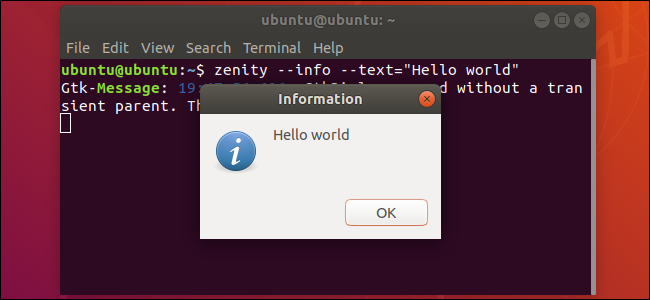
To create an information dialog window, use the following command:
zenity --info --width 300 --text "Update complete. Click OK to continue."
The new option we're using is --info , which tells zenity to create an information dialog window.
To create a question dialog window, use the following command:
zenity --question --width 300 --text "Are you happy to proceed?"; echo $?
The new option we're using is --question, which tells zenity to create a question dialog window.
The $? is a special parameter. It holds the return value from the most recently executed foreground pipeline. In general terms, this is the value from the most recently closed process. A zero value means "OK," and a value of one or more means "Cancel."
This is a general technique you can apply to any of the zenity dialog windows. By checking this value in your script, you can determine whether the data returned from a dialog window should be processed or ignored.
We clicked "Yes," so the return code is a zero indicating "OK."
To create a warning dialog window, use the following command:
zenity --warning --title "Low Hard Drive Space" --width 300 --text "There may not be enough hard drive space to save the backup."
The new option we're using is --warning , which tells zenity to create a warning dialog window.
The warning dialog window appears. It's not a question, so it only has one button.
The Progress Dialog Window
You can use the zenity progress dialog window to display a progress bar that indicates how close to completion your script is.
The progress bar is advanced according to the values that get piped into it from your script. To demonstrate the principle, use the following command:
(for i in $(seq 0 10 100); do echo $i; sleep 1; done)
The command breaks down like this:
The seq command steps through a sequence from 0 to 100, in steps of 10.
At each step, the value is stored in the variable i. This prints to the terminal window.
The command pauses for one second, due to the sleep 1 command.
We can use this with the zenity progress dialog window to demonstrate the progress bar. Note we're piping the output of the previous command into zenity:
(for i in $(seq 0 10 100); do echo $i; sleep 1; done) | zenity --progress --title "How-To Geek" -- auto-close
The new options we're using are:
--progress: Tells zenity we want to use a progress dialog window.
--auto-close: Closes the dialog when the progress bar reaches 100 percent.
The progress dialog window appears, and the bar advances towards 100 percent, pausing for one second between each step.
We can use that concept of piping values into zenity to include the progress dialog window in a script.
Enter this text in an editor and save it as "progress.sh."
The script defines a function called work-list. This is where you put your commands and instructions to perform real work. Replace each of the sleep 1 commands with your real ones.
zenity accepts the echo "# ..." lines and displays them within the progress dialog window. Change the text of these lines, so they pass informative messages to the user.
The echo lines that contain numbers, such as echo "25" , are also accepted by zenity and set the value of the progress bar.
The work-list function is called and piped into zenity.
Use this command to make the script executable:
chmod +x progress.sh
Use this command to run the script:
./progress.sh
The script runs, and the text message changes as each phase of the script executes. The progress bar moves in steps toward 100 percent.
The Scale Dialog Window
The scale dialog window lets someone move a slider to choose a numeric value. This means she can't input a value that's too high or low.
The new options we're using are:
--scale: Tells zenity we want to use a scale dialog window.
--min-value: Sets the minimum value for the scale.
--max-value: Sets the maximum value for the scale.
--step: Sets the amount the slider moves in when the arrow keys are used. This doesn't affect slider movements if someone uses the mouse.
--value: Sets the initial value and position of the slider.
The slider dialog window appears with the slider set to 15.
The user can move the slider to select a new value.
When she clicks "OK," the value is transferred to the variable Response and printed to the terminal window.
The Entry Dialog Window
The entry dialog window allows someone to input text.
The new options we're using are:
--entry: Tells zenity we want to use an entry dialog window.
--entry-text: You can use this if you want to type a suggested value in the text input field. We're using "" to force an empty field. This isn't strictly required, but we wanted to document the option.
A simple dialog window appears, containing a text entry field.
Someone can type and edit text.
When he clicks "OK," the value he typed is assigned to the variable Response. We use echo to print the value of the variable in the terminal window.
Putting It All Together
Let's put these techniques together and create a functional script. The script will perform a hardware info scan and present the results to the user in a scrolling text window. She can choose a long or short scan type.
For this script, we'll use three types of dialog windows, two of which are new to us:
The first is a list dialog window. It allows someone to make a choice.
The second is a progress dialog window that lets the user know something is happening, and she should wait.
The third is a text information window, which displays the results to the user.
Enter this text in an editor and save it as "hardware-info.sh."
# search for hardware info with the appropriate value in $Flag

            hwinfo $Flag | tee >(zenity --width=200 --height=100 \

             --title="Collating Information" --progress \

             --pulsate --text="Checking hardware..." \

             --auto-kill --auto-close) >${TempFile}
# Display the hardware info in a scrolling window

            zenity --width=800 --height=600 \

             --title "Hardware Details" \

             --text-info --filename="${TempFile}"
exit 0
Use this command to make it executable:
chmod +x hardware-info.sh
This script creates a temporary file, and the name of the file is held in the TempFile variable:
TempFile=$(mktemp)
The script uses the --list option to create a zenity dialog window called a list dialog window. The "\" characters at the end of the lines tell the script to treat them as one long line that's wrapped around. Here's the process:
We specify a width and height for the window.
The list dialog window supports columns. The --radiolist option causes the first column to be a column of radio buttons.
We set a title and text prompt for the window.
We set the title of the first column to be "Select." The content of this column will be the radio buttons.
We set the title of the second column to be "Select," and we provide the content of the second column. This column holds two text labels: "Short" and "Long." The TRUE and FALSE indicators mean the "Short" option is selected by default when the dialog window appears.
We're storing the result from this dialog window in a variable called ListType.
If the user presses "Cancel," we don't need to check the value in ListType, we can simply exit. If he presses "OK," we need to find out if he selected the "Short" or "Long" radio button:
The special parameter $? equals zero if the user pressed "OK." It equals one if he pressed "Cancel" or closed the window.
If it equals one, the script displays an error information dialog window and exits. If he presses "OK," we move on to test the value in the ListType variable.
If the ListType variable holds the value "Short," the script sets a variable called Flag to equal "--short."
If the ListType variable doesn't hold the value "Short," it must hold the value "Long." The script sets a variable called Flag to equal "", which is an empty string.
The script uses the Flag variable in the next section.
Now that the script knows which type of scan the user wants, we can perform the hardware information scan:
The script calls the hwinfo command and passes it the value in the Flag variable.
If Flag contains "--short," the hwinfo command performs a short scan. If the value of Flag is "", nothing passes to hwinfo and a default, long scan is performed.
The script pipes the output from hwinfo into tee. tee sends the output into zenity and the TempFile.
The script creates a progress bar dialog window. It sets the width and the height of the dialog window, and the title and prompt texts.
The script cannot know in advance how much information the hwinfo command will produce, so it cannot set the progress bar to advance correctly to 100 percent. The --pulsate option causes the progress dialog to display a moving indicator. This informs the user something is happening and he should wait.
The --auto-kill option terminates the script if someone clicks "Cancel."
The --auto-close option causes the progress dialog to close automatically when the process it's monitoring completes.
# search for hardware info with the appropriate value in $Flag
hwinfo $Flag | tee >(zenity --width=200 --height=100 \
--title="Collating Information" --progress \
--pulsate --text="Checking hardware..." \
--auto-kill --auto-close) >${TempFile}
When the hwinfo scan completes, the script calls zenity to create a text information dialog window with the --text-info option. The text information dialog window displays the contents of the TempFile file:
The script sets the width and height of the dialog window and the title text.
The --flename option is used to read the contents of the file held in the TempFIle variable.
# Display the hardware info in a scrolling window
zenity --width=800 --height=600 \
--title "Hardware Details" \
--text-info --filename="${TempFile}"
When the user closes the text information dialog window, the script exits.
exit 0
Let's fire it up and take a look.
./hardware-info.sh
The list box appears. The "Short" option is selected by default.
Let's select "Long," and then click "OK."
The progress window appears with a sliding indicator. It remains on the screen until the hardware scan is completed.
When the hardware scan is complete, the text information dialog window appears with details from the scan.
Click "OK."
Even a die-hard command-line jockey has to admit a couple of GUI dialog windows can give a humble Bash script a professional touch.