Quick Links
If you have trouble reading text, seeing specific colors, or making out things on the screen, Chrome OS has accessibility features bursting at the seams designed to help you. You can manage them individually from the system menu or the Settings app to use on everyday tasks.
How to View Accessibility Features
The easiest way to enable/disable each accessibility feature without having to open up the Settings app each time is directly from the system menu. This is off by default, so you'll need to toggle it on first.
First, click on the clock to open the system menu and notification tray; then click on the Settings icon.

Scroll to the bottom and click "Advanced."

Scroll a little bit further until you see the Accessibility section, and then toggle "Always show accessibility option in the system menu" to the On position.

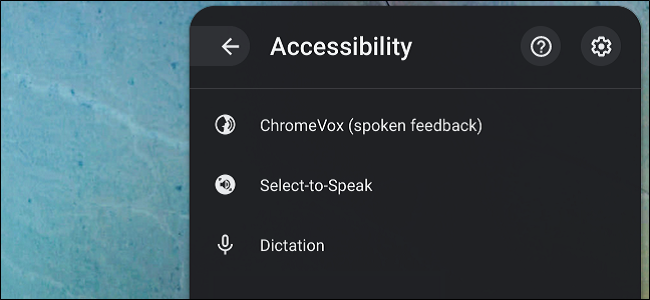
The next time you open the system menu, the Accessibility button will be available. Click on it to open the expanded view.
You can click on any of the features available in this menu to enable them. If you're unsure of what a particular feature does, however, we have you covered---read on to get the full details of what each of these does.

Text-to-Speech Features

Both features under this section focus on using Google's text-to-speech (TTS) engine to take content from the active window, then read it back to you. Chromebooks come equipped with a free built-in screen reader that allows you to hear what's on your display.
ChromeVox: Chrome OS' Screen Reader
ChromeVox is a free screen reader built into every Chromebook that helps visually impaired people use Chrome OS. It's built solely on web technologies (HTML5, CSS, and JavaScript), making it a fast and versatile way to navigate Chrome OS. It comes pre-installed in all current versions of Chrome OS, so all you need to do is enable it and it starts to read out everything on the screen.
You can turn on ChromeVox at any time by pressing Ctrl + Alt + z to hear a voice read aloud content from your cursor's current position. If you're using a tablet running Chrome OS, press and hold the Volume Up + Volume Down buttons for five seconds. You'll hear a chime sound and a ChromeVox bar will appear at the top of your screen, notifying you it is enabled.

Some common shortcuts include:
- Tab: Next focusable item
- Shift+Tab: Previous focusable item
- Search+H: Next heading
- Search+Shift+H: Previous heading
- Search+Down Arrow: Next line
- Search+Up Arrow: Previous line
- Search+L: Next link
- Search+Shift+L: Previous link
- Search+Ctrl+Shift+Right Arrow: Next word
- Search+Ctrl+Shift+Left Arrow: Previous word
- Search+Ctrl+Left Arrow: Go to the top of the page
- Search+Ctrl+Right Arrow: Go to the bottom of the page
A full list of keyboard shortcuts is on the Chromebook Help page for ChromeVox or by pressing Search+. (period) while ChromeVox is enabled.
To disable ChromeVox, repeat the hardware shortcut, and a chime will sound, notifying you it is now off.
Choose Text to Have Read Aloud with Select-to-Speak
Select-to-Speak works similarly to ChromeVox, but instead of reading full pages, it only reads text that you select. When enabled in System Menu > Accessibility > Select-to-Speak, an icon appears next to the system tray.

Once enabled, Select-to-Speak offers a few ways to select which text you want to hear:
- Press and hold the Search key + select a line of text.
- Press and hold the Search key + drag the pointer over an area of the screen.
- Highlight the text and press Search+S.
- Select the Select-to-speak icon from the taskbar, then select a line of text or drag the pointer over an area of the screen.
- On a touchscreen: Tap Select-to-speak. Then tap a line of text or drag your finger over an area of the screen.
Select-to-Speak surrounds the selected text in a pink border and highlights the word currently being read so that you can follow along easily with the voice.
You can stop Select-to-Speak at any time while it's reading by pressing either the Search key or Ctrl.
Change the Language or Voice Settings
If you don't like the way TTS is speaking to you, it's easy to change. You can alter its voice, pitch, or language without hurting its feelings. Head back to Settings > Manage Accessibility Features and click "Text-to-Speech voice settings" under the Text-to-Speech section.
Inside you'll find a plethora of voice altering options to give the TTS a personal touch for your ear. You can even change the speech engine used for playback.
Display Features

For anyone with trouble seeing what's on the screen, Google has you covered with a set of tools built to help make your screen more viewable. Whether you need to use high contrast mode to make text easier to read or an on-screen magnifier to increase the size of everything, your Chromebook comes equipped with it all.
Make Text Easier to Read With High Contrast Mode
High contrast mode lets you use your Chromebook with inverted colors, designed to make it easier to read text on your screen. When enabled, white becomes black, black becomes white, blue becomes orange, orange becomes blue, etc.

You can enable high contrast mode in the System Menu > Accessibility > High Contrast Mode, or by pressing Ctrl+Search+H on the keyboard, followed by "Continue."

Increase the Size of Everything With a Screen Magnifier
The screen magnifier for Chrome OS has two options to choose from: fullscreen or a docked magnifier. Fullscreen is a static magnification that increases the size of everything on the screen, while the docked version only magnifies the area around the mouse cursor. Either mode can magnify from 2X up to 20X. You can enable either option the System Menu > Accessibility.

Here's a look at the docked magnifier at 2X zoom:
Warning: 20X magnification is no joke. If you do select it by accident, you can decrease the magnifier with Ctrl+Alt+brightness down button (F6) or Ctrl+Alt+scroll down with two fingers on the touchpad.
Adjust Additional Display Settings
There are additional display options available in the Accessibility menu that allow you to adjust your screen resolution---to make everything on your screen appear larger and more comfortable to see---and adjust the harsh glow of blue light on your eyes at night with a few additional display device settings.
Head into the Accessibility settings by clicking into the System Menu > Accessibility > then the Settings Cog. From there, click on "Manage Accessibility Features."
Under the Display section, click on "Open display device settings."
Inside, you can set the display's resolution, orientation, or set up a night light---to remove blue light and make the screen easier on your eyes at night.
If the on-screen text is difficult to read or it strains your eyes, you can change the size and style of font in Chrome OS. Just head into the Accessibility settings and under the Display section, click on "Open appearance settings."
It redirects you to the Appearance section in the Settings app. At the bottom of the section, choose the font size, customize the font, or increase the page zoom to make everything easier to see.
Keyboard and Text Input
Keyboard and text input include sticky keys--- a feature that enables sequential keyboard shortcuts---an on-screen keyboard, and text dictation (speak-to-type). If you use your keyboard to navigate Chrome OS and browse the web, then you can make use of highlight features that show navigational focus on-screen.
Use Sequential Typing for Keyboard Shortcuts
The Sticky Keys feature is ideal for people who have trouble pressing more than one key at a time. It remembers each key you push, allowing you to take your finger off to press additional keys in a command. It frees up your fingers from having to press multiple keys all at the same time and instead take your time to push them in sequence with one finger. So, for example, if you want to take a screenshot, instead of pressing the Ctrl + []]] keys simultaneously, you can press them in tandem---first Ctrl, then []]].
When activated, a box appears in the upper left corner with the current 'stuck' key and a list of other keys available to press. Pressing the key a second time locks it, which lets you key in multiple commands without the need to press them again, indicated by an underline. Press the key a third time to cancel a stuck key.

Ditch the Physical Keyboard for an On-Screen Keyboard
When enabled, a keyboard icon appears next to the notification area and clock, click it to bring up the keyboard or click inside any text field to bring up the keyboard.

A few neat features that come along with the on-screen keyboard include handwritten text input, windowed mode---a feature that allows you to undock the keyboard from the bottom of the screen---and speak-to-text.
If you don't see these options, click the arrow icon on the left-hand side of the keyboard and they should appear in the bar next to it.
Dictate Your Thoughts Into Any Text Field With Speak-to-Text
If you don't want to enable the on-screen keyboard to use speak-to-text, your Chrome OS also has a standalone accessibility feature specifically for dictation. After you enable speak-to-text from the Accessibility section in the system tray, a microphone icon appears on the shelf, next to the clock.
Click the icon to turn on dictation and anything you say gets input into a text field.
Note: Anything you say while dictation is listening is sent to Google to work correctly. If you don't want Google having a record of everything you say, don't use dictation.
Highlight Objects When Using Keyboard Navigation
When you use a keyboard to navigate Chrome OS or to browse the internet, it can be challenging to see exactly where the focus lays, missing the small dotted line that surrounds each element. For that, enable "Highlight the object with keyboard focus when it changes" to display an orange perimeter around your intended focus. Now, any time you hit Tab to jump between links on-page, you don't need to scan the whole page to locate the focus.
Highlight the Text Cursor When Its Position Changes
This feature works similarly to the one above but instead of keyboard focus. It highlights the text caret---the blinking vertical line that appears when you click in a text box---when it appears or moves position. Anytime you click or start to type in a text field, a blue aura surrounds the caret.

Change Keyboard Device Settings
Under the Keyboard and Text Input section in Accessibility settings, there's a sub-menu that lets you change the behavior of pressing keys on the keyboard and functionality of the top-row keys.
Under Settings > Manage Accessibility Features, click on "Open keyboard device settings" to see a list of available features.
Here you can change the top row of keys into Windows-style "Function Keys" and enable whether you want keys to repeat if you continue to hold it down. You can also set the delay and repeat rate between the output of each character on screen.
Mouse and Touchpad

Mouse and touchpad accessibility focus on visibility of the cursor and how you interact with a mouse/touchpad. These features help you make the pointer easier to see, reduce the need to click your mouse physically, and highlight the cursor when it moves.
Reduce Physical Mouse Presses With Automatic Clicks
This feature eliminates the need actually to click the mouse/touchpad. Whenever you stop the cursor, a timer starts and will initiate the click for you if it remains unmoved. You can set the timer to different intervals that range from "Extremely Short (0.6s)" to "Very Long (4s)."
Easily Find Your Mouse Pointer With Increased Mouse Cursor Size
Chrome OS's default mouse cursor is by far one of the most challenging things to locate on-screen, even for someone with perfect 20/20 vision. Luckily, with this accessibility feature, you can change the size of the pointer up to an almost comical foam-finger size.

Highlight the Mouse Cursor When Its Position Changes
How many times have you frantically wiggled the mouse, squinting at the screen in a desperate attempt to find your cursor? We're all guilty of it, and with this feature, all you have to do is move the pointer, and a red circle surrounds it, which makes it way easier to spot on the screen.
Additional Mouse and Touchpad Device Settings
There are a few other mouse and touchpad settings you can access from a sub-menu that lets you customize them even further.
From Settings > Manage Accessibility Features and under the Mouse and Touchpad section, click "Open mouse and touchpad device settings" to open the settings.
Inside you can find swap mouse button, reverse scroll direction, change mouse speed, for the mouse. Then for the touchpad, you can change touchpad speed, enable tap-to-click or tap dragging---double-tap, then drag windows around---and scrolling orientation.
Audio
Chrome OS offers a couple of audio related accessibility features to round things out. You can enable mono mode to have all speakers play the same audio or have Chrome OS play a sound when it starts up.
Play the Same Audio Through All Speakers
A majority of devices use "Stereo" mode to play audio from your speakers/headphones with more than one channel (left and right). If you're hard of hearing in one ear or only listen to audio using one earbud/speaker, you can easily switch your Chromebook to "mono" mode, so the same audio comes out of all speakers.
Play a Sound When Chrome OS Starts Up
Just as the title suggests. When you start up Chrome OS, a sound plays to signal it's ready for you to sign in. You can only enable this feature through Settings > Accessibility > Manage Accessibility Features.
Chrome OS does a great job to include everyone, regardless of their ability to use a standard computer or not. With this comprehensive list of accessibility features, it's easy to add any number to your laptop that tailors it to your unique needs.