Quick Links
Microsoft removed Easy Transfer from Windows 10, but you can still move user profiles between PCs. Microsoft accounts are easy to transfer; you can move files manually. Transwiz (free) and PCmover (paid) also do a good job.
Easy Transfer Used To Make Things Easy

Microsoft introduced Windows Easy Transfer with Windows Vista and supported it in Windows 7, 8, and 8.1. It was a great free option to bring your settings and local user profiles from an old computer to a new computer. Starting with Windows 8, you could choose to sign in with a Microsoft account. Signing in with that same account on any device would transfer many of your settings.
When Microsoft released Windows 10, it did not bring forward Easy Transfer. Instead, Microsoft chose to partner with Laplink and for a short period offered free access to its PCmover software. Unfortunately, that free offer is no longer available. If you want to use PCmover, you'll need to spend at least $30 now.
What's the Best Way to Move a Windows User Profile?
We investigated several methods of manually moving Windows user profiles from one PC to another. But, in each case, we couldn't consistently move the profile without some further troubleshooting afterward. We can't recommend a process that requires so much manual fixing of file permissions and other complicated work.
That leaves you with a few reliable options to move your account: Convert your Local account to a Microsoft account, use free software like Transwiz, or purchase PCmover. Each has benefits and downsides.
- Converting your local Account to a Microsoft account is free and easy, and you won't need to download any outside software. But it won't move everything over. Files you have outside OneDrive, and settings for third-party apps like Photoshop won't make the move.
- TransWiz is free and simple software that will transfer a single profile account from one device to another. If you have quite a few profiles, you'll spend extra time exporting and importing since it doesn't handle multiple accounts well. Additionally, it can't transfer the account you're signed into, so you'll need at least two accounts on the source machine. You'll also need an external drive to move your data.
- PCmover is the more powerful option. It can move multiple profiles at once, and you can facilitate the transfer over your network, a USB transfer cable, or an external hard drive. Additionally, it can transfer files, settings, and even some programs. However, it is the most expensive option, starting at $30 and going up from there.
Option 1: Use a Microsoft Account and Transfer Files

If you're using Windows 8.1 or Windows 10, your Microsoft account user profile will automatically transfer with a sign-in. If you currently use a local account instead of a Microsoft account, you may want to consider converting it to a Microsoft account. Some features, like OneDrive and device encryption, won't work without it.
This won't bring everything over; you'll still need to manually transfer any important files and reinstall programs with an external hard drive. Think of this as a quick way to bring over Windows settings and get cloud sync going.
The conversion process is easy, especially if you already have a Microsoft account. If you don't, you'll need to make one. You'll need to start this process on the PC with the account you want to transfer.
Click on the Start button then the Settings gear. Then choose Accounts, followed by "Sign in with a Microsoft account" instead. Then follow the setup wizard.
Next, we'll manually move over data using Window 10's File History tool. After connecting a hard drive go to Settings > Update & Security > Backup. Select add a drive, then your external hard drive.

Windows will start making a backup automatically. By default, the backup includes the Desktop, Documents, Downloads, Music, Pictures, Videos folders. If you want additional folders, click on the "More options" text and choose the folders to add.
Take your external to your new machine and plug it in. Go back to Settings > Update & Security > Backup, and setup file history again using the external drive from before. Click more options, scroll to the bottom (past the list of folders) and click "restore files from a current backup."
Browse to your most recent backup, choose the folders you want to restore then click on the green button.

You will need to reinstall any programs to finish things up.
Option 2: Download TransWiz (Free)
Transwiz is an excellent option to consider if you need want to transfer one or two local accounts, and don't want to convert to a Microsoft account. You'll still need to manually move some things over, just like the Microsoft account conversion process, however. You'll also need an external hard drive.
First, download and install Transwiz on both the old and new machine. The program is free.
On the old machine, if you only have one profile, create a new one with admin rights. Then switch to it. If you have more than one profile, make sure at least two have admin rights and change to whichever profile you aren't currently transferring. Transwiz can't transfer a profile if you're currently signed into it.
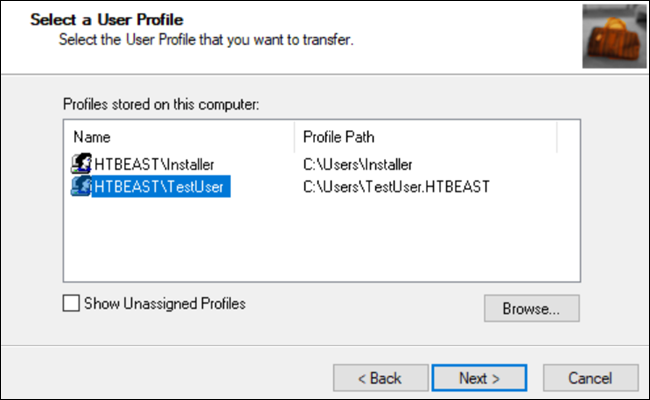
Start Transwiz and select "I want to transfer data to another computer" and click Next. Then choose the profile you want to switch and click Next.
Choose your external drive as the location to save; click next. Then enter a password if you want one. If you don't, leave both fields blank and click OK.
Transwiz will create a zip file on your external drive. Take it to your new machine, open Transwiz there, and choose the restore data option. Point it to the zip file on the drive (no need to unzip it yourself), and Transwiz will do the rest. A machine restart is required to finish adding the profile.
Transwiz brings over user profiles, but not any data. If you want your files and folders, use the file history process described above. You'll need to reinstall programs, too.
Option 3: Buy PCmover ($30)
The previous two options will work for moving profile data, but it's up to you to transfer files, folders, and reinstall programs. PCmover will not only migrate your user profile, but it will move files as well. More expensive options also transfer applications.
You'll need to download and pay for PCmover to get started. Several levels exist at different pricing, but if you want to move all users and applications the "Express" version for $30 will do the trick. Laplink offers ethernet and USB transfer cables you can purchase. The program will transfer data over your network, so the cables aren't required, but they can speed up the transfer process depending on the speed of your network. However, another benefit to this method if you can skip the external drive.
Once you've installed PCmover on each PC, open it and click through the Next buttons, providing the serial number when prompted. If you purchased a transfer cable, connect it to both PCs.

On each PC, choose the other PC to connect. If you have a transfer cable plugged in, you may see two entries for your devices, one for network connection and one for a cable connection. Select the cable connection for both. Then click "OK."

PCmover will try to guess the direction to move data. If it gets it wrong, you can click on the words "Switch transfer direction." Then on the "new PC" (that is, the PC you're moving data to) click "Analyze PC."

Depending on the amount of data to look through, you may need to wait awhile while the program scans your PC. Eventually, you'll see an amount of data to be transferred. If you'd like more granular control, click "View details."

From here, you can drill down into different categories and uncheck anything you don't want to transfer. Once you have everything to your liking, click "Start Transfer."
In our case, it took about five minutes to transfer 20 gigs of data over a USB 3 transfer cable. If you have more to move, or you are using a network connection (or both), it may take longer. When PCmover finishes, it will prompt to restart your computer. Once you the reboot completes, you're done.
It's a shame Microsoft removed EasyTransfer in Windows 10, but with Microsoft accounts and cloud options like OneDrive and Dropbox or large external drives, it is less necessary than it used to be. Transwiz can still do a decent job if you're looking for a free solution. And, while Laplink's PCmover does have a cost associated to it, the program works very well and is extremely easy to use.
If you need to move everything in your PC, you should take a closer look at PCmover.