There's no need to navigate your media center like it's the 20th century anymore. The future is now and you can zip through your media and control XBMC with the touchscreen of your iOS device.
Today we're taking a look at how you can ditch the ol' pushbutton remote and start browsing and interacting with your media via your iPhone or iPod Touch. You'll find no shortage of remotes for their big brother the iPad, but we're focusing on the small members of the family because of their traditional remote size.
What You'll Need

It's a safe bet you already have everything you need for this guide. Just to play it safe however, you'll need:
- An iOS device such as the iPhone or iPod Touch.
- A media center running XBMC (it can be the original Xbox or a newer computer-based HTPC with XBMC on it).
- A copy of XBMC Remote by Collect3 installed on your iOS device.
A Note on our selection: For our guide we're using XBMC Remote by Collect3. It's not free but it's quite reasonably priced at $2.99. All of the free iOS remotes we tested were too flaky or too light on features. Many of the most expensive remotes in the $4.99 and up category didn't offer twice the number of useful features as Collect3's modestly priced app. That said, the following setup instructions will help you setup any XBMC remote you decide to go with if XBMC by Collect3 doesn't fit your needs.
Configuring XBMC to Accept External Input

Nearly every remote for XBMC relies on the web server built into XBMC to function. In order to use XBMC Remote we'll need to turn it on.
In this tutorial we'll be using the Confluence skin, the default for XBMC 9.04 onward, to keep the visual elements clear and easy to understand. The steps should be the same regardless of the skin. Navigate to System --> Network --> Services and then check "Allow control of XBMC via HTTP" and "Allow programs on other systems to control XBMC".

From that same interface you can set the port number, a username, and a password. Since we're just using it within our home network we left it at 8080 and made the login and password xbmc/xbmc.
Next, return to the main menu in XBMC and navigate to the Info menu. Check the summary page to see the IP address of your XBMC. If you haven't assigned a static IP to your XBMC via your router, now would be an ideal time to do so. If you leave the IP dynamic you'll have to check it and update the remote every time you want to use it.
Once you've updated the settings in XBMC and noted the IP address it's time to configure the remote.
Configuring the XBMC Remote
Configuring XBMC Remote is a breeze. Fire it up on your iOS device and click Settings. It will prompt you to do so the first time you run it and it discovers you have no XBMC units set up. At this point it will attempt to automatically find XBMC units on your network. We're going to assume it fails for you (as it did for us) and skip right to entering the information manually. Click on Manually add a host and dismiss the error message if you get it again.

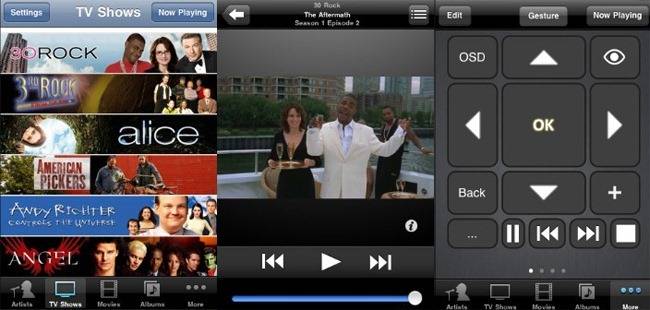
Click Done and then on the main settings screen click the new entry for XBMC. All the media available to the XBMC including music, movies, television shows, podcasts, photos, and more, should all be visible to the remote. Since we predominately use our media center for TV shows we're going to hop right in and take a peek to make sure everything is OK.

All our shows are neatly organized by season with episode summaries and a quick check in on the world of 30 Rock shows that Tracy Jordan is still, well, Tracy Jordan.
If you haven't watched the demo video at the top of this section now is the time to do so. XBMC Remote offers so much more than simple remote navigation of your media sources. With XBMC Remote you can use your phone as a keyboard, use the interface as a remote touch screen to control your media center as if you were using a mouse, use the onscreen remote, search for artists and media, and more.
One of the handiest (but easiest to over look) features in XBMC is one-click access to items normally buried in sub-menus. If you want to toggle the subtitles on, change the resolution, zoom in or out, or a dozen other obscure but useful tricks, all you have to do is click the Action button while watching your media and click the appropriate button for the task. No more digging around in the sub-menus of XBMC and interrupting your viewing in the process.
Have a favorite remote or other XBMC-related tip to share? Let's hear about it in the comments.