Quick Links
A sharp photo is one where the subject is in focus with clear lines, crisp details, and no (unintended) blurring. It’s generally a sign of a high-quality, technically excellent image. Here’s how to make sure you always take sharp photos.
I’ve explained in detail before what makes a photo sharp, but now we’re going to look at the practical side of things. To recap, sharpness is a combination of:
- An in-focus subject
- A static camera
- The properties of the lens you’re using

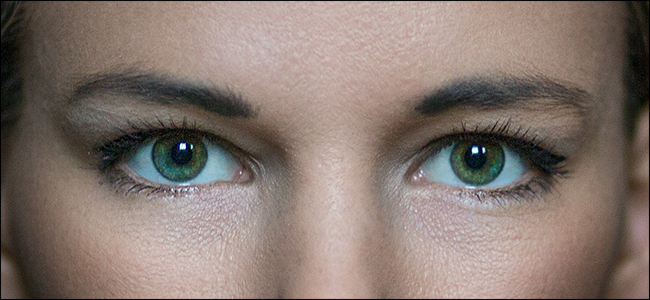
The photo above is an example of a sharp photo I took. Notice how you can see every one of Kat’s eyelashes. Now, let’s look at it in the real world.
Understand Your Gear
One of the major factors affecting sharpness is the properties of the lenses you’re using. One of the reasons professional lenses cost so much more (and are so heavy) is that they’re designed to be as sharp as possible---and that takes a lot of work. If you’re trying to take a super-sharp shot with an old, cheap lens, you’re going to struggle; the lens isn’t capable of resolving the details clearly.
Similarly, your camera has a limit on how much it can resolve. If the details you’re trying to capture are projected smaller than the pixels on the sensor, then they won’t show. Here’s another portrait with a close up on the model’s eyes.

Notice that her eyelashes aren’t as defined as they are with Kat’s above? That’s because I was standing further back so my Canon 5DIII could not resolve any greater details. With a higher resolution sensor, I could—at least theoretically—have captured them.
While your gear won’t normally stop you from taking great shots, it’s important to understand that it will affect the maximum possible sharpness you can achieve.
Pick the Right Aperture
The gear you’re using isn’t always in your control. Almost nobody can afford all the top end lenses and, even if you can, they’re a nightmare to lug around. This means that taking sharp photos is often about getting the most out of what you have.
The depth of field is one area that will make or break your images. If you use a wide aperture, your depth of field will be shallow, and parts of your image will be blurry. This is fine if you’re shooting a portrait and want the background out of focus, but if you don’t, then you’ve messed up. Here’s a shot of mine where the depth of field is too shallow.

While the man’s hands are in focus, his face and eyes aren’t. If I’d used a narrower aperture, I could have had both in focus and a great photo. Instead, I have an example of me not following my own advice.
In landscape shots where you want absolutely everything in focus, you will need to use an even narrower aperture.

In the photo above I used f/16, but because I was focusing on Hedda in the foreground with a 40mm lens, the background is not perfectly sharp. While it doesn’t particularly matter for this image (which is more about the model), if this were a pure landscape shot I’d have problems.
One complication is that your lenses are rarely consistently sharp at all apertures. Instead, they tend to be sharpest at about two-stops narrower than the widest aperture. This is normally between f/5.6 and f/11, depending on your lens. Once you get much narrower than f/16, whatever sharpness you gain by using a narrower aperture is often lost by the lens performing poorly. One solution to this problem is focus stacking which I covered in detail here.
For more on selecting the right aperture, check out my article on what aperture you should use in different circumstances.
Nail Your Focus
Even if you’re using the right aperture, if you miss focus, you’re still going to have a photo that isn’t sharp. The photo of the old fisherman above would probably be usable if I’d focused on his eyes instead of his hands. It’s the combination of missed focus and a too-shallow depth of field that makes it unworkable. This wider version I shot a few seconds before (that I’m not as keen on for other reasons) is much sharper.

The reality is that it’s impossible for an out-of-focus shot to be sharp. No amount of digital sharpening in post-production will fix things. Trust me; I’ve tried. This means you need to get it right in camera, on location.
Again, we’ve got full guides to help you nail focus, so check out:
- How to Take Photos That Are Always in Focus for general tips on getting the focus right every time, and,
- How to Focus With Wide Aperture Lenses for specific tips on working with wider apertures and shallower depths of field.
Keep Your Camera Static
Missing the focus is not the only potential source of blur; if your camera moves while you take the image and your shutter speed isn’t fast enough, you’ll get camera shake.
The reciprocal rule is a general guideline as to what the slowest shutter speed you can use is. It states that the minimum handheld shutter speed is the reciprocal of the focal length of the lens. So, if you’re using a 70mm lens (and remember to account for crop factor) then the slowest shutter speed you should try, and use is 1/70th of a second. For a 50mm lens, it’s 1/50th of a second. And so on.
In the image below, you can see a range of different shutter speeds with a 40mm lens.

Although the reciprocal rule is a good guideline, there are ways to use slower shutter speeds: the two main ones are using optical image stabilization or mounting your camera to a tripod.
If your photos aren’t sharp because your shutter speed is too low, either increase it or use something to keep your camera still.
Clean Your Lens
Dirty lenses take dirty pictures so keep your greasy paws off the glass and clean your lenses with a microfiber lens cloth every time you shoot. It’s simple to buff out a few smudges on the front element of your lens, and it will do wonders for your images. Cleaning up dust spots in post is not a lot of fun.
Reliably taking sharp shots means you can stop focusing on the technical aspects of photography and start exploring the creative aspects. It’s an important step on the road to being a better photographer.