Quick Links
It's easy enough to superimpose a logo onto something in Photoshop. But what if your base photo isn't head-on, so a square logo (or any other image) will look skewed? Here's how to get your top image aligned with the correct perspective.
Using The Transform Tool For Perfect Matches
Let's use a gadget screen image as a base: a common need for marketers (or web writers like me). Our source image here is a Nintendo Switch with a regular 16:9 screen, but we need to put on a screenshot of something else---let's say an image from Zelda instead of Mario. Here are the pictures I'll be using, so you can grab them and practice on your own:
Highlight the screenshot image in the Layers tool, then activate the Transformation tool with the Ctrl+T shortcut on Windows or Command+T on macOS.
If you've used Photoshop for any amount of time, you're probably comfortable with the Free Transform tool already: you should know how to move the image around, shrink or expand it, or rotate it. But you can also skew it considerably, enough to let you alter it to alter the perspective and match it to the image below. This is a pretty straightforward example: we're going to match this rectangular screenshot of Zelda to the rectangular screen on the Switch, a simple corner-to-corner move.
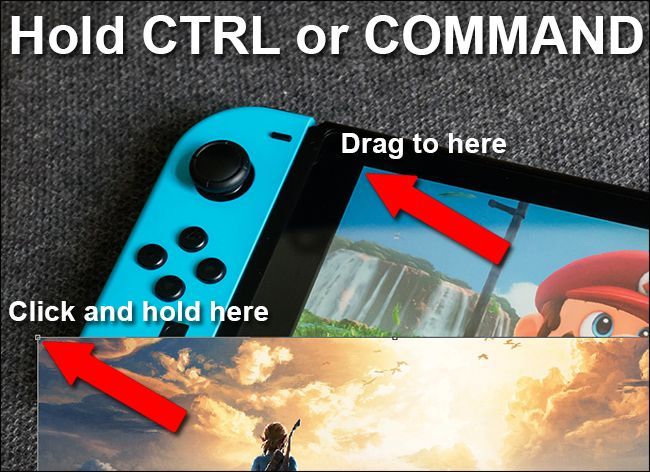
Hold down the Ctrl button on Windows or the Command button on Mac, then click one of the white squares at the corner of the screenshot that are part of the Transform tool. Holding down Ctrl and the left mouse button, drag one of the corners of the top screenshot image to the matching corner on the Switch's screen on the image beneath. Zoom into the pixel view if you need to match it perfectly.
You'll notice that instead of the normal resize action, the Ctrl or Command modifier lets you grab one corner of the image and move it while the other four corners remain in place.
Repeat this step for the next four corners, moving the screenshot image over the screen of the Switch beneath. Don't apply the transformation until you're finished, or you won't be able to grab all four corners again---they'll be filled in with transparency. You can make the top layer extend past the bottom one by a pixel or two just to make sure that it completely covers the screen beneath. Press Enter to close the Transform tool.
Because both the phone's screen and the screenshot image have the same aspect ratio, this little cover-up fits perfectly and needs no further editing. Let's move on to something a little trickier.
Using The Transform Tool On Oddly-Sized Images
Say you've got this image of a Mac laptop and you don't want to use an Apple logo in an advertisement. You'd rather show off your company logo. I'll use a circular Review Geek logo as an example---both source images are below.
So you want to cover up the Apple logo just like the phone screen before, but now the plane of the source image (the laptop lid) doesn't match the layer you want to add (the circular logo), and you still need to keep the perspective right. In this case, we're going to use something else in the photo as a guide: the roughly rectangular lid of the laptop. We'll match the logo's perspective to the laptop lid, then scale it down to the size we need while keeping the perspective locked.
To begin, press Ctrl+T or Command+T with the top layer selected to open the transformation tool again. Now press Ctrl+Click or Command+Click, select the guide squares at the corners of the logo layer, and match them up with the corners of the laptop lid. The corners are rounded, but you can use the edges of the lid and the transform guide to line up.
Because the lid of the laptop isn't square, your circle is a little too wide. You can adjust it back down to a square-sized transformation. You can eyeball this if it doesn't need to be perfect, or rotate the layer beneath and use Photoshop's Ruler guides if you need more precision. Press Enter to apply the transformation when you're ready.
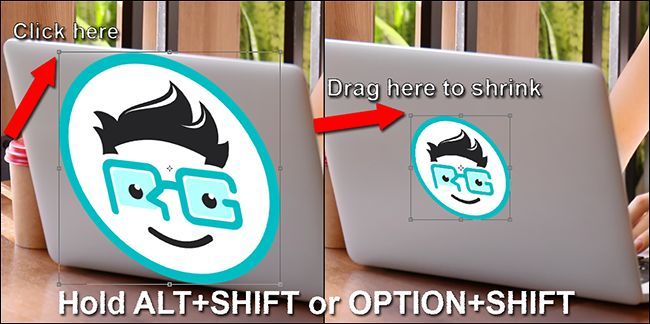
Now you have a square image over the laptop screen, and it's in the right perspective to match the Apple logo beneath. You need to size it down, so it doesn't look out of place. With the Transform tool active, hold Alt+Shift on Windows or Option+Shift on a Mac, then click one of the corners and drag it inwards to scale the logo image down, so it's not much bigger than the Apple logo.
Here's the final result:
If your bottom image is fairly regular, with a perspective skew that's predictable on one side, you can hold Ctrl+Alt+Shift on Windows or Command+Option+Shift on Mac to use the Transform tool in Skew mode. It's pretty rare that your image will line up perfectly for this, though.
Using Free Transform On Irregular Surfaces
Okay, so now you can match a perspective and resize as needed. But what if you're trying to get something on a surface that isn't flat? Let's try one more example: putting the Review Geek logo on a ball. Once again, use the images below in your copy of Photoshop for practice.
Using the tools you learned in the previous sections, it's easy to get the logo image onto the top of the ball and even adjust its perspective to match the orientation of the ball itself. But the logo file looks odd because it's flat and the surface of the ball is not.
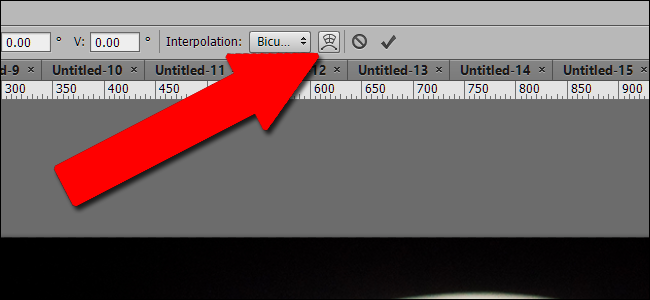
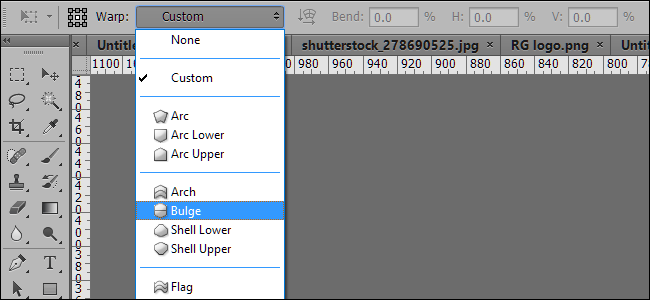
To fix this, press Ctrl+T or Command+T to activate the Transform tool and look at the top of the Photoshop window. You're looking for the curved rectangular button that activates Warp Mode. Click it.
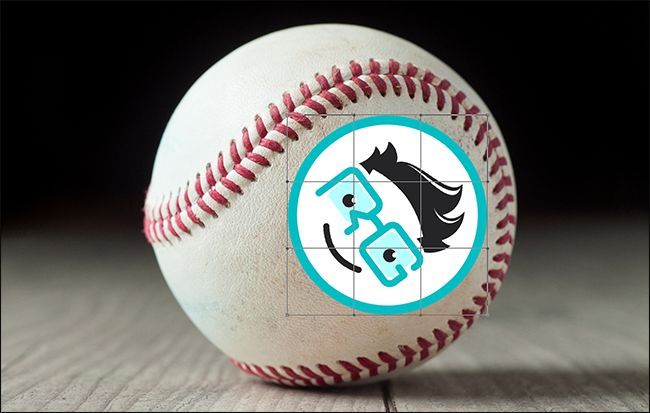
With the Transform Tool in Warp Mode, you can move the image around at any point on the inside or outside, not just the corners. This lets you click and drag different parts of the image into irregular positions. You'll see the nine guidelines move along with the image, helping you to see how you've changed things.
The Warp Tool takes some practice to use effectively. You might need to undo and redo your work several times. But within a few minutes, you should be able to match the curve of the ball pretty well. Press Enter to apply the transformation.
For surfaces that are a little more predictable, but still too irregular for the regular Transform tool, you can use the pre-set Warp tools on the right side of the upper menu.
You can combine the techniques above with any other tools in Photoshop, like color corrections, curves, filters, blurs, et cetera, to get your top layer to match your bottom layer. Play around with these tools, and you'll soon be matching up logos and screenshots with ease.
Image credit: Shutterstock/Wachiwit, Shutterstock/Africa Studio, Shutterstock/Ygor, Yiorgos GR/Shutterstock.com, Nintendo

