If you're running Linux, then it's likely that you've needed to change some options for your file systems. Getting acquainted with fstab can make the whole process a lot easier, and it's much easier than you think.
What Is Fstab?
Fstab is your operating system's file system table. If you want a review of file systems, be sure to check out our other article, HTG Explains: Which Linux File System Should You Choose? In the old days, it was the primary way that the system mounted files automatically. Nowadays, you can plug in a USB drive of any kind and it'll just pop up in Nautilus like it does in Windows and Mac OS, but once upon a time, you had to manually mount those disks to a specific folder using the "mount" command. This held true for DVDs, CDs, and even floppies (remember those?).
Back then, your only alternative was the tell the computer that anytime a specific device was plugged in, it should be automatically mounted in a specific place. This is where fstab came in, and it was awesome. Suppose you swapped hard disks on your IDE or SCSI controller. The computer could load the file systems in a different order, potentially messing things up. Fstab is configured to look for specific file systems and mount them automatically in a desired way each and every time, preventing a myriad of disasters from occurring.
Your Fstab File
The fstab file is located at:
/etc/fstab
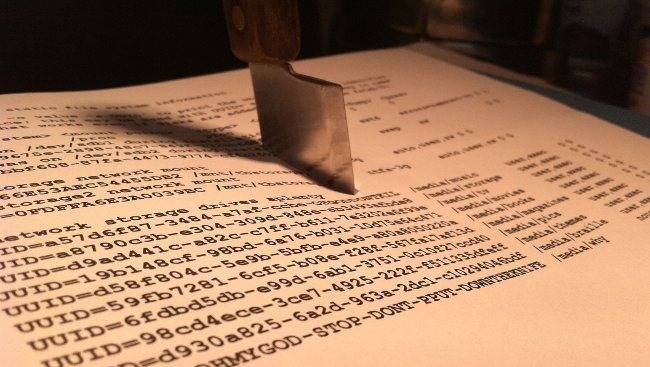
Let's take a look at my fstab file, shall we?

You'll definitely see differences, but if you want to follow along with your own fstab just pop this command into a terminal:

You can also use gedit if you're not comfortable with nano.
The Obvious Options

You'll notice all of the entries begin with UUIDs. You may remember seeing this in one of our previous articles, How to Choose a Partition Scheme for Your Linux PC, but we'll explain it again anyway. Each file system, during formatting, gets assigned a Universally Unique Identifier, which it takes to the grave. Since it cannot be changed, this is the ideal way to select file systems for mounting, especially for important ones. Let's say your /home partition is on a second hard drive and you end up moving it to an external hard drive; fstab will still find that partition and mount it correctly, avoiding a failed boot. If you switch to (or are stuck using) the old method of using device identifiers to select partitions (i.e. /dev/sda1), this advantage disappears because hard drives and partitions are counted by their controllers, and can thus change.
Edit: Using UUIDs in your fstab file, while convenient for most home users, does have a few big caveats. This doesn't work when using things like "assembled" or "network-based" devices. If you're more of an advanced user, or plan on using things like software RAID in the future, you're better off not using UUIDs.

The next section of fstab, like all subsequent ones, is separated by either a space or a tab, or a combination of them. Here, you'll find the mount point. As you can see, I have a root (/) mount point, a swap, and two that I manually added in for my shared network storage drives. If you're adding an entry to fstab, then you'll have to manually create the mount point before you restart your computer (and the changes take effect).

Next is the section which identifies the type of file system on the partition. Many, such as ext2/3/4, ReiserFS, jFS, etc. are natively read by Linux. Your particular system may still need to have particular packages installed to be able to read and write to them. The perfect examples are my NTFS partitions; you can see that I'm using the ntfs-3g driver to access them.
The Scarier Stuff
The next few sections are what usually scare away newcomers, but they're really not so complicated. There's a large set of options available, but there's a handful or so of very common ones. Let's take a look at them. (The default option is first, followed by alternatives, but as Linux distros can be very different, your mileage may vary.)
- auto/noauto: Specify whether the partition should be automatically mounted on boot. You can block specific partitions from mounting at boot-up by using "noauto".
- exec/noexec: Specifies whether the partition can execute binaries. If you have a scratch partition that you compile on, then this would be useful, or maybe if you have /home on a separate file system. If you're concerned about security, change this to "noexec".
- ro/rw: "ro" is read-only, and "rw" is read-write. If you want to be able to write to a file-system as the user and not as root, you'll need to have "rw" specified.
- sync/async: This one is interesting. "sync" forces writing to occur immediately on execution of the command, which is ideal for floppies (how much of a geek are you?) and USB drives, but isn't entirely necessary for internal hard disks. What "async" does is allow the command to execute over an elapsed time period, perhaps when user activity dies down and the like. Ever get a message asking to your "wait while changes are being written to the drive?" This is usually why.
- nouser/user: This allows the user to have mounting and unmounting privileges. An important note is that "user" automatically implies "noexec" so if you need to execute binaries and still mount as a user, be sure to explicitly use "exec" as an option.
These options are separated by a comma and no spaces, and can be put in any order. If you're not sure about the defaults, it's okay to explicitly state your options. Things that are mounted from temporary places (like USB) won't follow this basic pattern unless you created entries for them (by UUID) in fstab. It's convenient when you want an external hard drive to always mount in a particular way, because normal thumb-drives and the like won't be affected.

You can see that my two storage drives have user mounting privileges enabled, read-write access enabled, and auto-mounting is turned on. I don't compile much software, but when I do, I add the "exec" option at the end of the list.
Dumping and Fscking

The next option is a binary value ("0" for false and "1" for true) for "dumping." This is a pretty much out-dated method of backup for cases when the system went down. You should leave this as "0".

The last option is a numeric value for "passing." This tells the system the order in which to fsck (pronounce that however you like), or perform a file system check. If a disk has an option of "0" it will be skipped, like my NTFS-formatted storage drives. The root file system should always be "1" and other file systems can go afterward. This works best for journaling file systems like ext3/4 and ReiserFS. Older file systems like FAT16/32 and ext2 can take a while, so it's better to turn their fscking off and do it periodically yourself.
Now that you know what you're doing, you can go crazy with automatic mounting and the like. It's very convenient when you've got a ton of partitions that need to be managed. Always remember to make a backup in case something goes wrong, but have fun, and be sure to leave your experiences in the comments!