Creating greeting cards can be a lot of DIY fun around the holidays, but printing them can often be a nightmare. This simple How-To will show you how to figure out how to perfectly print your half fold card.
Last week we showed you how to create a simple, attractive greeting card in Microsoft Word using Creative Commons images and basic fonts. If you missed out, it is still available, and the Word template used here can still be downloaded. If you have already made your Christmas card and are struggling to get it printed right, then this simple How-To is for you.
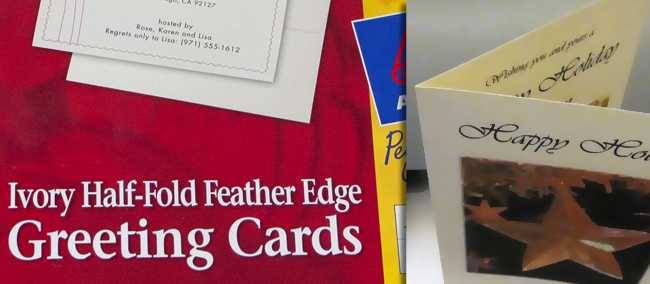
Using Avery Pre-Made Cards

While there is no need to buy card kits, Avery makes blank half-fold cards for this specific purpose. This one in particular (note the product number 3251 in the corner) is an excellent choice because the paper is textured, complete with a handsome deckled edge that will give your cards a handmade feel.

On a side note, Avery offers templates for these products on their website for free download. These are poor, difficult templates to use. If you have not made your card yet, download the How-To Geek Greeting Card Template rather than using the Avery half-fold templates.
Printing Cards in an Inkjet

The problem with printing anything two sided is ensuring that your front and back are aligned properly or that your front and back are printed on the same side.
You'll want to grab a blank piece of standard printer paper and draw an "A" on one of the sides, with a simulated space for the front.

Open your finished card and press


to print your first page.

You'll want to select "Current Page" or manually input "1" under the radial selection "Pages." This will ensure that you print only the front of your card. Click "OK."

You may get this dialog box when you print. Hit "Yes" and ignore it to print anyway.

In order to test how your printer picks up the paper to print, insert the drawn on page into the printer in any way you choose. Illustrated here, the "A" side is inserted into the machine, with the intended "Front" side sticking out, facing upwards.

Failure! The "A" side is facing downward, and the printer has created the Front image on the back of our intended front.

We see here that the front image is clearly on the opposite side of our intended front. From this, we can learn that this particular printer flips the page to print. Your printer may operate differently, so do this test and draw your own conclusions.

Create another page, this time with a simulated inside opposite the "A" side, and a "B" side opposite the Front. For this particular printer, I insert the "A" side into the printer, with the "A" facing down, as the printer flips the page.

Success! The front image prints on the intended front.

From this lesson, I know that in order to print my inside, I have to run the "B" side (in reverse on the right of the printed front) upside down and with it facing into the printer.

Pop back into word and navigate to the inside of your card again.

With the second page selected, select the "Current Page" radial, or simply the "Pages" and input 2 to print the second page.

With side B going into the printer face down, we are ready to run our print. Remember, your printer may handle pages differently---simply use this method to figure out how it handles pages.

Success again! The inside prints on the intended inside. With this particular printer, we learn that to print our inside, we have to insert our card front into the paper tray, with the unprinted side facing down.

You can see the front and back through the thin printer paper, illustrating how you want your final image to look. Note the "B" side on the back of the card front, and the reversed "A" on the back of the card inside.

If your card or paper has a pre-scored fold, you'll want to make sure it is inserted so that your card folds correctly. Armed with this understanding of your printer, this should not be difficult.

The pre-made card is inserted into the printer, with the front facing downwards and out of the paper tray.

The final result? A Christmas card you can send to anyone, made with simple MS Word, and printable on practically any desktop printer. Happy Holidays, and good luck printing!
Image Credits: Christmas Star by brockvicky, released under Creative Commons. Christmas Time by *L*u*z*A*, released under Creative Commons.